Table of Contents
Advertisement
Quick Links
Advertisement
Table of Contents

Related Manuals for Lumberjack SCMS305DB


Summary of Contents for Lumberjack SCMS305DB
- Page 1 305mm Sliding Compound Mitre SAW SCMS305DB ORIGINAL INSTRUCTIONS SCMS305DB...
-
Page 2: Table Of Contents
TABLE OF CONTENTS Welcome to Lumberjack! Dear customer, Congratulations on your purchase. Before using the Product for the first time please be sure to read these instructions for use. They provide you with all information necessary for using the product safely and to ensure its long service life. -
Page 3: General Power Tool Safety Warnings
A wrench or a key left c) Do not expose power tools to rain or wet attached to a rotating part of the power tool may conditions. Water entering a power tool will result in personal injury. increase the risk of electric shock. SCMS305DB... - Page 4 Use power tools only with specifically operate the power tool. Power tools are designated battery packs. Use of any other dangerous in the hands of untrained users. battery packs may create a risk of injury or fire. SCMS305DB...
- Page 5 Unsharpened or improperly set saw blades b) Make sure that the guard operates properly produce narrow kerf causing excessive friction, and that it can move freely. Never lock the blade binding and kickback. guard in place when opened. SCMS305DB...
- Page 6 Never use the machine with a damaged cable. Do not touch the damaged cable and pull the mains plug when the cable is damaged while working. Damaged cables increase the risk of an electric shock. SCMS305DB...
-
Page 7: Symbols & Cable Rating Chart
Caution! Risk of Injury! Do Caution! Wear ear defenders. The not reach into the running impact of noise can cause damage saw blade to hearing. Caution: Laser radiation. Do Caution! Wear a dust mask. not look into the beam! Laser class II product! SCMS305DB... -
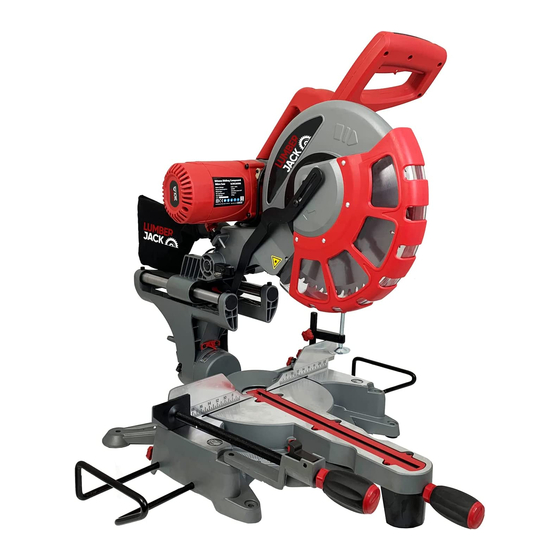
Page 8: Machine Details And Product Features
Dust bag 12. Locking Clamp 13. Saw table 14. Mounting holes 15. Extension bars 16. Bevel gauge 17. Dual Laser guide 18. Locking knob for Bevel Angle 19. Trenching facility 20. Sliding carriage 21. Dust bag SCMS305DB AIR6V AIR6V AIR6V AIR6V... - Page 9 27. Blade bolt 37. Retaining spring 28. Outer clamping flange 38. Carbon brush 39. Terminal 29. Extension bar lock 30. Fence extension cap screw 40. Positive stop knob 31. Fence extension lock 41. Blade wrench SCMS305DB AIR6V AIR6V AIR6V AIR6V...
-
Page 10: Assembly
Touching or To ensure safe handling, the machine must be breathing-in the dusts can cause allergic reactions mounted on a level and stable surface (e. g., and/or lead to respiratory infections of the user or workbench) prior to using. bystanders. SCMS305DB... - Page 11 – Push swing back the retracting blade guard (5) Always empty the dust bag in good time. to the stop. Hold the retracting blade guard in this position. – Loosen both screws (26). This then releases blade guard (5). SCMS305DB...
- Page 12 15–23 Nm turning in anticlockwise direction. – Reposition the blade guard (5) and secure this with the two screws (26). – Guide the retracting blade guard downward into its original position. SCMS305DB...
-
Page 13: Operation
(1) toward the saw table (13)until it reaches the saw table. Pull out transport safety lock (24) and turn 90° and push in to secure. The tool arm is now securely locked for transport. SCMS305DB... - Page 14 Use mitre gauge (11) to achieve desired angle. While clamping the workpiece, do not reach under the clamping lever of either of the clamps with your fingers. – Press the workpiece firmly against the fence (8). SCMS305DB...
- Page 15 – Press the laser on/off switch (2) and align the work piece cut line with either laser beam. The beams describe where the edges of the blade (6) will cut. – Clamp the piece in place then cut as normal. SCMS305DB...
-
Page 16: Starting Operation
Pull down on handle (1) and push the blade down through the workpiece then away from your body. – Once the cut is complete raise the head and release the on/off switch (3) and lever (4). – Wait until the blade has stopped spinning before removing the workpiece. SCMS305DB... -
Page 17: Working Advice
Do not cross your arms when operating the – tool arm. Transport Before transporting the power tool, the following steps must be carried out: – Bring the machine into the transport position. – Remove all accessories that cannot be mounted firmly to the power tool. SCMS305DB... -
Page 18: Maintenance And Service
The retracting blade guard must always be able to move freely and retract automatically. Therefore, always keep the area around the retracting blade guard clean. Remove dust and chips after each working procedure by blowing out withcompressed air or with a brush SCMS305DB... -
Page 19: Lumberjack Guarantee
If a return is requested by the Authorised Dealer or 1.2.3 If asked to do so by Lumberjack or its Lumberjack, you will be provided with a Returns Authorised dealer, you return the product at Material Authorisation number which must be your own cost to Lumberjack’s or supplying... - Page 20 Lumberjack. If you include a contact number with this it will speed your claim 2.4 Please note that it is essential that the letter of claim reaches Lumberjack on the last day of this Guarantee at the latest. Late claims will not be considered.
-
Page 21: Declaration Of Conformity
Old Heath Road, Wolverhampton, WV1 2RP. Tel: 01902 450 470 Declares that the MITRE SAW(SCMS305DB) Is in compliance with the regulations included in the Directives:2006/42/EC EC DECLARATION OF CONFORMITY Certificate for EC-type examination delivered by TÜV Rheinland LGA Products GmbH – Tillystraße 2 –... -
Page 22: Parts List
Laser switch cap Brush hold Cable plug Brush spring Cord protector Brush Cold clamp Screw Screw Motor cover Cold clamp Screw Screw Blade bolt Transformer Blade flange outer Trigger Blade Screw Blade flange inner Carry handle Screw SCMS305DB AIR6V AIR6V AIR6V... - Page 23 Cast centre Bearing cover Screw Laser fixed plate Rivet Screw Screw Dual laser carrier Moving guard Screw Moving guard cover Laser Shoulder screw Screw Linkage(A) Laser case Rivet Laser window Socket head screw Hex grub screw SCMS305DB AIR6V AIR6V AIR6V...
- Page 24 Knob(short) Turntable Workpiece knob Miter pointer Support pole Screw Socket head screw Turntable bolt Knob(short) Turntable bolt cover Knob(long) Screw Right attach fence Knob(long) Socket head screw Safety foot Silde stopper Lock boot Lock handle cap SCMS305DB AIR6V AIR6V AIR6V...
- Page 25 Lock handle Spring washer Fixture Socket head screw Locked nut Spring Capacitor Roled pin Spring washer Lock bolt Wave washer Pressure plate Washer Dust bag Screw Cold clamp Lock washer Screw Head sunk screw Support bar SCMS305DB AIR6V AIR6V AIR6V...
-
Page 26: Parts Diagram
Parts Diagram SCMS305DB... - Page 27 Parts Diagram SCMS305DB...
- Page 28 Parts Diagram SCMS305DB...
Need help?
Do you have a question about the SCMS305DB and is the answer not in the manual?
Questions and answers