
Related Manuals for Jonix MATE


Summary of Contents for Jonix MATE
- Page 1 JONIX mate USE AND MAINTENANCE MANUAL AIR PURIFICATION DEVICE WITH ADVANCED COLD PLASMA TECHNOLOGY MADE IN ITALY...
- Page 2 These instructions are translated from Italian (the original language). JONIX S.p.A. reserves every right concerning this manual, including the right to make any necessary change or improvement to its products and to the manual at any time and without notice. It is forbidden to reproduce in full or in part...
-
Page 3: Table Of Contents
4.1 - COMPONENT DESCRIPTION JONIX mate 4.1.1 - Technical features JONIX mate 5 - TECHNICAL DATA JONIX duct 5.1 - JONIX duct IONISING MODULES MANUFACTURING CHARACTERISTICS 5.2 - COMPONENT DESCRIPTION JONIX duct 5.2.1 - Technical features JONIX duct 5.2.2 - Using the JONIX duct module 6 - RECEPTION, TRANSPORT AND STORAGE 6.1 - PACKAGING... - Page 4 This manual contains the information and all that is required for the transportation, installation, use and maintenance of the JONIX sanitation and filtering module. mate Improper installation of the device and/or failure to comply with the instructions in this manual, may invalidate the warranty that the Manufacturer issues for its products.
-
Page 5: General Information
In particular, if equipment maintenance is carried out in a way that is not in compliance with the instructions supplied, or in a way to jeopardise integrity or modify features, JONIX S.p.A. is relieved from any liability inherent to safety of persons and faulty operation of the equipments. -
Page 6: Symbols
JONIX for another copy or download the document S.p.A. from www.jonixair.com. Repairs and maintenance work must be carried out by JONIX authorised S.p.A. staff or by qualified staff according to the provisions set out by this manual. Do not alter or tamper with the device as it can lead to hazards and the manufacturer of the device shall not be liable for any damage caused. - Page 7 When installing, commissioning and operating this product, it is mandatory to observe the requirements and instructions specified in this manual. disclaims any liability for damage caused to people, animals or JONIX S.p.A. property due to installation, adjustment and maintenance errors or by improper use.
-
Page 8: The Operating System
The sanitising cabinet can be equipped with an air outlet to be installed in rooms with overpressure. Compact, portable and quiet, the JONIX module quickly mate and effectively meets the requirements of reducing bacterial and particulate load. -
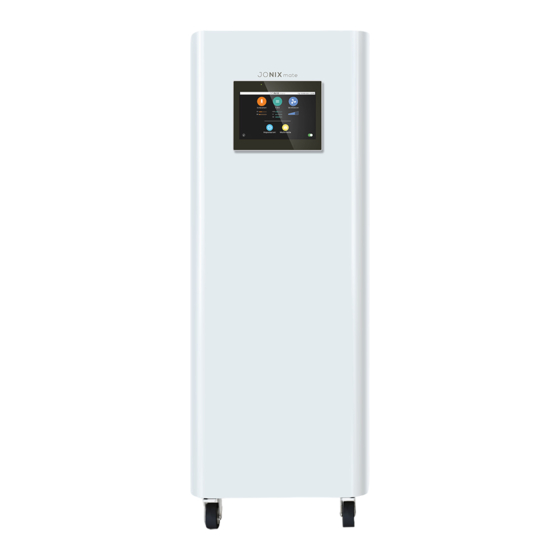
Page 9: Technical Data Jonix Mate
J O N I X m at e 4 - TECHNICAL DATA JONIX mate FRONT VIEW REAR VIEW 4.1 COMPONENT DESCRIPTION JONIX mate 01 Adjustable 2 way air outlet register 09 Rear panel closing JONIX 02 Ionising modules 10 Electrical panel duct 03 Display Touch screen (7"... -
Page 10: Technical Data Jonix Duct
The switch lights up, indicating that the device is on and a slight hissing sound indicates that the condensers have started running. The alarm connector (09) enables to check the module status (normal operation, maintenance required or failure) by the machine in which the JONIX module is inserted. duct... -
Page 11: Reception, Transport And Storage
JONIX mate intact until they are assembled. The materials that were not installed for technical requirements are supplied with suitable enclosure secured to the inside or outside of the device itself. The package... -
Page 12: Installation And Commissioning
J O N I X m at e 7 - INSTALLATION AND COMMISSIONING ATTENTION! Before carrying out any operation on the devices read ALL the instructions in this manual carefully. Definitions: USER: USER/OPERATOR: QUALIFIED STAFF: Person, organisation or Individual been Individuals who have completed a company who or which authorised by the user to... -
Page 13: Getting Started
- The device has been exposed to the elements. - A malfunction persists despite all the installation and/or maintenance procedures have been performed properly. IMPORTANT The installer and the user, when using the JONIX device, must mate take into account and solve all the other types of risk associated with the system. -
Page 14: Choosing The Installation Site
Using power supply that does not meet the requirements requested by the device could resolve in damaging the device or part of it. • The electrical mains of the JONIX device must be used for the device only, there must mate be no other devices powered by the same power line. -
Page 15: Electric Power Supply
7.6 USING THE DEVICE Fig. 01: Connect the device to the mains using the power cable provided. Fig. 02: Once connected to the mains supply, the JONIX module is ready mate to work. In order to turn on the device act on the red switch 0/I (present on the upper rear panel) turning it to I. -
Page 16: User Interface And Menu Navigation
7.8 USER INTERFACE AND MENU NAVIGATION is provided with a touch screen, allowing the user to control device status and to JONIX mate modify its operation as needed. 7.8.1 Main screen It allows to check quickly the device status and to modify its operation mode. - Page 17 Alarms notifications and alarms screen: When the Jonix will notice that the user intervention is needed, this alert state will be shown with the appearance of a notification on the icon of the device part that has caused the alarm.
-
Page 18: Ionisers Screen
J O N I X m at e 7.8.2 Ionisers screen It displays the detailed status of the modules and allows the management of each of them according to the user needs. a) On/Off button: it turns on/ off the corresponding module (LH - RH). -
Page 19: Fan Screen
J O N I X m at e 7.8.4 Fan screen Shows a more detailed fan status and allows the management of its operation status as needed. a) Air flow set point (m /h): through the buttons “-“ and “+” the flow rate can be set in a range between 500 and 3000 m /h with an increasing / decreasing step of 100 m... -
Page 20: Language
• Device On/Off. • Ionising modules On/Off. • Increase/decrease of the fan speed. The password of the device JONIX is: 100. It is possible to modify the mate password holding the button to the side of the currently set password. -
Page 21: Time Slots
The setting of the start time of the next slot (in the same day or in another) implies the end of the previous time slot. f) Machine status: enable / disable JONIX mate g) L Module: enable / disable the left ionising module. -
Page 22: Alarms History
J O N I X m at e 7.8.5.5 Alarms History Shows the list of all the alarm messages displayed from the device in the set time lapse. 7.8.5.6 Maintenance Maintenance screens of the ionising modules and of the filters are accesible from this screen. a) Access to the menu "Ionisers Maintenance". -
Page 23: Display
J O N I X m at e Filters Maintenance Maintenance operations on the corresponding filter can be recorded in the system from this menu. a) Filter H13. b) Filter F7. c) Filter G4. After pressing one of the buttons, a message of confirmation of the record by the system of the maintenance operation that was done will appear. -
Page 24: Configuration
J O N I X m at e 7.8.5.9 Configuration a) Advanced configuration: restricted menu technical support, accessible to the final user. 7.8.5.10 Multimedia screen Shows the links to all the multimedia content installed on the system. a) User manual: enables to display an extract of the user manual directly from the display. -
Page 25: Maintenance
The frequency of the operations to be performed to ensure proper maintenance of the device depends mainly on the quality of the treated air. JONIX mate Air can be especially harmful for condensers when it contains polluting or aggressive substances such as:... -
Page 26: Cleaning The Ionising Tubes
On/Off switch to O. Remove the plug connected to the mains. Fig. 04: Use a screwdriver to open the rear panel. Fig. 05: Switch the JONIX module duct off by turning the luminous On/Off switch to Disconnect the power supply plug and the other plugs from the JONIX module. - Page 27 J O N I X m at e Fig. 07: Gently unscrew the tubes, using the green plastic base. If you have trouble, first pull off the outer mesh. If the operation is difficult to perform, pull slightly the earthing spring so that it is not in contact with the surface of the tube.
- Page 28 Otherwise contact the manufacturer. Fig. 13: Reposition the JONIX duct module, inserting it horizontally into its box by using the handle and tighten the 4 fixing screws.
- Page 29 J O N I X m at e Fig. 14: Reinsert the power supply plug and all other plugs into the specific sockets of the JONIX module. duct Switch the module on by turning the On/Off switch to I. Fig. 15: Close the rear panel.
-
Page 30: External Cleaning Of The Equipment
J O N I X m at e Register the maintenance operation done using the display: Reset the alarm launched by the device in the alarm screen: Make sure the condensers work properly: you must be able to hear a slight hissing. Check that the device responds to commands. -
Page 31: Special Maintenance
The device will signal the need of replacement of the component after 14000 hours of operation. - filters: the components have the function of barrier, and they tend to saturate so that eventually they will obstruct the air flow. The detection devices internal to JONIX signal how mate necessary is an operation of replacement in order to maintain a smooth functioning of the device. - Page 32 J O N I X m at e Fig. 20: Unscrew the four screws of the box with which it is anchored to the cabinet and pull it out by the specific handle. Fig. 21: Gently unscrew the tubes, using the green plastic base.
- Page 33 J O N I X m at e Fig. 23: Reposition the JONIX duct module, inserting it horizontally into its box by using the handle and tighten the 4 fixing screws. Fig. 24: Reinsert the power supply plug and all other plugs into the specific sockets of the JONIX module.
- Page 34 J O N I X m at e Register the maintenance operation done using the display: Reset the alarm launched by the device in the alarm screen: Make sure the condensers work properly: you must be able to hear a slight hissing. Check that the device responds to commands.
-
Page 35: Replacing Filters
J O N I X m at e 8.3.2 Replacing the filters Replace the filters every time it is notified on the display. Fig. 27: Switch the device off by turning the luminous On/Off switch to O. Remove the plug connected to the mains. Fig. - Page 36 J O N I X m at e Fig. 30: Type of filters on the JONIX mate device: a) Absolute filter H13 b) Thin particulate filter F7 c) Prefilter particulate coarse G4 NOTE: periodically verify the status of the G4 filter ("c"),...
- Page 37 J O N I X m at e Fig. 32: Put the new / clean filters back in place. Push the filter locking tabs towards the device until they click. Fig. 33: Put the cover panel back in place. Screw the knobs back on. Fig.
- Page 38 J O N I X m at e Fig. 35: Reinsert the power supply plug. Switch the device on by turning the On/Off switch to I. Register the maintenance operation done using the display: Reset the alarm launched by the device in the alarm screen: Check correct operation of the device.
-
Page 39: Accessories
9 - ACCESSORIES 9.1 AIR OUTLET FOR OVERPRESSURE ROOMS The JONIX module is provided with an additional air outlet, which can be connected by a mate duct to an environment outside the room where the machine is installed. -
Page 40: Operational Check And Troubleshooting
J O N I X m at e 10 - OPERATIONAL CHECK AND TROUBLESHOOTING This section summarises the most common problems that may arise when using the unit. Before contacting customer services, carry out the checks listed below. PROBLEM POSSIBLE CAUSE SOLUTION The sensors associated to the Alarm for filter with... -
Page 41: Disposal
J O N I X m at e 11 - DISPOSAL When JONIX devices are no longer used they must be disposed of in compliance with mate the regulations in force in the country of installation. The unit consists of the following materials: •... -
Page 42: Attachments
J O N I X m at e ATTACHMENTS EXPLODED JONIX mate... -
Page 43: Overall Dimensions Jonix Mate
J O N I X m at e EXPLODED JONIX mate : ambient air. : ionised air flow. - Page 44 J O N I X m at e NOTES ............................................................................................................................................................................................................................................................................................................................................................................................
- Page 45 J O N I X m at e ............................................................................................................................................................................................................................................................................................................................................................................................
- Page 46 J O N I X m at e ............................................................................................................................................................................................................................................................................................................................................................................................
- Page 48 JONIX S.p.A. Società Benefit Operational Headquarters: Registered Office: Research and Development info@jonixair.com Headquarters: Viale Spagna 31/33 Via dell’Artigianato, 1 Certified mail: jonixsrl@legalmail.it 35020 Tribano (PD) - Italy 35020 San Pietro Viminario Via Tegulaia 10/b web: www.jonixair.com tel +39 049 9588511 (PD) –...
Need help?
Do you have a question about the MATE and is the answer not in the manual?
Questions and answers