
Related Manuals for BH FITNESS Tokyo H9181


Summary of Contents for BH FITNESS Tokyo H9181
- Page 1 H9181 UNIDAD ELECTRÓNICA ELECTRONIC MONITOR UNITÉ ÉLECTRONIQUE ELEKTRONIKEINHEIT UNIDADE ELECTRÓNICA IMPIANTO ELETTRONICO ELEKTRONISCHER MONITOR...
- Page 2 Fig.1 Fig.2 Fig.3...
- Page 3 Español COLOCACIÓN PILAS. CONFIGURACIÓN.- Este monitor utiliza una pila CR2032 En el modo SCAN, el monitor revisa y de 3 voltios. visualiza cada segundos Para colocar la pila, suelte la tapa continuamente todas las funciones trasera del monitor, Fig.1, e inserte durante su ejercicio.
-
Page 4: Guia De Problemas
Programación de las calorías.- Problema: El display no se enciende Pulsa la tecla ENTER hasta que la o la visualización de los segmentos ventana de las calorías parpadee del display es muy débil. Pulsando la tecla UP/DOWN, puede Solución: programar las calorías de su ejercicio a.- Compruebe que las pilas estén entre (1- 999 Cal.). -
Page 5: Fitting The Batteries
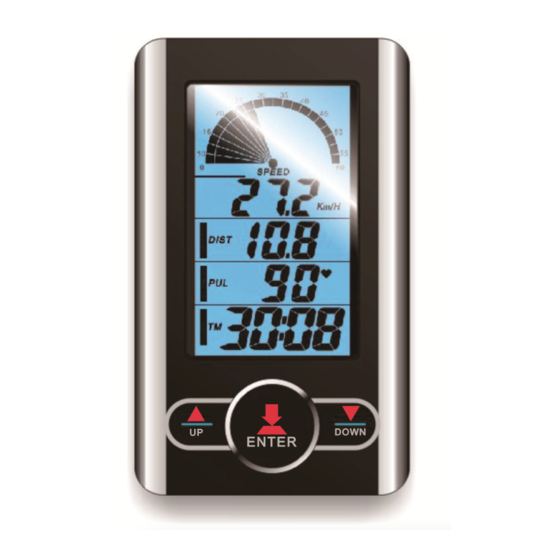
English FITTING THE BATTERIES.- SETUP.- TIn SCAN mode the computer, shown This monitor uses one CR2032 3 volt in the upper display, continuously battery. scans and displays all of the functions To fit the battery, remove the rear every 5 seconds during exercise. cover on the monitor, Fig.1, and The message line displayed in SCAN carefully insert the battery into the... -
Page 6: Troubleshooting Guide
Programming a calorie limit.- TROUBLESHOOTING GUIDE.- Once you are in the main screen, you Problem: The display comes on but press the ENTER key three times the only the Time function works. calorie window will start flashing. By Solution: pressing the UP/DOWN key you can a.- Make sure that the connection program the calories for the exercise cable is connected. -
Page 7: Mise En Place Des Piles
Français MISE EN PLACE DES PILES.- CONFIGURATION.- Dans le mode SCAN, l’ordinateur moniteur fonctionne pile révise et affiche toutes les 5 secondes CR2032 3 volt. et de façon permanente, toutes les Pour placer la batterie, retirez le fonctions durant la réalisation de vos couvercle arrière du moniteur, Fig. - Page 8 Programmation des calories.- Solution: Appuyez sur la touche ENTER jusqu'à A. Vérifiez si le cordon de connexion ce que la fenêtre calories clignote. En est bien connecté. appuyant sur la touche UP/DOWN, Problème: le display ne s’allume pas vous pourrez programmer les calories l’affichage segments de l’exercice entre 1 et 999 calories.
-
Page 9: Einsetzen Der Batterien
Deutsch EINSETZEN DER BATTERIEN.- KONFIGURATION.- Im SCAN-Modus, prüft der Computer Dieser Monitor funktioniert während der Übung alle Funktionen CR2032 3 Volt Batterie. und zeigt sie alle fünf Sekunden an. Zum Einsetzen der Batterien lösen Sie Folgende Meldungsleiste wird bitte den hinteren Deckel des Monitors, SCAN-Modus angezeigt: Fig.1 und setzen Sie die batterien Geschwindigkeit. - Page 10 Sie können die Kalorien Ihrer Übung programmieren, indem Sie die Taste Problem: Das Display schaltet nicht ein UP/DOWN drücken oder die Anzeige der Segmente des Kalorien). Wählen Sie die Kalorien Displays ist sehr schwach. drücken ENTER, Lösung: Bestätigen. a.- Prüfen Sie, ob die Batterien korrekt Die Kalorien werden zurücklaufen, bis eingesetzt sind.
-
Page 11: Colocação Das Pilhas
Português COLOCAÇÃO DAS PILHAS.- CONFIGURAÇÃO.- No modo SCAN, o computador revê e Este monitor utiliza bateria visualiza cada segundos CR2032 de 3 volt. continuamente todas funções Para colocar a pilha, solte a tampa de durante o seu exercício. atrás do monitor, Fig.1, e coloque com Linha de mensagens visualizadas no precaução a pilha no compartimento modo SCAN:... - Page 12 Carregando na tecla UP/DOWN, pode Problema: Não se consegue acender programar as calorias do seu exercício o display ou os segmentos do display entre (1-999 Cal). Seleccione as só se podem ver de uma forma muito calorias e carregue em ENTER para débil.
- Page 13 Italiano COLLOCAZIONE PILE.- CONFIGURAZIONE.- Nella modalità SCAN il computer Questo monitor funziona con una verifica e visualizza ogni 5 secondi batteria CR2032 da 3 V volt. continuamente tutte funzioni Per collocare le pile, tolga il coperchio durante l’allenamento. posteriore del monitor, Fig.1, ed Linea di messaggi visualizzati nel inserisca con attenzione le pile nello modo SCAN:...
-
Page 14: Soluzione Di Problemi
Programmazione delle calorie.- Soluzióne: Premere il tasto ENTER fino a quando a.- Verifichi se il cavo di collegamento finestra calorie inizia è stato collegato. lampeggiare. Premendo tasto Problema: Il display non si accende o UP/DOWN, si possono programmare la visualizzazione dei segmenti del le calorie del vostro esercizio tra (1- display è... - Page 15 Nederlands PLAATSING BATTERIJEN.- INSTELLINGEN.- SCAN-modus, scant Deze monitor functioneert op één computer voortdurend alle functies CR2032 3V volt batterij. gedurende het oefenen en geeft deze Om de batterijen te plaatsen, opent u elke 5 seconden weer. het klepje aan de achterkant, Fig.1, en De boodschapsregel die weergegeven plaatst voorzichtig batterijen in het wordt in de SCAN-modus:...
- Page 16 Een calorielimiet programmeren.- Oplossing: Druk op de ENTER toets ingedrukt a.- Controleer of de verbindingskabel totdat het calorievenster begint te juist is aangesloten. knipperen. Door op de toets UP/DOWN Probleem: De display licht niet op of te drukken, kunt u de calorieën voor uw de segmenten in de display worden oefening programmeren (tussen 1 –...
- Page 17 Tel: +34 945 292 012 / Tel.: +351 234 729 510 902 170 258 e-mail: info@bhfitness.pt Fax: +34 945 56 05 27 e-mail: sat@bhfitness.com BH FITNESS NORTH AMERICA BH FITNESS MEXICO BH FITNESS UK 20155 Ellipse BH Exercycle de México S.A. de Tel: 02037347554...
Need help?
Do you have a question about the Tokyo H9181 and is the answer not in the manual?
Questions and answers