Advertisement
Available languages
Available languages
Quick Links
Οδηγίες Χρήσης / Instructions Manual
ΓΙΑ ΠΕΡΙΣΣΟΤΕΡΕΣ ΠΛΗΡΟΦΟΡΙΕΣ:
FOR FURTHER INFORMATION:
(ΝΕΑ) Χ. ΜΠΕΝΡΟΥΜΠΗ & ΥΙΟΣ Α.Ε.
(NEW) H. BENRUBI & FILS S.A.
Ελληνικά (GR) – English (EN)
Αγ. Θωμά 27, 15124, Μαρούσι-Αθήνα
27 Aghiou Thoma str. GR 15124, Maroussi-Athens
Τηλ. 210 6156400, Fax: 210 6199316
Tel: 00302106156400, Fax: 00302106199316
Ανεμιστήρας Δαπεδου - Stand Fan ΙΖ-9020
e-mail: benrubi-sda@benrubi.gr
e-mail: benrubi-sda@benrubi.gr
Advertisement

Subscribe to Our Youtube Channel
Related Manuals for izzy ΙΖ-9020


Summary of Contents for izzy ΙΖ-9020
- Page 1 Οδηγίες Χρήσης / Instructions Manual ΓΙΑ ΠΕΡΙΣΣΟΤΕΡΕΣ ΠΛΗΡΟΦΟΡΙΕΣ: FOR FURTHER INFORMATION: (ΝΕΑ) Χ. ΜΠΕΝΡΟΥΜΠΗ & ΥΙΟΣ Α.Ε. (NEW) H. BENRUBI & FILS S.A. Ελληνικά (GR) – English (EN) Αγ. Θωμά 27, 15124, Μαρούσι-Αθήνα 27 Aghiou Thoma str. GR 15124, Maroussi-Athens Τηλ.
- Page 2 Περιεχόμενα / Contents GR........Σελίδες 2-10 EN.........Pages 11-19...
- Page 3 σφαλές σημείο για μελλοντική αναφορά, μαζί με την απόδειξη α- γοράς, η οποία λειτουργεί ως εγγύηση (βλ. παρακάτω «Εγγύηση και Εξυπηρέτηση Πελατών»). Η IZZY δε φέρει καμία ευθύνη σε πε- ρίπτωση μη τήρησης των οδηγιών χρήσης. Όταν χρησιμοποιείτε τη συσκευή σας θα πρέπει να ακολουθείτε...
- Page 4 • Η συσκευή αυτή προορίζεται για χρήση σε εσωτερικό χώρο. Μη χρησιμοποιείτε τη συσκευή σε υπαίθριο χώρο. • Η συσκευή αυτή προορίζεται μόνο για οικιακή χρήση. Κάθε άλλη χρήση ακυρώνει την εγγύηση. • Χρησιμοποιείτε πάντα τη συσκευή επάνω σε ασφαλή, στεγνή καθαρή και...
- Page 5 κινούμενα μέρη της συσκευής. • Μη χρησιμοποιείτε τη συσκευή μετά από πτώση ή αν παρουσιάζει οποιαδήποτε βλάβη και απευθυνθείτε σε ένα από τα εξουσιοδοτημένα κέντρα επισκευών ΜΠΕΝΡΟΥΜΠΗ. • Μη χρησιμοποιείτε τη συσκευή σε περίπτωση που παρατηρήσετε κάποιο περίεργο θόρυβο, μυρωδιά ή καπνό. Βγάλτε αμέσως της συσκευή...
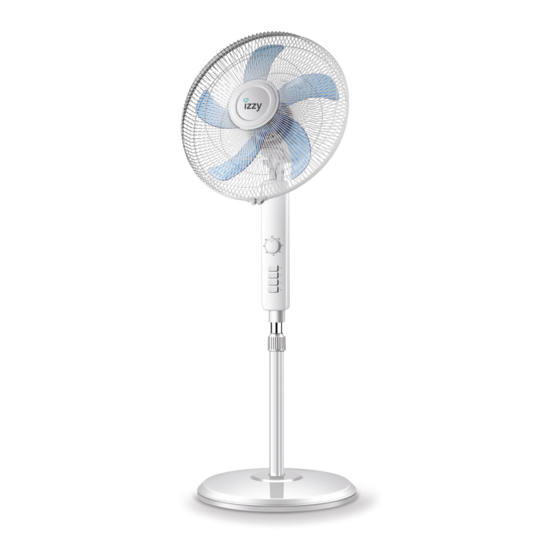
- Page 6 Μέρη της Συσκευής 1. Μπροστινό προστατευτικό κάλυμμα 12. Βίδα στήριξης 2. Στεφάνι προστατευτικών καλυμμάτων 13. Πάνω μέρος σωλήνα στήριξης 3. Παξιμάδι στήριξης πτερύγιων 14. Ρυθμιστής ύψους 4. Πτερύγια ανεμιστήρα 15. Κάτω μέρος σωλήνα στήριξης 5. Παξιμάδι στήριξης πίσω καλύμματος 16. Βάση 6.
- Page 7 Συναρμολόγηση Ανεμιστήρα Αφαιρέστε τη συσκευασία. Συναρμολόγηση μοτέρ ανεμιστήρα 1. Τοποθετήστε το πίσω προστατευτικό κάλυμμα (6) στον άξονα του μοτέρ (7) και βιδώστε καλά το παξιμάδι στήριξης πίσω καλύμματος (5). 2. Τοποθετήστε τα πτερύγια του ανεμιστήρα (4) και βιδώστε καλά το παξιμάδι στήριξης πτερυγίων...
- Page 8 Συναρμολόγηση επιδαπέδιου ανεμιστήρα 1. Τοποθετήστε τον σωλήνα στήριξης (15) στην υποδοχή στη βάση (16) του ανεμιστήρα και βιδώστε καλά το παξιμάδι (17) στο κάτω μέρος της βάσης. 2. Τοποθετήστε τον ρυθμιστή ύψους (14) και βιδώστε στο επιθυμητό ύψος. 3. Τοποθετήστε το πάνω μέρος του ανεμιστήρα στον σωλήνα στήριξης (15) και βιδώστε καλά τη βίδα...
- Page 9 Χρήση του Ανεμιστήρα ΠΡΟΣΟΧΗ: • Πριν τη χρήση, βεβαιωθείτε ότι έχετε συναρμολογήσει σωστά όλα τα μέρη της συσκευής και ότι δεν υπάρχουν μέρη τα οποία έχουν υποστεί οποιαδήποτε βλάβη. • Πάντα τοποθετείτε τη συσκευή σε επίπεδη, στεγνή και σταθερή επιφάνεια. Υπάρχει κίνδυνος...
- Page 10 Μεταφορά και Αποθήκευση • Απενεργοποιήστε και αποσυνδέστε τη συσκευή από το ρεύμα πριν την αποθηκεύσετε. • Αποθηκεύσετε τη συσκευή σε στεγνό μέρος χωρίς υγρασία. • Πριν χρησιμοποιήσετε τη συσκευή ύστερα από μεγάλο χρονικό διάστημα, βεβαιωθείτε ότι είναι καθαρή και στεγνή. •...
- Page 11 Εγγύηση • Η εταιρία ΜΠΕΝΡΟΥΜΠΗ εγγυάται τα προϊόντα της για οποιαδήποτε ελάττωμα κατασκευής ή υλικών για δύο (2) έτη από την ημερομηνία αγοράς ή παράδοσης με την προσκόμιση της απόδειξης αγοράς. Εάν το προϊόν που έχετε αγοράσει, παρουσιάσει ελάττωμα κατασκευής ή υλικών, απευθυνθείτε...
- Page 12 We thank you for having chosen an appliance from the IZZY range. Safety Interlocks Please read these instructions carefully before using the appliance and save them for future reference. Please keep the sales receipt for guarantee purposes (please see below “Guarantee and Customer Service”).
- Page 13 • Do not operate or place the device or parts in places of high humidity or where it may get wet. • Do not use this appliance in the immediate surroundings of a bath, a shower or a swimming pool or in places where it may get wet. •...
- Page 14 • Do not move the appliance when it is in operation. • Do not touch the appliance with wet or damp hands. • Do not use an extension power cord. • This appliance is not intended to be operated by means of an external timer or separate remote control system.
- Page 15 Parts of the Appliance 1. Front fan grill 12. Support screw 2. Grilles’ wreath 13. Upper support tube 3. Blades support nut 14. Height adjustment 4. Blades 15. Lower support tube 5. Rear grille support nut 16. Base 6. Rear fan grille 17.
- Page 16 Fan Assembly Remove the packaging. Motor assembly 1. Install the rear fan grille (6) on the motor shaft (7) and securely fasten the rear grille support nut (5). 2. Fit the blades (4) and fasten the blades support nut (3). CAUTION: The blade support nut bolts counterclockwise.
- Page 17 Standing fan assembly 1. Place the support tube (15) at the reception of the base (16) and tighten securely the nut at the bottom of the base. 2. Place the height adjustment (14) and tighten at the desired height. 3. Insert the upper part of the fan at the support tube (15) and screw tightly the support screw (12).
- Page 18 Using the Fan CAUTION: • Before using, make sure that all parts of the device are properly assembled and that there are no parts that have been damaged. • Always place the device on a flat, dry and stable surface. There is a risk of damage if it is not installed on a flat and level surface.
- Page 19 Storage • Switch off and unplug the appliance before storing it. • Store the appliance in a dry place without humidity. • Before using the appliance for a long time, make sure it is clean and dry. • Store the appliance where it is not reachable by children. Technical Specifications Model: Stand fan IZ-9020 Voltage: AC 220~240V...
- Page 20 Guarantee & Customer Service • BENRUBI Company guarantees its products for any manufacturing defect or defective materials for a period of two (2) years from the date of purchase or delivery by presenting purchase receipt. If your product malfunctions or you find any defects, please revert to the retail location you have purchased it from or contact an authorized BENRUBI Service Centre.
Need help?
Do you have a question about the ΙΖ-9020 and is the answer not in the manual?
Questions and answers