Advertisement
Available languages
Available languages
Quick Links
Οδηγίες Χρήσης / Instructions Manual
ΓΙΑ ΠΕΡΙΣΣΟΤΕΡΕΣ ΠΛΗΡΟΦΟΡΙΕΣ:
FOR FURTHER INFORMATION:
(ΝΕΑ) Χ. ΜΠΕΝΡΟΥΜΠΗ & ΥΙΟΣ Α.Ε.
(NEW) H. BENRUBI & FILS S.A.
Ελληνικά (GR) – English (EN)
Αγ. Θωμά 27, 15124, Μαρούσι-Αθήνα
27 Aghiou Thoma str. GR 15124, Maroussi-Athens
Τηλ. 210 6156400, Fax: 210 6199316
Tel: +302106156400, Fax: +302106199316
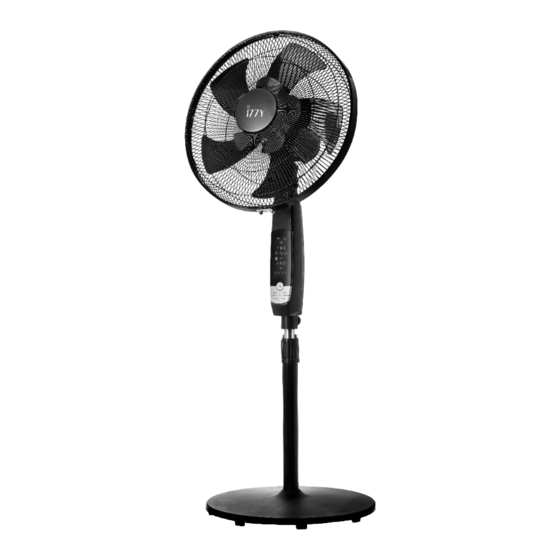
Επιδαπέδιος Ανεμιστήρας με Διπλά Πτερύγια IZ-9033
e-mail: benrubi-sda@benrubi.gr
e-mail: benrubi-sda@benrubi.gr
Stand Fan with Double Blades IZ-9033
Advertisement

Related Manuals for izzy IZ-9033


Summary of Contents for izzy IZ-9033
- Page 1 Ελληνικά (GR) – English (EN) Αγ. Θωμά 27, 15124, Μαρούσι-Αθήνα 27 Aghiou Thoma str. GR 15124, Maroussi-Athens Τηλ. 210 6156400, Fax: 210 6199316 Tel: +302106156400, Fax: +302106199316 Επιδαπέδιος Ανεμιστήρας με Διπλά Πτερύγια IZ-9033 e-mail: benrubi-sda@benrubi.gr e-mail: benrubi-sda@benrubi.gr Stand Fan with Double Blades IZ-9033...
- Page 2 Περιεχόμενα / Contents GR........Σελίδες 1-11 EN.........Pages 12-21...
- Page 3 Ευχαριστούμε που επιλέξατε μια συσκευή της γκάμας IZZY. Συμβουλές Aσφαλείας Διαβάστε προσεκτικά τις οδηγίες χρήσης και κρατήστε τις σε ασφαλές σημείο για μελλοντική αναφορά, μαζί με την απόδειξη αγοράς, η οποία λειτουργεί ως εγγύηση (βλ. παρακάτω «Εγγύηση και Εξυπηρέτηση Πελατών»).
- Page 4 ακυρώνει την εγγύηση. • Χρησιμοποιείτε πάντα τη συσκευή επάνω σε ασφαλή, στεγνή καθαρή και επίπεδη επιφάνεια. • Μη λειτουργείτε και μην τοποθετείτε τη συσκευή ή μέρη της σε μέρη με υγρασία ή σε σημεία όπου μπορεί να βρέχεται. • Μη χρησιμοποιείται τη συσκευή στο μπάνιο ή κοντά σε πισίνα ή σε οποιοδήποτε...
- Page 5 • Μη χρησιμοποιείτε τη συσκευή μετά από πτώση ή αν παρουσιάζει οποιαδήποτε βλάβη και απευθυνθείτε σε ένα από τα εξουσιοδοτημένα κέντρα επισκευών ΜΠΕΝΡΟΥΜΠΗ. • Μη χρησιμοποιείτε τη συσκευή σε περίπτωση που παρατηρήσετε κάποιο περίεργο θόρυβο, μυρωδιά ή καπνό. Βγάλτε αμέσως της συσκευή από το ρεύμα...
- Page 6 Μέρη της Συσκευής 1. Μπροστινό προστατευτικό κάλυμμα 2. Βίδα στήριξης κλιπ 3. Κλιπ στήριξης προστατευτικών καλυμμάτων 4. Μικρό πτερύγιο 5. Μεγάλο πτερύγιο 6. Παξιμάδι στήριξης πίσω καλύμματος 7. Πίσω προστατευτικό κάλυμμα 8. Άξονας μοτέρ 9. Μοτέρ 10. Σωλήνας στήριξης 11. Πίνακας ελέγχου 12.
- Page 7 Πίνακας ελέγχου 20. Οθόνη ενδείξεων 21. Κουμπί λειτουργίας 22. Κουμπί επιλογής λειτουργιών “MODE” 23. Κουμπί χρονοδιακόπτη “TIMER” 24. Κουμπί ρύθμισης ταχύτητας “SPEED” 25. Κουμπί περιστροφής Χειριστήριο 26. Κουμπί ρύθμισης ταχύτητας 27. Κουμπί ON/OFF 28. Κουμπί επιλογής λειτουργιών “MODE” 29. Κουμπί χρονοδιακόπτη “TIME” 30.
- Page 8 Συναρμολόγηση του Ανεμιστήρα Αφαιρέστε τη συσκευασία. Συναρμολόγηση μοτέρ ανεμιστήρα 1. Τοποθετήστε το πίσω προστατευτικό κάλυμμα (7) στον άξονα του μοτέρ (8) και βιδώστε καλά το παξιμάδι στήριξης πίσω καλύμματος (6). 2. Τοποθετήστε το μεγάλο πτερύγιο του ανεμιστήρα (5) και βιδώστε καλά το μικρό πτερύγιο (4). ΠΡΟΣΟΧΗ: Το...
- Page 9 Συναρμολόγηση επιδαπέδιου ανεμιστήρα 1. Τοποθετήστε το σωλήνα επέκτασης (16) στην υποδοχή στη βάση (17) του ανεμιστήρα. 2. Τοποθετήστε τη ροδέλα βάσης (18) και βιδώστε καλά τη βίδα βάσης “L” (19). 3. Τοποθετήστε το σωλήνα στήριξης (10) στην υποδοχή του σωλήνα επέκτασης (16). 4.
- Page 10 Αλλαγή Μπαταρίας Χειριστηρίου Πριν από την πρώτη χρήση, αφαιρέστε την προστατευτική μεμβράνη από την υποδοχή μπαταρίας. Το χειριστήριο λειτουργεί με μπαταρία λιθίου 3V (CR2025). Αλλαγή μπαταρίας: 1. Πιέστε στο πλάι την υποδοχή μπαταρίας και τραβήξτε προς τα έξω. 2. Αφαιρέστε την μπαταρία και τοποθετήστε την καινούρια στην υποδοχή. Χρήση...
- Page 11 • Πριν χρησιμοποιήσετε τη συσκευή ύστερα από μεγάλο χρονικό διάστημα, βεβαιωθείτε ότι είναι καθαρή και στεγνή. • Αποθηκεύστε την συσκευή σε σημείο που να μην προσεγγίζεται από παιδιά. Τεχνικά Χαρακτηριστικά Μοντέλο: Επιδαπέδιος ανεμιστήρας με διπλά πτερύγια IZ-9033 Tάση: AC 220~240V Συχνότητα: 50/60Hz Ισχύς: max 70W...
- Page 12 Προειδοποιήσεις για τη Σωστή Απόρριψη της Συσκευής Σύμφωνα με την Ευρωπαϊκή Οδηγία 2002/96/ΕΚ Στο τέλος της ωφέλιμης ζωής του, το προϊόν δεν πρέπει να απορρίπτεται με τα αστικά απορρίμματα. Πρέπει να απορριφθεί σε ειδικά κέντρα διαφοροποιημένης συλλογής απορριμμάτων που ορίζουν οι δημοτικές...
- Page 13 Please keep the sales receipt for guarantee purposes (pls see below “Guarantee and Customer Service”) Any use which does not conform to the instructions will absolve IZZY from any liability. • Make sure your electricity supply is the same as the one shown on the underside of the appliance.
- Page 14 shower or a swimming pool or in places where it may get wet. • Never let the power unit, cord or plug get wet. If the appliance does get wet, immediately remove the power cord from the wall outlet and do not put your hands in the water.
- Page 15 • Do not use an extension power cord. • This appliance is not intended to be operated by means of an external timer or separate remote control system. • Check the power cord periodically for possible damages. • If the power cord or the plug of the appliance has been damaged, do not use the appliance and contact an authorized BENRUBI Service Center.
- Page 16 Parts of the Appliance 1. Front fan grill 2. Clip screw 3. Clip 4. Small blades 5. Large blades 6. Rear grille support nut 7. Rear fan grille 8. Motor shaft 9. Motor 10. Support tube 11. Control panel 12. Tube mounting screw 13.
- Page 17 Control panel 20. Display screen 21. Power button 22. “MODE” button 23. “TIMER” button 24. “SPEED” button 25. “SWING” button Remote control 26. “SPEED” button 27. ON/OFF button 28. “MODE” button 29. “TIME” button 30. “OSC” button 31. Screen light button “LAMP”...
- Page 18 Assembly Remove the packaging. Motor assembly 1. Install the rear fan grille (7) on the motor shaft (8) and securely fasten the rear grille support nut (6). 2. Fit the large blades (5) and fasten the small blades (4). CAUTION: The small blades bolt counterclockwise. 3.
- Page 19 Stand fan assembly 1. Insert the extension tube (16) into the reception on the base (17). 2. Insert the base gasket (18) and tighten the base screw "L" (19). 3. Insert the support tube (10) into the extension tube socket (16). 4.
- Page 20 Changing the Remote-Control Battery Before the first use, remove the protective film from the battery compartment. The remote-control works with a 3V (CR2025) lithium battery. Changing battery: 1. Push the battery holder to the side and pull it out. 2. Remove the battery and insert the new one into the slot. Using the Fan CAUTION: •...
- Page 21 • Before using the appliance for a long time, make sure it is clean and dry. • Store the appliance where it is not reachable by children. Technical Information Model: Stand fan with double blades IZ-9033 Voltage: AC 220~240V Frequency: 50/60Hz...
- Page 22 Important Information for Correct Disposal of the Product in Accordance with EC Directive 2002/96/EC At the end of its working life, the product must not be disposed of as urban waste. It must be taken to a special local authority differentiated waste collection centre or to a dealer providing this service. Disposing of a household appliance separately avoids possible negative consequences for the environment and health deriving from inappropriate disposal and enables the constituent materials to be recovered to obtain significant savings in energy and resources.
Need help?
Do you have a question about the IZ-9033 and is the answer not in the manual?
Questions and answers