Table of Contents
Advertisement
Quick Links
Advertisement
Table of Contents

Related Manuals for avertX HD458IR


Summary of Contents for avertX HD458IR
- Page 1 HD458IR 4K OUTDOOR MINI IP BULLET CAMERA WITH SMART ANALYTICS User Manual...
- Page 2 The information in this publication is provided “as is” without warranty of any kind. The entire risk arising out of the use of this information remains with recipient. In no event shall AVERTX be liable for any direct, consequential, incidental, special, punitive, or other damages whatsoever (including without limitation,...
- Page 3 Before using, make sure power supply and others are properly connected. • While operating, if any abnormal condition or malfunction is observed, stop using the camera • immediately and then contact AvertX Customer Support. Handling Do not disassemble or tamper with parts inside the camera. •...
- Page 4 REGULATION This device complies with Part 15 of the FCC Rules. Operation is subject to the following two conditions: (1) this device may not cause harmful interference, and (2) this device must accept any interference received, including interference that may cause undesired operation. This symbol on the product or on its packaging indicates that this product shall not be treated as household waste in accordance with Directive 2002/96/EC.
-
Page 5: Table Of Contents
TABLE OF CONTENTS INTRODUCTION ............................8 Overview ..........................8 Camera Default Settings ....................8 Product Features ......................8 GETTING STARTED ..........................9 Box Contents ........................9 Camera Overview ......................10 Camera Diagram ......................10 Cable Connection ....................... 11 Dimensions ......................... 11 CONNECTING ............................ - Page 6 Static Address ...................... 20 DHCP ........................20 IPv6 ........................21 Port ............................ 21 Port Mapping ......................21 DDNS ..........................22 FTP ........................... 23 General ........................23 Video ........................... 24 E-Mail ..........................25 STREAMING SETTINGS ........................26 Video ..........................26 Snapshot ........................... 28 Audio ..........................
- Page 7 Plan ..........................48 STORAGE .............................. 49 Storage ..........................49 Snapshot Download ......................50 Recording Download ......................50 SECURITY SETTINGS ........................... 51 User ........................... 51 Network Security ....................... 52 HTTPS ......................... 52 Authentication ...................... 52 IP Address Filtering ....................53 Video Watermark ......................53 MAINTENANCE .............................
-
Page 8: Introduction
192.168.51.2 Username admin Password This AvertX camera model does not have a default password The admin user password can be set using the following methods: 1. ProConnect recorders running software version 2.1 or newer will automatically set a new unique password by: ... -
Page 9: Getting Started
GETTING STARTED BOX CONTENTS Before proceeding, please check that the box contains the items listed here. If any item is missing or has defects, do not install or operate the product and contact AvertX Support for assistance. Self-Tapping Mounting Plastic Anchors... -
Page 10: Camera Overview
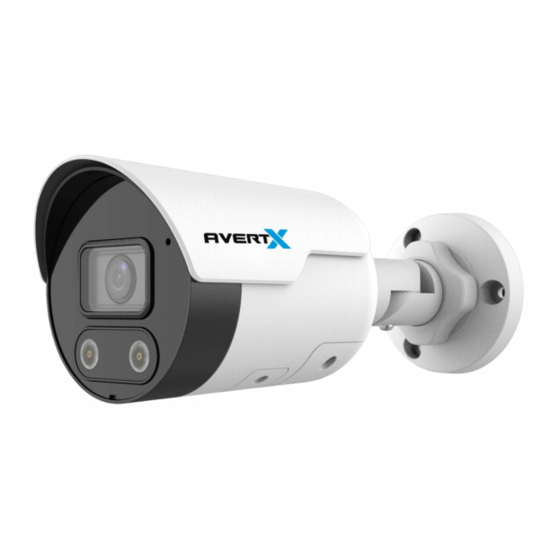
CAMERA OVERVIEW Before installing or connecting the bullet camera, please refer to this section and complete preparations for camera setup and all switch settings. Camera Diagram Lock Nut To adjust angle, loosen lock nut. Adjustment Screws To adjust angle or rotate camera body, loosen screws. Use the reset button to restore the factory default settings. -
Page 11: Cable Connection
Cable Connection RJ-45 Data Connection DC12V Power Connection Dimensions 7.5” 3” 37735AA... -
Page 12: Connecting
Once the camera is connected to the recorder, test all functions to ensure proper operation. If the camera will not connect or is not functioning correctly, do not install, and contact AvertX Support. NETWORK CAMERA MANAGER Network Camera Manager (NCM) is a software tool that allows you to quickly and easily connect and configure your AvertX IP cameras. -
Page 13: Connecting To The Camera
1. AvertX ProConnect recorders will check the camera for a password once connected. If AvertX software does not detect a password, it will set the camera password to a secure text string of 8 to 16 characters (Including upper-case letters, lower-case letters, digits and special characters (!"#$%&'()*+,-./:;<=>?@[\]^_`{|}~ space)). -
Page 14: Logging Into The Web Interface
LOGGING INTO THE WEB INTERFACE The default static IP address of the camera is 192.168.51.2, and the default subnet mask is 255.255.255.0. DHCP is turned on by default. If a DHCP server is used in the network, the IP address of your camera will be assigned dynamically. -
Page 15: Installing The Camera
7. Attach the camera to the ceiling or wall with the included screws. 8. Adjust the position of your camera. Note: Use the AvertX Connect app to view the camera while adjusting view. 9. Tighten the locknut to secure your camera. -
Page 16: Waterproof Cable Connector
Waterproof Cable Connector This camera features an IP66-rated waterproof cable connector. For unprotected outdoor connections, screw the connector on the included ethernet camera cable onto the camera dongle. If your installation location does not require a waterproof connection, loosen and slide the connector back on the cable until it’s out of the way. -
Page 17: Cleaning The Lens Cover
Removing the lens cover or otherwise opening the camera will destroy the seal and void the warranty. Focusing the Camera Lens The HD458IR is pre-focused at the factory and cannot be adjusted by the end user. If your camera is out of focus, contact AvertX Support. -
Page 18: Live View
LIVE VIEW Item Description Live View Browse to Live View page to view live video Setup Browse to Setup options Logout Exit the device interface 37735AA... -
Page 19: Basic Camera Settings
BASIC CAMERA SETTINGS Basic Info Basic Information displays details about the camera. Refresh to update the display after any changes have been made that affect the listed information or status. Common Configuration Click shortcuts to other menu items: Network, Time, On-Screen Display or User. -
Page 20: Network Settings
NETWORK SETTINGS NETWORK Modify communication settings such as the IP address for the camera so that the camera can communicate with other devices. Note: After you have changed the IP address, you need to use the new IP address to log in. Note: The configurations of DNS (Domain Name System) server are applicable when the device is accessed by domain name. -
Page 21: Ipv6
IPv6 1. Click Setup > Network Settings > Network. 2. By default, the IPv6 is set to Manual. 3. Enter the IPv6 address, set the prefix length and default gateway. The IP address must be unique on the network. 4. Click Save. PORT 1. -
Page 22: Ddns
DDNS DDNS (Dynamic Domain Name Service) is a service that allows a connection to an IP address using a hostname (URL) address instead of a numeric IP address. Most Internet Service Providers use Dynamic IP Addressing that frequently changes the public IP address of your internet connection; this means that when connecting to the camera over the internet, you need to know if your IP address has changed. -
Page 23: Ftp
General After the configuration of FTP, you will be able to upload snapshots from network cameras to a specified FTP server. 1. Click Setup > Network > FTP. Go to the General tab. 2. Configure the IP address, port number of the FTP server, the username and password of the upload account, enable Upload Images and Overwrite Storage, and then set the overwrite image threshold. -
Page 24: Video
Video After the configuration of FTP, you will be able to upload video from network cameras to a specified FTP server. 1. Click Setup > Network > FTP. Go to the Video tab. 2. Configure the IP address, port number of the FTP server, the username and password of the upload account, enable Upload Video, and then set the overwrite image threshold. -
Page 25: E-Mail
E-MAIL After the configuration of E-mail, when alarms are triggered, you will be able to send messages to the specified E-mail address. The camera can send an e-mail via Simple Mail Transfer Protocol (SMTP) when a variety of events occur. SMTP is a protocol for sending e-mail messages between servers. SMTP is a relatively simple, text-based protocol, where one or more recipients of a message are specified, and the message text is transferred. -
Page 26: Streaming Settings
1. Click Setup > Stream Settings > Video. 2. Modify the settings as required. The following table describes some major parameters. Parameter Description Video AvertX ProConnect software only supports H.264 compression. Compression Resolution Set video resolution. Frame Rate Frame rate for encoding images. Unit: FPS (frame per second). - Page 27 Image Quality When Encoding Mode is VBR, you can move the slider to adjust quality level for images. Moving the slider toward Bit Rate decreases the bit rate and may affect image quality. Moving the slider toward Quality increases the bit rate and improves image quality.
-
Page 28: Snapshot
SNAPSHOT 1. Click Setup > Streaming Settings > Snapshot. 2. Select On, and then set resolution, most large and schedule as needed. Some parameters are described in the table below. Parameter Description Snapshot Interval between two snapshots. For example, with Snapshot Interval set to 1 and Interval Number of Snapshot set to 2, the camera will take 2 snapshots (take one first and then take another after 1 second). -
Page 29: Audio
AUDIO 1. Click Setup > Streaming Settings > Audio. 2. Modify the settings as required. The following table describes some major parameters. Parameter Description Audio Input No audio data will be encoded when Off is selected. It is recommended to select Off if you do not need audio. This can improve Note: device performance to some extent. -
Page 30: Roi
When Region of Interest (ROI) is enabled, the system ensures image quality for ROI first if the bit rate is insufficient. 1. Click Setup > Streaming Settings > ROI. 2. Click , and then drag the mouse to cover the intended part of the images. To delete, select the area and then click 37735AA... -
Page 31: Media Stream
MEDIA STREAM You can display the established media streams from a camera. You may also set the camera so it transmits code streams by the UDP or TCP protocol to a specified IP address and port number. The settings can be saved and take effect after the camera is restarted. Note: Choosing a transport protocol based on your actual needs and network performance. -
Page 32: Picture Settings
PICTURE SETTINGS IMAGE Image Enhancement Note: You may move the sliders to adjust settings or enter values in the text boxes directly. Clicking Default will restore all the default image settings. 1. Click Setup > Picture Settings > Image. 2. Use the sliders to change the settings. You may also enter values directly. The following table describes some major parameters. - Page 33 Set the degree of difference between the blackest pixel and the whitest pixel. Contrast Low contrast High contrast Contrast of boundaries of objects in an image. Sharpness Low sharpness High sharpness 2D Noise Reduce the noise of images. The function may cause image blurring. Reduction 3D Noise Reduce the noise of images.
-
Page 34: Exposure
Exposure The default settings are used for common scenes. Keep the default settings unless a particular scene is required. 1. Click Setup > Image > Image and then click Exposure. 2. Set the parameters as required. The following table describes some major parameters. 37735AA... - Page 35 Parameter Description Exposure Mode Select the correct exposure mode to achieve the desired exposure effect. Shutter (s) Shutter is used to control the light that comes into the lens. A fast shutter speed is ideal for scenes in quick motion. A slow shutter speed is ideal for scenes that change slowly.
- Page 36 WDR Level After enabling the WDR function, you can improve the image by adjusting the WDR level. Use level 7 or higher when there is a high contrast between the bright and Note: dark areas of the scene. In the case of low contrast, it is recommended to disable WDR or use level 1-6.
-
Page 37: Smart Illumination
Smart Illumination 1. Click Setup > Picture Settings > Image and then click Smart Illumination. 2. Select the corresponding lighting type and then configure other parameters. Parameter Description Lighting Type Infrared: The camera uses infrared light illumination. White Light: The camera uses white light illumination. ... -
Page 38: White Balance
White Balance White balance is the process of offsetting unnatural color cast in images under different color temperatures so as to output images that best suit human eyes. 1. Click Setup > Picture Settings > Image and then click White Balance. 2. -
Page 39: Advanced
Advanced Use the defog function to adjust the clarity of images captured in fog or haze conditions. 1. Click Setup > Image > Image and then click Advanced. Note: You can set this parameter only when WDR is turned off. Only some camera models support optical defog. -
Page 40: On-Screen Display
ON-SCREEN DISPLAY On Screen Display (OSD) is the text displayed on the screen with video images and may include time and other customized contents. 1. Click Setup > Image > On-Screen Display. 2. Enable the On-Screen Displays to appear on the camera image. 3. -
Page 41: Analytics
ANALYTICS INTRUSION DETECTION Intrusion detection detects objects that enter a specified area in live video and triggers alarm when such an event is detected. Rule Settings 1. Click Setup > Analytics > Intrusion Detection. Select the Rule Settings tab. 2. Check Intrusion Detection to enable. 3. -
Page 42: Trigger Actions
Trigger Actions 1. Select the Trigger Actions tab. 2. Check the boxes to choose the actions that are triggered when a person or vehicle is detected. Item Description Send Email With Send E-mail selected, the camera will automatically send snapshots to the specified E-mail addresses when a person or vehicle is detected. -
Page 43: Alarm Sound
Save Snapshot With Record Snapshot to SD Card selected, the camera will automatically save an to SD Card image to the SD Card when a person or vehicle is detected. Make sure you have completed Storage configuration before using this Note: function. -
Page 44: Alarm Light
Alarm Light 1. Click Light Config after enabling Alarm Light. 2. Set the Duration(s) for how long the alarm light stays on when triggered. 3. Set the Start Time(s) and End Time(s) during which the alarm is effective. The time periods cannot overlap. - Page 45 3. Click Edit. 4. Set the start and end times during which Trigger Actions are effective. The time periods cannot overlap. The camera reports alarms during the specified period(s) only. 5. Select from Monday to Sunday and set up to four periods for each day or check the days and Copy to set the same schedule for multiple days.
-
Page 46: Event Settings
EVENT SETTINGS ALARMS You can schedule alarm reporting and set actions that can be triggered by other devices so that alarms and the triggered actions can be handled in time. Alarm reporting can be scheduled for a motion detection alarm. Rule Settings Motion detection detects the object motion in a specified rectangular area during a period. -
Page 47: Trigger Actions
Trigger Actions 1. Select the Trigger Actions tab. 2. Check the boxes to choose the actions that are triggered by a motion detection alarm. Item Description Upload to FTP With Upload to FTP selected, the camera will automatically upload snapshots to the specified FTP server when an alarm is triggered. -
Page 48: Plan
Plan 1. Select the Plan tab. 2. Click Armed or Unarmed and click the schedule to set when an enabled Trigger Action is effective. 3. Click Edit. 4. Set the start and end times during which an enabled Trigger Event is effective. The time periods cannot overlap. -
Page 49: Storage
STORAGE STORAGE Edge storage is used to save video data and snapshots to the memory card directly. Edge storage is recommended when the camera is running in stand-alone mode. The camera records live video repeatedly if manual storage is enabled. 1. -
Page 50: Snapshot Download
SNAPSHOT DOWNLOAD 1. Select Setup > Storage Settings > Snapshot Download. 2. Open the file directory. 3. Click Refresh to display the most recently saved files. 4. Click Export Images to download. 5. Click Delete to delete files. RECORDING DOWNLOAD 1. -
Page 51: Security Settings
SECURITY SETTINGS USER There are two types of users in the system: Administrator: referred to as “admin” in this manual. The default name of the administrator • is admin, which cannot be modified. Admin has full permission and can manage all users and devices. -
Page 52: Network Security
NETWORK SECURITY HTTPS HTTPS allows secure connections between the IP Camera and web browser that protects camera settings or Username/Password info from snooping. To use HTTPS, you are required to install a self-signed certificate or a Authority (CA) -signed certificate. The HTTPS certificate can be obtained by either creating and sending a certificate request to a CA or creating a self-signed HTTPS certificate 1. -
Page 53: Ip Address Filtering
IP Address Filtering Use IP address filtering to allow or forbid access from specified IP address(es). 1. Click Setup > Security Settings > Network Security. 2. Select On to enable IP address filtering. 3. Select a filtering mode, and then add IP address(es). 4. -
Page 54: Maintenance
MAINTENANCE TIME You can use the following methods to adjust the system time of your device. Manually Setting or Synchronizing the System Time 1. Click Setup > Maintenance > Time. 2. Select a synchronization mode. 3. Set the correct time zone and system time. You may also click Sync with Computer Time to synchronize the time settings of your camera with that of your PC. -
Page 55: Maintenance
MAINTENANCE Software Upgrade New versions of camera firmware is available periodically and can be found at http://www.avertx.com/product-downloads/. Note: Make sure the software upgrade file is available before starting the software upgrade. 1. Click Setup > Maintenance > Maintenance. 2. Under Local Upgrade, click Browse and select the correct upgrade file. -
Page 56: Config Management
Config Management Export the current configurations of the camera and save them to the PC or an external storage medium. You can also quickly restore configurations by importing backup configurations stored on the PC or an external storage medium back to the camera. CAUTION! After you perform the Default operation, all settings are restored to factory defaults, except the following: login password of the system administrator, network settings, and... -
Page 57: Log
The camera’s log displays a searchable list of changes made to the system. 1. Set a Time range. 2. Narrow search by selecting a Main Type. 3. Click Query. 4. Export to download the result. 37735AA... - Page 58 All rights reserved. No part of this publication may be reproduced by any means without written permission from AvertX. The information in this publication is believed to be accurate in all respects. However, AvertX cannot assume responsibility for any consequences resulting from the use thereof. The information contained herein is subject to change without notice.
Need help?
Do you have a question about the HD458IR and is the answer not in the manual?
Questions and answers