
Related Manuals for La Crosse Technology WS-3512


Summary of Contents for La Crosse Technology WS-3512
- Page 1 All manuals and user guides at all-guides.com TOUCH SCREEN WEATHER STATION (WIND AND AIR PRESSURE) WS-3512 Operation Manual...
-
Page 2: Table Of Contents
All manuals and user guides at all-guides.com Table of Contents i……………….About this Manual ii………………Glossary of Common Terms 1..... General 2...... Important Operating Notes 3..... Getting Started 3.1....Wiring the System 3.2....Power Supply 3.2.1..Batteries 3.2.2..AC/DC Mains Adapter 3.2.3..Cable Connection 3.3.... - Page 3 All manuals and user guides at all-guides.com About this Manual Thank You Congratulations on selecting a La Crosse Technology Professional Weather Station! We are positive you will enjoy the benefits of accurate weather readings and the precise, radio- controlled time information that our instruments offer. La Crosse Technology introduced radio-controlled instruments to the US market in 1991 and continues to be on the cutting-edge of this technology in America.
- Page 4 All manuals and user guides at all-guides.com RADIO-CONTROLLED TIME* A radio-controlled time device is often confused with an atomic clock. However, a radio-controlled time device receives its time information from the atomic clock each day through an internal antenna. The radio- controlled time device searches for an exact time signal every night when the signal from the WWVB is the strongest.
-
Page 5: General
Important Note: Before inserting batteries, please carefully read the operation manual. The Touch Screen Weather Station WS-3512 includes a Base Station (Receiver), a Transmitter unit, one Wind Sensor, Connecting Cables, an AC/DC Adapter, and a PC Software Package on CD-ROM. -
Page 6: Important Operating Notes
All manuals and user guides at all-guides.com as the ability to upload the data to Internet Web Sites. Important Operating Notes All actions and functions of the Weather Station are started on the • Touch Screen by slightly touching (not pressing!) the switching areas appearing with star (... -
Page 7: Getting Started
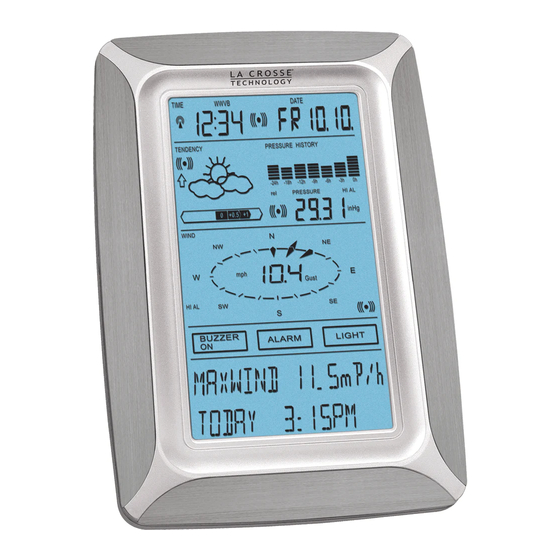
All manuals and user guides at all-guides.com Symbol showing Storm- warning alarm is On Alarm-On symbol for time alarm Date section Time section Pressure Weather History section Tendency section Pressure section Alarm-On symbol for pressure Wind direction / Wind speed / Wind gust Alarm-On symbol for wind Buzzer selection speed/ gust/ wind direction... -
Page 8: Wiring The System
All manuals and user guides at all-guides.com components work properly before positioning them in their final locations. Wiring the System AC/ DC adapter Transmitter unit PC COM Port cable Wireless Transmission Direct cable connection Independent of the final operating mode at first, the fixed cable of the Wind Sensor has to be connected to the Transmitter unit by plugging it into the marked receptacle. -
Page 9: Power Supply
All manuals and user guides at all-guides.com The direct cable connection of Transmitter unit and Base Station can be used if: the flexibility of 433 MHz radio transmission is not needed and • data transmission absolutely free of any environmental •... -
Page 10: Cable Connection
All manuals and user guides at all-guides.com Note: In both cases it is important to power the units in this order because the transmitter will send an identification code which has to be received and stored by the Base Station within the first few minutes of operation. -
Page 11: System Start
All manuals and user guides at all-guides.com System Start After inserting the batteries and connecting the AC/DC adapter, the LCD of the Weather Station will, for a few seconds, display all possible display segments for checking. Immediately after this, the unit will enter the “play mode”, during which for about 15 minutes all measured and received weather data are being switched through, updated, and displayed. -
Page 12: Setting Up
All manuals and user guides at all-guides.com Note: Commonly the radio communication between receiver and transmitter in the open field can reach a distance of up to 330 feet providing that there are no interfering obstacles such as buildings, trees, vehicles, high voltage lines, etc. Radio interferences such as PC screens, radios or TV sets can, in bad cases, entirely cut off radio communication. - Page 13 All manuals and user guides at all-guides.com Time Zone → Time Zones can be set in the range from -12 to +12 hours (Default EST). WWVB Radio-Controlled Clock (RCC) → ON/OFF. In setting “OFF“ the clock is operating as a normal Quartz clock (Default RCC OFF). 12/24 hour Time Display Format (Default 12h Format).
- Page 14 All manuals and user guides at all-guides.com Weather Tendency (Tendency) → Setting to a definite switching threshold (2 hPa to 4 hPa) for a change in display of weather icons (Default 3 hPa). Storm Warning (Storm) → Setting to a definite switching threshold for storm warning display at a decrease of air pressure from 3 hPa to 9 hPa over 6 hours (Default 5 hPa).
-
Page 15: Display Of Stored Min/Max And Alarm Value Settings
All manuals and user guides at all-guides.com Default Settings (Factory Reset) → Allows clearing of all weather data in non-volatile buffer memory (EEPROM) and to reset of all set and/or stored values to the factory settings set prior to shipment → Acknowledge with ٭CONFIRM.٭... -
Page 16: Radio-Controlled Wwvb Clock
All manuals and user guides at all-guides.com With ٭MINMAX ٭the below shown menu step is activated, which in return leads to the displays of the stored Min/Max values by use of ٭MIN٭ / ٭MAX ,٭which on their part again can be directly selected. Note: During individual displays of the stored Min/Max values the top line of the LCD screen will automatically display the time and date of their storage. - Page 17 All manuals and user guides at all-guides.com Start ٭TIME ٭in the menu section (last 2 lines on the LCD). Set the hours and minutes. Leave the mode with ٭EXIT ٭or wait for automatic time-out. Setting the Date The action is started by touching the date display in the DATE section of the Touch Screen.
-
Page 18: Weather Tendency
All manuals and user guides at all-guides.com Note: By touching the DATE section twice, the display will toggle between the following: Date in MM.DD.YY format (12 hour time format) or Date in • DD.MM.YY format (24 hour time format) Weekday, Month, Date of Day (12 hour time format) or •... -
Page 19: Air Pressure History
All manuals and user guides at all-guides.com The text section (last 2 lines on the LCD) will show because (with time and date) the weather condition corresponds to the presently displayed weather symbol Sunny, Fair (Cloudy with sunny intervals) or Rainy. -
Page 20: Features And Operations
All manuals and user guides at all-guides.com Features and Operations Air Pressure (Pressure), Relative and Absolute • Wind Speed, Wind Gust • Important Note! Because the operating procedures in all measurements are identical, the various functions of the weather station will be explained once here by the following example of “Air Pressure”. - Page 21 All manuals and user guides at all-guides.com Resetting of the displayed value to the present value with ٭CONFIRM.٭ Without resetting advance with ٭EXIT.٭ End of Example Example for Setting of Alarms by means of the HI Alarms In this example the setting up of Pressure high/ low alarm will be demonstrated.
- Page 22 All manuals and user guides at all-guides.com Proceed with ٭HI AL ٭in the menu section. (Similarly, setting of the LO alarms is here possible through touching the ٭LO AL ٭key in this example.) Adjusting the high alarm value with the key ٭UP ٭or ٭DOWN.٭ Proceed with ٭ON/OFF.٭...
-
Page 23: Wind Function Information
Operating and Setting of Wind Direction Alarm Apart from high or low alarm of the wind speed, the wind direction alarm is available in the WS-3512. Note: Alarm for wind gust is also available. When the Wind display is showing the wind direction, touch the center of Wind section once. - Page 24 All manuals and user guides at all-guides.com Then the below wind direction menu will be shown in text display. Proceed with ٭DIR AL ٭key at the text display: In the following menu up to 16 separate alarms can be activated (depending on the basic set up clockwise around the compass card from N via NNE to NNW, or from 0°...
-
Page 25: Operating El Backlight, Buzzer, And Alarm History
All manuals and user guides at all-guides.com To leave the setting mode, press ٭EXIT.٭ Operation of EL Backlight, Buzzer, and Alarm History 11.1 EL Backlight For better visibility of the LCD, the EL backlight can be switched ON or OFF by touching the LIGHT section once. When switched “ON”, the backlight will be switched on for approximately 15 seconds every time any one of the LCD sections is being touched. -
Page 26: Pc Connection
All manuals and user guides at all-guides.com alarm) -- be displayed that have reached an alarm condition since their last deletion. Here for every alarm, the time and date of appearance can be displayed by touching ٭ALARM.٭ PC Connection As an important feature in addition to the display on the Touch Screen, the Weather Station allows the read-out of all measured and displayed time and weather data in form of complete history data sets on a PC. -
Page 27: Technical Data
Heavy Weather Program. (The temperature, humudity and rain measurements are not applicable to the model WS-3512.) Prior to manual setting or reception of WWVB radio-controlled time information there will be no recording of weather history data. -
Page 28: Time Alarm
All manuals and user guides at all-guides.com data after 5 successive attempts, "- -" will be shown and the communication period will be changed to 10 min. Air pressure measuring intervals: 20 s 13.3 Time Alarm: Alarm Duration: about 120 seconds 13.4 Power Supply: Base Station:... -
Page 29: Warranty Information
La Crosse Technology, Ltd or La Crosse Technology, Ltd’s authorized service center. La Crosse Technology, Ltd will repair or replace this product, at our option and at no charge as stipulated herein, with new or reconditioned parts or products if found to be defective during the limited warranty period specified above. - Page 30 LA CROSSE TECHNOLOGY, LTD WILL NOT ASSUME LIABILITY FOR INCIDENTAL, CONSEQUENTIAL, PUNITIVE, OR OTHER SIMILAR DAMAGES ASSOCIATED WITH THE OPERATION OR MALFUNCTION OF THIS PRODUCT. THIS PRODUCT IS NOT TO BE USED FOR MEDICAL PURPOSES OR FOR PUBLIC INFORMATION.
- Page 31 This device must accept any interference received, including interference that may cause undesired operation. La Crosse Technology Made in China All rights reserved. This handbook must not be reproduced in any form, even in excerpts, or duplicated or processed using electronic, mechanical or chemical procedures without written permission of the publisher.
Need help?
Do you have a question about the WS-3512 and is the answer not in the manual?
Questions and answers