
Related Manuals for La Crosse Technology WS6890


Summary of Contents for La Crosse Technology WS6890
-
Page 1: Table Of Contents
Model: WS6890 Instructional Manual Wireless Weather Station with Bluetooth Speaker Table Of Contents Animated Color Circle Button Location Forecast Information Initial Setup Low Battery Indicator LCD Layout High/Low Values Bluetooth Operation Outdoor Sensor Signal Strength Audio Input Jack Time Signal Search... -
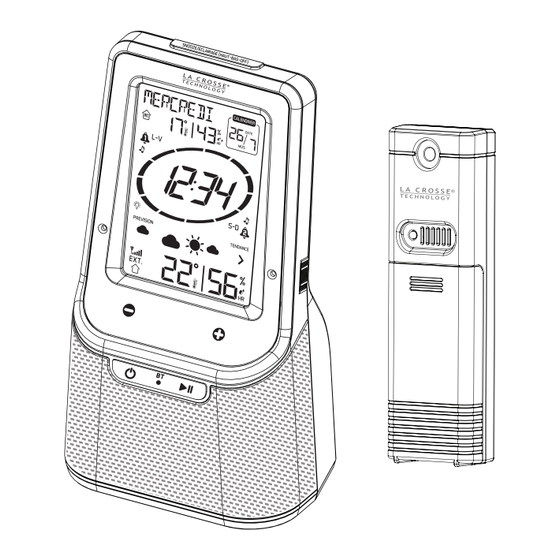
Page 2: Button Location
Button Location Front Buttons 1. Front View Snooze/Backlight SNOOZE/ECLAIRAGE rm 1 On/Off Alarm 2 On/Off Volume Buttons Front Buttons - Bluetooth Power - Play/Pause Back View Back Buttons rm 2 ALARME 2 TX/RCC Search RECHERCHE TX/RCC Settings REGLAGES Rim Light ALARME 2 ALARME 1 Audio Input... -
Page 3: Initial Setup
Outdoor Sensor Bottom View TX141TH-BV2 AC/DC Adapter Jack Button Sensor Sensor Battery Battery Battery Compartment Compartment Cover 2 “AA” LR6 Batteries 3 “AAA” LR3 Batteries Initial Setup Step 1: Insert the 5 volt AC adapter (included) into the wall outlet then into the weather station. -
Page 4: Lcd Layout
LCD Layout Rim Light Day of Alarm 1 Icons Indoor Indicator the week Temperature + Humidity Outdoor Outdoor Forecast Icons Calendar Temperature + Sensor Signal Month/Date Humidity Strength Time Icons Alarm 2 Icons Forecast Animated Color Shows when Tendency Circle signal is received Page | 3... -
Page 5: Bluetooth Operation
Bluetooth 2.1 Operation Note: connection clarity will vary Step 1: based on Apps Hold the Bluetooth Power used to play Button for a few seconds to music start syncing Step 2: Activate Bluetooth on mobile device The LED will Look for this blue alternately name: BT001 when syncing... -
Page 6: Settings
Settings 1. Hold the SETTINGS(REGLAGES) but ton on the back for three seconds to enter set mode. 2. Press the on the front to adjust the values. 3. Press the SETTINGS(REGLAGES) button to confirm adjustments and move to the next item. Note: Press the SNOOZE/BACKLIGHT(SNOOZE/ECLAIRAGE) button on the top to exit at anytime. -
Page 7: Time Alarm Settings
Time Alarm Options ( Week, L-V or Weekend) Your weather station has two separate alarms (1& 2). Each alarm has different options for alarm type, sound, and volume of alarm. Time Alarm Settings 1. Hold the ALARME 1 or ALARME 2 button to enter alarm setting mode . 2. - Page 8 Alarm Setting Order 1. Alarm Time Note: After 20 seconds with no buttons pressed, the weather 2. Alarm Type station will return to the live time display. 3. Alarm Sound Alarm Time Adjust Minutes Adjust Hour Icon Alarm Type Monday-Friday Alarm Type Weekend Only Single or Day...
-
Page 9: Activate/Deactivate Time Alarm
Activate/Deactivate Time Alarm • Slide the Alarm 1 switch on the left side, up to activate or down to deactivate. A white dot will show on the front when active. • Slide the Alarm 2 switch on the right side, up to activate or down to deactivate. Alarm 1 Alarm 2 Indicator... -
Page 10: Colored Led Rim Light
Colored LED Rim (Bottom of Weather Station) The bottom rim light of the weather station can be programmed to change color based on Weather Forecast, user selection of one color, or on a loop of all colors. Press RIM LIGHT Color HIGH/LOW/OFF LED Rim Light Button:... -
Page 11: Usb Charging Port
USB Charging Port(PORT DE CHARGE USB) Charge a smartphone, camera or other USB devices when the weather station is operated with the 5V AC adapter (included). Note: This is a power-output charging port. It ALARME 2 ALARME 1 does not supply power to the weather station . RECHERCHE INTENSITE DU CERCLE TX/RCC... -
Page 12: Forecast Information
Forecast Information Forecast icons use changing atmospheric pressure to predict weather conditions for the next 12 hours with 70-75% accuracy.When Outdoor temperature is be - low 0°C and the forecast is Rainy or Thunderstorm, the LCD will display snowy. Sunny Rainy Thunderstorm Partly Cloudy... -
Page 13: High/Low Values
View and Reset High/Low Values The station automatically resets the HIGH/LOW values daily at midnight (00:00) . • Press the HIGH/LOW(REGLAGES/ ) button to view maximum values. • In HIGH mode, hold HIGH/LOW(REGLAGES/ button for five seconds to manually reset maximum values. -
Page 14: Care And Maintenance
Care and Maintenance • Do not mix old and new batteries • Do not mix Alkaline, Standard, Lithium or Rechargeable Batteries • Always purchase the correct size and grade of battery most suitable for the intended use. • Replace all batteries of a set at the same time. •... -
Page 15: Specifications
0°C to 50°C (32°F to 122°F) • Temperature Range: Indoor • Humidity Range: 10% - 99% (RH) • Temperature Range: -40°C to 60°C (-40°F to 140°F) • Alkaline Batteries: -29°C to 60°C (-20°F to 140°F) • Lithium Range: -40°C to 60°C (-40°F to 140°F) Note: Temperatures below -29°C(- 20°F ) require Lithium Outdoor batteries in the outdoor sensor... -
Page 16: Liability Disclaimer
Liability Disclaimer •The electrical and electronic wastes contain hazardous substances. Disposal of electronic waste in wild country and/or in unauthorized grounds strongly damages the environment. •Please contact your local or/and regional authorities to retrieve the addresses of legal dumping grounds with selective collection. •All electronic instruments must from now on be recycled.
Need help?
Do you have a question about the WS6890 and is the answer not in the manual?
Questions and answers