Table of Contents
Advertisement
Quick Links
Advertisement
Table of Contents
Troubleshooting

Related Manuals for Buchi Kjel Line K-365


Summary of Contents for Buchi Kjel Line K-365
- Page 1 K-365 Kjel Line Operation Manual...
- Page 2 CH-9230 Flawil 1 E-Mail: quality@buchi.com BUCHI reserves the right to make changes to the manual as deemed necessary in the light of experience, especially with respect to structure, illustrations and technical details. This manual is copyrighted. Information from it may neither be reproduced, distributed, or used for competitive purposes, nor made available to third parties.
-
Page 3: Table Of Contents
Büchi Labortechnik AG Table of contents Table of contents About this document...................... 9 Mark-ups and symbols ...................... 9 Trademarks ........................... 9 Connected devices ........................ 9 Safety.......................... 10 Proper use ........................... 10 Use other than that intended .................... 10 Staff qualification ......................... 10 Personal protective equipment .................... 11 Warning notices in this document.................. 11 Warning and directive symbols.................... 11 Protection devices ....................... 12 Residual risks ........................ 12... - Page 4 Table of contents Büchi Labortechnik AG Installation.......................... 29 Before installation ........................ 29 Establishing electrical connections.................. 29 Securing against earthquakes ..................... 29 Installing the cooling water supply.................. 30 5.4.1 Installing a tap water supply (option) .............. 30 5.4.2 Installing the recirculating chiller on the condenser (option)........ 30 Installing the drain tubing (option) ..................
- Page 5 Büchi Labortechnik AG Table of contents Preparations for a determination .................. 52 Editing the preheating function .................... 52 Editing the priming function .................... 52 Editing the single determination .................. 52 8.3.1 Changing the name of the single determination ............. 52 8.3.2 Selecting the determination type for a single determination........ 53 8.3.3 Selecting the method for a single determination ............
- Page 6 Table of contents Büchi Labortechnik AG 8.7.4 Selecting a user...................... 72 Installing the sample tube.................... 72 Installing a receiving vessel.................... 73 8.10 Preparing the end stop for the sample tube size .............. 73 8.11 Preparing the level detection sensor (option) .............. 74 8.12 Selecting the operation mode.................... 74 8.13...
- Page 7 Büchi Labortechnik AG Table of contents Cleaning and servicing ..................... 81 10.1 Regular maintenance work.................... 82 10.2 Cleaning and servicing the sample tube................ 82 10.3 Cleaning the glass components .................. 83 10.4 Cleaning and servicing the hoses and hose connections............ 83 10.5 Cleaning and servicing the sample tube seal ..............
- Page 8 Table of contents Büchi Labortechnik AG Appendix .......................... 99 13.1 Spare parts and accessories .................... 99 13.1.1 Accessories ...................... 99 13.1.2 Splash protector spare parts ................ 100 13.1.3 Tank spare parts.................... 101 13.1.4 Condenser spare parts .................. 101 13.1.5 Titration spare parts.................... 102 13.1.6 Sample tubes......................
-
Page 9: About This Document
BÜCHI Labortechnik AG accepts no liability for damage, faults and malfunctions resulting from not following this operation manual. If you have any questions after reading this operation manual: Contact BÜCHI Labortechnik AG Customer Service. https://www.buchi.com/contact Mark-ups and symbols NOTE This symbol draws attention to useful and important information. -
Page 10: Safety
— Use of samples, which can explode or inflame (example: explosives, etc.) due to shock, friction, heat or spark formation. — Use of the instrument with other than original BUCHI glassware. Staff qualification Unqualified persons are unable to identify risks and are therefore exposed to greater dangers. -
Page 11: Personal Protective Equipment
Büchi Labortechnik AG Safety | 2 BUCHI service technicians Service technicians authorized by BUCHI have attended special training courses and are authorized by BÜCHI Labortechnik AG to carry out special servicing and repair measures. Personal protective equipment Depending on the application, hazards due to heat and/or corrosive chemicals may arise. -
Page 12: Protection Devices
Büchi Labortechnik AG 2 | Safety Symbol Meaning Wear protective gloves Wear safety goggles Fig. 1: Location of the warning and directive symbols Protection devices Fig. 2: Protection devices Protection shield Protection shield Stop button Residual risks The device has been developed and manufactured using the latest technological advances. -
Page 13: Hot Surfaces
Unauthorized modifications can effect safety and lead to accidents. Use only genuine BUCHI accessories, spare parts and consumables. Carry out technical changes only with prior written approval from BUCHI. Only allow changes to be made by BUCHI service technicians. BUCHI accepts no liability for damage, faults and malfunctions resulting from unauthorized modifications. -
Page 14: Product Description
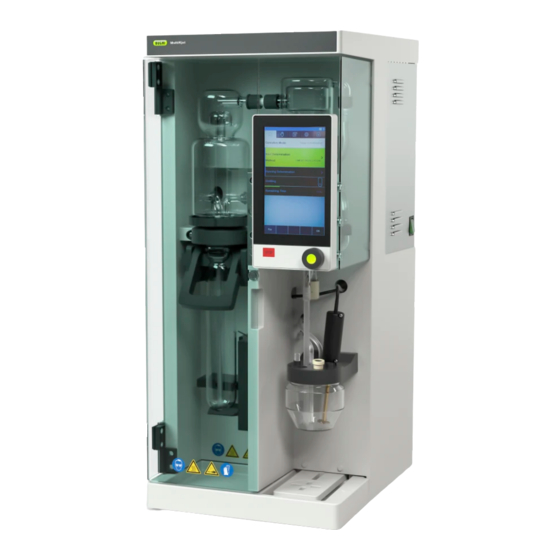
Büchi Labortechnik AG 3 | Product description Product description Description of function The instrument is suitable for determining nitro- gen using the Kjeldahl (TKN; Total Kjeldahl Nitro- gen) and Devarda methods as well as for other distillations of steam-volatile substances (e.g. of alcohol). - Page 15 Büchi Labortechnik AG Product description | 3 Fig. 3: Front view Splash protector Condenser Ventilation slots On/Off master switch Ventilation slots Receiving area See Chapter 3.2.3 "Receiving area", page 16 Sample tube Handle Interface (according to the instrument configu- ration) Operation Manual K-365 Kjel Line 15/106...
-
Page 16: Rear View
Büchi Labortechnik AG 3 | Product description 3.2.2 Rear view Fig. 4: Rear view Communication connections Ventilation slots See Chapter 3.2.4 "Communication connections", page 18 Ventilation slots Dosing pumps window Connections on the rear side Steam valve See Chapter 3.2.5 "Connections on the rear side", page 20 Cooling water out Drain connection (according to the instrument configu-... - Page 17 Büchi Labortechnik AG Product description | 3 Receiving area Fig. 5: Receiving area Rear cable duct Cable duct reaction detection sensor Condenser outlet Receiving vessel area Receiving area (MultiKjel T only) Fig. 6: Receiving area Cable duct reaction detection sensor 2 Condenser outlet tubing Rear cable duct Tubing for boric acid aspiration Boric acid dosing...
-
Page 18: Communication Connections
Büchi Labortechnik AG 3 | Product description 3.2.4 Communication connections Communication connection EasyKjel Fig. 7: Communication connections BUCHI standard communication port BUCHI standard communication port (COM) (COM) (marked COM) (marked COM) Level detection sensor port H₂O tank level sensor port (marked Level Detection) (marked H₂O) - Page 19 Büchi Labortechnik AG Product description | 3 Communication connection BasicKjel Fig. 8: Communication connection LAN port BUCHI standard communication port (COM) (marked LAN) (marked COM) BUCHI standard communication port Level detection sensor port (COM) (marked Level Detection) (marked COM) H₂O tank level sensor port Waste tank level sensor port (marked H₂O)
-
Page 20: Connections On The Rear Side
Büchi Labortechnik AG 3 | Product description Communication connection MultiKjel Fig. 9: Communication connections LAN port BUCHI standard communication port (COM) (marked LAN) (marked COM) BUCHI standard communication port BUCHI standard communication port (COM) (COM) (marked COM) (marked COM) Stirrer port... - Page 21 Büchi Labortechnik AG Product description | 3 Connections on the rear side EasyKjel The connections are located at the rear side of the instrument. See Chapter 3.2.2 "Rear view", page 16 Fig. 10: Connections on the rear side Reserve H₂O supply for steam generation Reserve Reserve Reserve...
- Page 22 Büchi Labortechnik AG 3 | Product description Connections on the rear side BasicKjel (option) The connections are located at the rear side of the instrument. See Chapter 3.2.2 "Rear view", page 16 Fig. 12: Connections on the rear side Waste pump H₂O supply for sample tube H₂O supply for steam generation Reserve Acid supply for sample tube...
- Page 23 Büchi Labortechnik AG Product description | 3 Fig. 13: Connections on the rear side Waste pump for sample tube H₂O supply for sample tube H₂O supply for steam generation Boric acid supply NaOH supply for sample tube Reserve Connections on the rear side MultiKjel T The connections are located at the rear side of the instrument.
-
Page 24: Scope Of Delivery
Büchi Labortechnik AG 3 | Product description Scope of delivery NOTE The scope of delivery depends of the configuration of the purchase order. Accessories are delivered as per the purchase order, order confirmation, and delivery note. Type plate The type plate identifies the instrument. The type plate is located at the rear of the instrument. - Page 25 Büchi Labortechnik AG Product description | 3 EasyKjel BasicKjel MultiKjel Tap water pressure 1 - 10 bar 1 - 10 bar 1 - 10 bar Tap water condition 1- 25°C 1 - 25°C 1 - 25°C (If the temperature is more than 25°C use a recirculating chiller) Tap water consumption ~ 1.2 L/min...
-
Page 26: Ambient Conditions
Büchi Labortechnik AG 3 | Product description EasyKjel BasicKjel MultiKjel Boric acid pump Sample disposal Optional Receiver disposal Optional Safety sensors Titration vessel Optional Titrator connection Optional Interface specifications Interface Interface pro EasyDist, BasicDist BasicDist (option), MultiDist Display LCD color, 4.3 in LCD color, 7.0 in Control elements Buttons / control... -
Page 27: Installation Site
Büchi Labortechnik AG Product description | 3 Component Materials of construction Plastic splash protector Glass fiber reinforced polypropylene Protective cover PMMA Sealing NaOH hose EPDM Three-way valve PP / PE 3.5.4 Installation site — The installation site meets the safety requirements. See Chapter 2 "Safety", page 10 —... -
Page 28: Transport And Storage
Büchi Labortechnik AG 4 | Transport and storage Transport and storage Transport NOTICE Risk of breakage due to incorrect transportation Make sure that the instrument is fully dismantled. Pack every instrument components properly to prevent breakage. Use the original packaging whenever possible. Avoid sharp movements during transit. -
Page 29: Installation
Risk of instrument damage because of not suitable power supply cables. Not suitable power supply cables can cause bad performance or an instrument damage Use only BUCHI power supply cables. Precondition: R The electrical installation is as specified on the type plate. -
Page 30: Installing The Cooling Water Supply
Büchi Labortechnik AG 5 | Installation Installing the cooling water supply 5.4.1 Installing a tap water supply (option) Precondition: R The tap water supply complies with the specified parameters. See Chapter 3.5 "Technical data", page 24 R Make sure that the instrument is not connected to the power supply. -
Page 31: Installing The Drain Tubing (Option)
Büchi Labortechnik AG Installation | 5 Install the drain hose to the connection marked OUT Cooling Water / Chiller on the rear of the instrument. Make sure that the hoses are not bend. Installing the drain tubing (option) Install the drain hose to the connection marked Drain. -
Page 32: Installing The Sample Waste Pump Connection (Multikjel T Only)
Büchi Labortechnik AG 5 | Installation Installing the sample waste pump connection (MultiKjel T only) Attach the waste hose to the connection marked Pump Sample Tube OUT. Secure the hose in place with a hose clip. Put the other end of the hose in a suitable collection device. -
Page 33: Installing Naoh Supply (Multikjel, Multikjel T Only)
Büchi Labortechnik AG Installation | 5 Moist the hose. Insert the inlet hose through the opening of the cap nut and the screw cap of the water tank. Submerse the inlet hose into the water. Installing NaOH supply (MultiKjel, MultiKjel T only) Install the inlet hose onto the connection marked NaOH Sample Tube IN. -
Page 34: Installing The H₂O Supply For The Sample Tube (Multikjel, Multikjel T Only)
Büchi Labortechnik AG 5 | Installation Moist the aspiration hose. Push the hoses together. Attach the hose grommet to the canister lid. Submerse the inlet hose into the H₃BO₃. 5.11 Installing the H₂O supply for the sample tube (MultiKjel, MultiKjel T only) NOTE MultiKjel only The water supply comes from one canister. -
Page 35: Installing The Level Sensor On The Canister (Option)
Büchi Labortechnik AG Installation | 5 Submerse the inlet hose into the H₂O. 5.12 Installing the level sensor on the canister (option) NOTE Do not expose the tank level sensor to an electromagnetic field in the frequency range of 2 to 10 MHz. Attach the hook-and-loop fastener sticker to the sensor. -
Page 36: Installing A Titrator With Rs232 (Multikjel Only)
Büchi Labortechnik AG 5 | Installation Connect the LAN cable to the related connection on the instrument. See Chapter 3.2 "Configuration", page 14 Specifications on the display: Precondition: R The titrator is prepared. See related manual Navigate to the specified submenu. Peripherals Titrator Model Select the specified action. -
Page 37: Installing A Dispenser (Multikjel T Only)
Büchi Labortechnik AG Installation | 5 Specifications on the display: Select the titrator model you wish to use. Tap the specified function on the function bar. SAVE ð The titrator model is saved. 5.15 Installing a dispenser (MultiKjel T only) Precondition: R The dosing unit is prepared. -
Page 38: Installing The Stirrer (Multikjel Only)
Büchi Labortechnik AG 5 | Installation Attach the metal plate to the magnetic area of the instrument. Push the cable through the rear cable duct. Connect the sensor cable to the related connection on the instrument. See Chapter 3.2 "Configuration", page 14 5.19 Installing the stirrer (MultiKjel only) Attach the stirrer to the receiving vessel. -
Page 39: Description Of The Interface
Büchi Labortechnik AG Description of the interface | 6 Description of the interface Layout of the interface Fig. 16: Interface Description Function Status bar Shows the determination name and status of the instrument. See Chapter 6.4 "Status bar interface", page 43 Menu bar Shows symbols representing the menus. -
Page 40: Function Bar Interface
Büchi Labortechnik AG 6 | Description of the interface Function bar interface The function bar shows available functions according to the current operation. The functions on the function bar are executed by tapping the relevant function buttons. Symbol Description Meaning [Back] The display reverts to the previous view. -
Page 41: Method Menu
Büchi Labortechnik AG Description of the interface | 6 Menu symbol Name Explanation — Change settings Configuration — Service menu menu — System information — View processed determinations Determination menu data 6.3.1 Home menu 6.3.2 Manual control menu The manual control menu contains the following submenus: Submenu Explanation Dose manually... - Page 42 Büchi Labortechnik AG 6 | Description of the interface Action Option Explanation [Current Time] Time input Enter in sequence: Minutes, hours. Apply the settings by pressing [Save]. Time zone Choice of time zone Select your time zone [Keyboard Layout] Choice of display key- Select the keyboard layout board on the interface [Key Tones]...
-
Page 43: Status Bar Interface
[Network] Enter value The following parameters can be edited: Device name/MAC address/DHCP/ System IP address/Subnet mask/ Gateway/DNS server/BUCHI Cloud/ Server IP address Service submenu NOTE Only super user can carry out changes in the [Service] submenu. System Information submenu Technical information about the connected devices (e.g. serial number, firmware version). - Page 44 Büchi Labortechnik AG 6 | Description of the interface View Status A tank level sensor is connected to the instru- ment. Dosing unit attached. Titration unit attached. White: A SD card is in the instrument. Red: The SD card in the instrument is in read only mode.
-
Page 45: Description Of The Interface Pro
Büchi Labortechnik AG Description of the interface pro | 7 Description of the interface pro CAUTION Risk of injury from glass splinters Sharp objects can damage the display. Keep sharp objects away from the display. Layout of the interface pro Fig. 17: Interface pro Description Function... -
Page 46: Function Bar Interface Pro
Büchi Labortechnik AG 7 | Description of the interface pro Using the navigation control Select an entry. Confirm the selected entry. Function bar interface pro The function bar shows available functions according to the current operation. The functions on the function bar are executed by tapping the relevant function buttons. -
Page 47: Menu Bar Interface Pro
Büchi Labortechnik AG Description of the interface pro | 7 Menu bar interface pro Menu Name Explanation symbol — Process control parameters menu Home — Start various processes manually Manual control menu — Editing and saving: menu Process ◦ Methods ◦... - Page 48 Büchi Labortechnik AG 7 | Description of the interface pro Submenu Explanation [Preheating] See Chapter 8.1 "Editing the preheating function", page 52 [Priming] See Chapter 8.2 "Editing the priming function", page 52 [Cleaning] See Chapter 10.3 "Cleaning the glass components", page 83 [Stirring] See Chapter 8.15 "Changing the stirring speed manually", page 76 [Pump Calibration] See Chapter 10.14 "Calibrating the pumps", page 85 7.3.3...
- Page 49 Büchi Labortechnik AG Description of the interface pro | 7 Action Option Explanation [Default Amount Select value The following values are selectable: Unit] g, mL [MaxAccuracy On / Off Compensation of the steam power Mode] caused by voltage fluctuations. [AutoDist Mode] On/Off Conditioning and distillation are per- formed automatically.
-
Page 50: Status Bar Interface Pro
Büchi Labortechnik AG 7 | Description of the interface pro Network submenu Action Option Explanation [Network] Enter value The following parameters can be edited: Device name/DHCP/MAC address/ System IP address/Subnet mask/ Gateway Service submenu NOTE Only super user can carry out changes in the [Service] submenu. System Information submenu Technical information about the connected devices (e.g. - Page 51 Büchi Labortechnik AG Description of the interface pro | 7 View Status A recirculating chiller is connected. Operation Manual K-365 Kjel Line 51/106...
-
Page 52: Preparations For A Determination
Büchi Labortechnik AG 8 | Preparations for a determination Preparations for a determination Editing the preheating function The preheating function defines how long the instrument parts are conditioned with steam. Specifications on the display: Navigate to the specified submenu. Preheating Select the preheating function for which you want to change the preheating time. -
Page 53: Selecting The Determination Type For A Single Determination
Büchi Labortechnik AG Preparations for a determination | 8 Specifications on the display: Select the specified action. Determination Name EDIT Tap the specified function on the function bar. Enter the name for the single determination. Tap the specified function on the function bar. SAVE ð... -
Page 54: Changing The Sample Quantity For Single Determination
Büchi Labortechnik AG 8 | Preparations for a determination Specifications on the display: Tap the specified function on the function bar. SAVE 8.3.4 Changing the sample quantity for single determination Specifications on the display: Precondition: R The determination type is set to [Sample]. See Chapter 8.3.2 "Selecting the determination Single Determination type for a single determination", page 53... -
Page 55: Editing A Series
Büchi Labortechnik AG Preparations for a determination | 8 Editing a series 8.4.1 Creating a new series There are two possibilities to create new series: — Chapter "Creating a new series", page 55 — Chapter "Creating a new series from a template", page 55 Creating a new series Specifications on the display: Navigate to the specified submenu. -
Page 56: Adding A Determination To A Series
Büchi Labortechnik AG 8 | Preparations for a determination 8.4.3 Adding a determination to a series Add the first determination to a series Specifications on the display: Navigate to the specified submenu. Series Select the series you wish to edit. Tap the specified function on the function bar. -
Page 57: Selecting The Determination Type Within A Series
Büchi Labortechnik AG Preparations for a determination | 8 Specifications on the display: Select the series you wish to edit. Select the determination you wish to edit. Select the specified action. Determination Name EDIT Tap the specified function on the function bar. Enter the name for the single determination. -
Page 58: Selecting The Method For A Determination Within A Series
Büchi Labortechnik AG 8 | Preparations for a determination 8.4.7 Selecting the method for a determination within a series Specifications on the display: Navigate to the specified submenu. Series Select the series you wish to edit. Select the determination you wish to edit. Select the specified action. -
Page 59: Editing A Template
Büchi Labortechnik AG Preparations for a determination | 8 Unit Explanation [ml] Enter the weight for the determination in mL. See Chapter 8.3.4 "Changing the sample quantity for single determination", page 54 Specifications on the display: Precondition: R The determination type is set to [Sample] or [Reference Substance]. -
Page 60: Changing The Name Of A Template
Büchi Labortechnik AG 8 | Preparations for a determination Creating a new template Specifications on the display: Navigate to the specified submenu. Templates Tap the specified function on the function bar. ð The template is created. 8.5.2 Changing the name of a template Specifications on the display: Navigate to the specified submenu. -
Page 61: Changing The Name Of A Method
Büchi Labortechnik AG Preparations for a determination | 8 Specifications on the display: Navigate to the specified submenu. Methods Select a method you wish to delete. Tap the specified function on the function bar. DELETE Confirm the secure question. ð The method is deleted. 8.6.3 Changing the name of a method Specifications on the display:... -
Page 62: Changing The H₂O Volume For A Method (Multikjel Only)
Büchi Labortechnik AG 8 | Preparations for a determination Specifications on the display: Select the method that you wish to edit. Select the specified action. Reaction Detection EDIT Tap the specified function on the function bar. ð The status is changed. 8.6.5 Changing the H₂O volume for a method (MultiKjel only) NOTE... -
Page 63: Changing The Naoh Volume For A Method (Multikjel Only)
Büchi Labortechnik AG Preparations for a determination | 8 Specifications on the display: Select the specified action. H₂SO₄ for Digest. EDIT Tap the specified function on the function bar. Enter the quantity of the sulfuric acid. Tap the specified function on the function bar. SAVE ð... -
Page 64: Changing The Reaction Time For A Method (Basickjel, Multikjel Only)
Büchi Labortechnik AG 8 | Preparations for a determination Specifications on the display: Select the specified action. Acid Volume EDIT Tap the specified function on the function bar. Enter the quantity for the dosing. Tap the specified function on the function bar. SAVE ð... -
Page 65: Changing The Time A Steam Step Is Carried Out For A Method
Büchi Labortechnik AG Preparations for a determination | 8 Selection Explanation Steam power in % selectable. See Chapter 8.6.12 "Changing the steam power for a method", page 66 and Duration time of the steam step selectable. See Chapter 8.6.11 "Chang- ing the time a steam step is carried out for a method", page 65 Specifications on the display: Navigate to the specified submenu. -
Page 66: Changing The Steam Power For A Method
Büchi Labortechnik AG 8 | Preparations for a determination Specifications on the display: EDIT Tap the specified function on the function bar. Enter the time for the steam step. Tap the specified function on the function bar. SAVE ð The time for the steam step is saved. 8.6.12 Changing the steam power for a method The steam power in % during a steam step. -
Page 67: Changing The Distillation Time For A Method
Büchi Labortechnik AG Preparations for a determination | 8 Specifications on the display: Select the specified action. Level Detection EDIT Tap the specified function on the function bar. ð The status changed. 8.6.14 Changing the distillation time for a method Enter manually the time for the determination. -
Page 68: Changing The Titration Type For A Method (Multikjel T Only)
Büchi Labortechnik AG 8 | Preparations for a determination 8.6.16 Changing the titration type for a method (MultiKjel T only) Titration type Explanation [None] No titration [Boric Acid Titration] Titration [Back Titration] Back titration Specifications on the display: Navigate to the specified submenu. Methods Select the method that you wish to edit. -
Page 69: Changing The Dosing Unit Volume For A Method (Multikjel T Only)
Büchi Labortechnik AG Preparations for a determination | 8 8.6.18 Changing the dosing unit volume for a method (MultiKjel T only) NOTE The availability depends on the selected titration type. Specifications on the display: Navigate to the specified submenu. Methods Select the method that you wish to edit. -
Page 70: Changing The Aspiration Time For The Sample Tube For A Method (Basickjel, Multikjel, Multikjel T Only)
Büchi Labortechnik AG 8 | Preparations for a determination Specifications on the display: Navigate to the specified submenu. Methods Select the method that you wish to edit. Select the specified action. Titration Start Time EDIT Tap the specified function on the function bar. Enter a value for the titration start time. -
Page 71: Editing User Setting
Büchi Labortechnik AG Preparations for a determination | 8 Specifications on the display: EDIT Tap the specified function on the function bar. Enter a value for the aspiration time. Tap the specified function on the function bar. SAVE ð The aspiration time is saved. Editing user setting NOTE The user [Service User] is a default user and password protected. -
Page 72: Changing The Name Of A User
Büchi Labortechnik AG 8 | Preparations for a determination 8.7.3 Changing the name of a user Specifications on the display: Navigate to the specified submenu. User Administration Select the user that you wish to edit. EDIT Tap the specified function on the function bar. Enter a new name for the user. -
Page 73: Installing A Receiving Vessel
Büchi Labortechnik AG Preparations for a determination | 8 Insert the sample tube. Apply a light force to push the sample tube against the end stop and the sample tube sealing. Secure the sample tube in place with the handle. Installing a receiving vessel Insert the sample receiving vessel to the instrument. -
Page 74: Preparing The Level Detection Sensor (Option)
Büchi Labortechnik AG 8 | Preparations for a determination 8.11 Preparing the level detection sensor (option) Precondition: R The installations for the level sensor are completed. See Chapter 5.18 "Installing the level detection sensor (option)", page 37 Attach the magnetic level sensor to the metal plate. -
Page 75: Dosing Naoh Manually
Büchi Labortechnik AG Preparations for a determination | 8 Specifications on the display: Precondition: R A sample tube is installed. See Chapter 8.8 "Installing the sample tube", page 72 Navigate to the specified menu. Tap the specified button. H₂O ð The pump applies a defined quantity of H₂O. 8.13.2 Dosing NaOH manually NOTE The quantity of liquid per keystroke can be changed in the [Settings] submenu. -
Page 76: Aspirating The Receiving Vessel Manually
Büchi Labortechnik AG 8 | Preparations for a determination Specifications on the display: Tap the specified button. [Sample Tube Aspiration] ð The pump aspirates liquid from the sample tube. 8.14.2 Aspirating the receiving vessel manually NOTE The aspiration time per keystroke can be changed in the submenu. - Page 77 Büchi Labortechnik AG Preparations for a determination | 8 Operation Manual K-365 Kjel Line 77/106...
-
Page 78: Carrying Out A Determination
Büchi Labortechnik AG 9 | Carrying out a determination Carrying out a determination Preparing the instrument Navigation path ➔ Precondition: R All commissioning operations have been completed. See Chapter 5 "Installation", page 29 Set the On/Off master switch to On. ð The instrument is starting up. Make sure that no defective sealings or glass parts are used. -
Page 79: Ending A Determination
Büchi Labortechnik AG Carrying out a determination | 9 Ending a determination Navigation path ➔ Precondition: R The display shows the dialog. Finished Confirm the message on the dialog. Shutting down the instrument Precondition: R The extraction process has ended. Shut down the connected instruments (MultiKjel only). -
Page 80: Deleting All Determination Data
Büchi Labortechnik AG 9 | Carrying out a determination Specifications on the display: Tap the specified function on the function bar. DELETE Confirm the secure question. ð The determination data is deleted. 9.7.2 Deleting all determination data Specifications on the display: Navigate to the specified menu. -
Page 81: Cleaning And Servicing
Any servicing and repair work which involves opening up the casing may only be carried out by BUCHI service technicians. Use only genuine BUCHI consumables and spare parts in order to ensure correct operation of the device and preserve the warranty. -
Page 82: Regular Maintenance Work
Büchi Labortechnik AG 10 | Cleaning and servicing 10.1 Regular maintenance work Action Additional information 10.2 Cleaning and servicing the Carry out this action before sample tube every instrument use. 10.3 Cleaning the glass compo- Carry out this action after nents every instrument use. -
Page 83: Cleaning The Glass Components
Büchi Labortechnik AG Cleaning and servicing | 10 Cleaning If cleaning with a dishwashing machine: Make sure, that there is no contact with other glassware. Storage (e.g. drawer) Prevent rolling and small hits. ð This can cause hair cracks which may lead to breakages. 10.3 Cleaning the glass components The following values for the cleaning can be adjusted (the list differs according to the... -
Page 84: Cleaning And Servicing The Splash Protector
Check the pump connectors in the dosing pump window for: — Leakages — Crystallization If necessary, contact BUCHI customer service. 10.12 Cleaning and servicing the condenser Decalcification solution: 160 g citric acid or 80 g amidosulfuric acid dissolved in 0.8 L water. -
Page 85: Cleaning And Servicing The Steam Generator
Büchi Labortechnik AG Cleaning and servicing | 10 Check if the inside of the coil is showing condensation droplets. ð If droplets appear: — Flush the condenser coil through the condensate expansion vessel with an 1% hydrochloric acid. — Flush the condenser coil through the condensate expansion vessel with water and water/ethanol mixture. -
Page 86: Calibrating The Acid Pump
Büchi Labortechnik AG 10 | Cleaning and servicing 10.14. Calibrating the acid pump Specifications on the display: Precondition: R A sample tube is installed. See Chapter 8.9 "Installing a receiving vessel", page 73 Pump Calibration Navigate to the specified submenu. Select the specified action. Acid Tap the specified function on the function bar. -
Page 87: Calibrating The H₃Bo₃ Pump
Büchi Labortechnik AG Cleaning and servicing | 10 10.14. Calibrating the H₃BO₃ Pump Specifications on the display: Precondition: R A receiving vessel is installed. See Chapter 8.9 "Installing a receiving vessel", page 73 Pump Calibration Navigate to the specified submenu. H₃BO₃ Select the specified action. Nominal Volume EDIT Tap the specified function on the function bar. -
Page 88: Replacing The Splash Protector
Büchi Labortechnik AG 10 | Cleaning and servicing Remove the decalcification solution from the instrument. See Chapter 12.4 "Removing water from the steam generator", page 98 Do steps (5) thru (10) again. Install the H₂O supply for steam generation. Set the On/Off master switch to On. Press the [READY] button on the function bar. -
Page 89: Replacing The Condenser
Büchi Labortechnik AG Cleaning and servicing | 10 10.17 Replacing the condenser NOTE Installing is done in reverse sequence. Remove the protection shield. See Chapter 10.18 "Attaching and removing the protection shield", page 89 Loosen the cap nut at the condenser. Remove the cooling water hoses. Remove the rubber band. -
Page 90: Attaching The Protection Shield
Büchi Labortechnik AG 10 | Cleaning and servicing 10.18. Attaching the protection shield Attach the protection shield onto the instrument. 10.19 Cleaning the drip tray Pull the drip tray. Rinse the trip tray with water. 10.20 Rinsing a pump Precondition: R A sample tube is installed. - Page 91 Büchi Labortechnik AG Cleaning and servicing | 10 Open the splash protector nut. Remove the splash protector. Remove the seal. Operation Manual K-365 Kjel Line 91/106...
-
Page 92: Help With Faults
False ratio of H to catalyst. Use KjelOptimizer software digestion to optimize the digestion (download available on BUCHI website). Digestion time too long. Decrease digestion time. Compare to conditions to similar applications. Suction capacity of scrubber Lower the suction capacity too strong. -
Page 93: Troubleshooting Distillation
Büchi Labortechnik AG Help with faults | 11 Problem Possible cause Action Samples do not get Air in NaOH hose. Flush the system. See dark blue/brown af- Chapter 8.13 "Dosing ter addition of manually", page 74 NaOH No catalyst used for digestion (only H or Kjeldahl tablets ECO). - Page 94 Use different Kjeldahl tablet. The H₂SO₄ volume is too low. Use KjelOptimizer software to optimize the digestion (download available on BUCHI website). Kjeldahl Tablets and H₂SO₄ in Correct ratio of Kjeldahl wrong ratio. Tablets and H₂SO₄. Use KjelOptimizer software...
-
Page 95: Troubleshooting Instrument
See Chapter 5.2 "Establishing electrical connections", page 29 The power supply cable is de- Replace the power supply fect. cable. The fuse was triggered. Reset the fuse The switch is defect. Contact BUCHI Customer Service. Operation Manual K-365 Kjel Line 95/106... - Page 96 Display is black The connection between in- Check the connection cable strument and display is inter- from the instrument to the rupted. display. Contact BUCHI Customer Service. No cooling water The cooling water supply is Make sure, that the hoses flow blocked.
-
Page 97: Turning The Splash Protector Nut
Büchi Labortechnik AG Help with faults | 11 11.4 Turning the splash protector nut Turn the splash protector nut. Operation Manual K-365 Kjel Line 97/106... -
Page 98: Taking Out Of Service And Disposal
Chapter 3.5 "Technical data", page 24 12.3 Returning the instrument Before returning the instrument, contact the BÜCHI Labortechnik AG Service Department. https://www.buchi.com/contact 12.4 Removing water from the steam generator Precondition: R The On / Off master switch is set to Off. -
Page 99: Appendix
StatusLight cpl., incl. communication cable 11068959 Indicates the status of the instrument (instrument is ready to use, has an error or is in operation). BUCHI Bluetooth® Dongle, connects instrument 11067770 to smartphone via Bluetooth® Adapter for 3rd party sample tubes... -
Page 100: Splash Protector Spare Parts
Büchi Labortechnik AG 13 | Appendix Order no. Image Cyanide caps 11067871 Caps for hermetical closing of all types of Kjeldahl sample tubes during sample preparation for cyanide in food Communication cableRJ45, 2 m 044989 Connection between vacuum controller/interface and recir- culating chiller, vacuum controller/interface and vacuum pump or steam distillation unit and Eco titrator. -
Page 101: Tank Spare Parts
Büchi Labortechnik AG Appendix | 13 Order no. Image Cap nut GL14 033577 Hose barbs. set. 4 pcs, straight, GL14, FPM seal 040296 Content: Hose barbs, cap nuts, seals. Seals, set. 10 pcs, for hose barbs GL14, 040040 FPM, green 13.1.3 Tank spare parts Order no. -
Page 102: Titration Spare Parts
Büchi Labortechnik AG 13 | Appendix Order no. Image Dist. Outlet PTFE L=300 11071940 13.1.5 Titration spare parts Order no. Image Receiving vessel 043390 Stirrer cpl. 11070246 pH electrode (refillable electrolyte) 11065834 pH Electrode 11056842 Clamp cone pH-electrode 11069793 Hose Tygon Ø 8.0 x 4.8 043364 Receiving support 11071003... -
Page 103: Sample Tubes
Büchi Labortechnik AG Appendix | 13 13.1.6 Sample tubes Order no. Image Sample tubes micro (100 mL) 11057442 4 pcs. Sample tubes 300 mL 11059690 20 pcs. Sample tubes 300 mL 037377 For sample volumes up to 200 mL or 5 g in weight 4 pcs. -
Page 104: Other Spare Parts
Büchi Labortechnik AG 13 | Appendix 13.1.8 Other spare parts Order no. Image Cap RJ-45 cap 11055949 USB cover 11069375 Level sensor capacitive 11065245 Tank level sensor (Velcro point) 11070517 Tank level sensor (Velcro strap) 11070516 Silicone hose D6/9 L=3 m 048355 Collecting pan 11066465... -
Page 105: Documentation
Büchi Labortechnik AG Appendix | 13 Order no. Upgrade Multi base unit with titration vessel 11CSN12160 Upgrade MultiKjel to MultiDist 11CSN12161 13.1.1 Documentation Order no. IQ/OQ Kit Kjel Line 11073604 Repeating OQ Kjel Line 11073605 Kjeldahl Knowledge Base (EN) 11595478 Comprehensive guide covering all aspects of the theoretical and practical know- how. - Page 106 T +971 4 313 2860 T +52 55 9001 5386 F +66 2 862 08 54 F +971 4 313 2861 latinoamerica@buchi.com bacc@buchi.com middleeast@buchi.com www.buchi.com/es-es www.buchi.com/th-th www.buchi.com We are represented by more than 100 distribution partners worldwide. Find your local representative at: www.buchi.com...
Need help?
Do you have a question about the Kjel Line K-365 and is the answer not in the manual?
Questions and answers