
Related Manuals for WANHAO CGR Mini Mono


Summary of Contents for WANHAO CGR Mini Mono
- Page 1 Monochrome you can C.G.R Mini WANHAO USER MANUAL Like the printing speed of lightning...
-
Page 2: Table Of Contents
CONTENTS Important Warranty Details Technical Specifications Product Overview A Safety Instructions B Congratulations Working Principles of DLP 3D Printers C Electrical Power Repair Recommendations Disposal Instructions D Useful Tips Contents of Tool Kit Recommended Tools Computer Minimum Requirements E Getting Started Software Installation And Configuration USB Memory Stick Printing WiFi Printing... -
Page 3: Important
Read this manual carefully You will be able to set up with ease Visit our website for tutorial videos and guides www.wanhao3dprinter.com Join Wanhao Google forum for online support https://groups.google.com/forum/#!forum/wanhao-printer-3d Google Forum Email us! We’re always happy to hear from you Technical support: support3@wanhao3dprinter.com... -
Page 4: Warranty Details
People’s Republic of China. In case you purchase from WANHAO distributor, your warranty shall be covered by the distributor’s warranty and honored by WANHAO distributor as well. -
Page 5: Technical Specifications
TECHNICAL SPECIFICATIONS CGR Mini Mono Technical Specifications Table Machine Type DLP (Digital Light Processing) 3D Printer Extruder System 405-410nm Wavelength UV Lamp Enclosure Type Tilt Hood with Transparent Cover UV Safe Max printable area 130.56(L)*82.62(W)*200(H) mm Software Chitu UV Type... -
Page 6: Product Overview
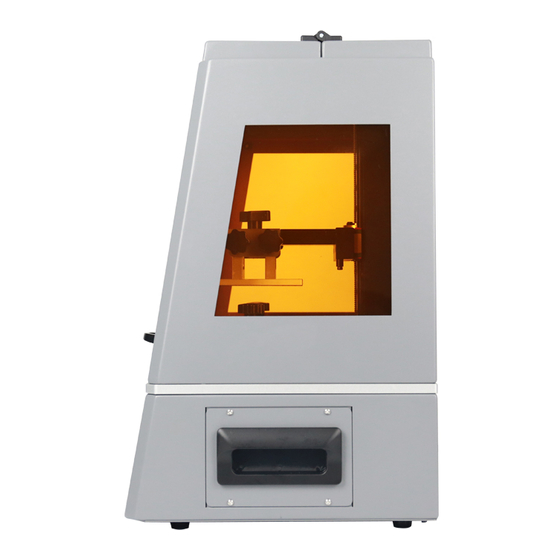
PRODUCT OVERVIEW 1. Gray Anti Wobble Cover Super Flat, Re-usable Vat 2. Aluminum Super Flat Build Plate 5. Touch Screen 3. Z Axis Rail 6. USB Slot AFTER SALES SUPPORT 86-571-63379578 support3@wanhao3dprinter.com... - Page 7 PRODUCT OVERVIEW 7. Power Switch 9. Cooling Fan 8. Plug Socket 10. Portable grip AFTER SALES SUPPORT 86-571-63379578 support3@wanhao3dprinter.com...
-
Page 8: A Safety Instructions
Before you get started, please read these safety instructions. CAUTION : WANHAO 3D Printers include moving parts that can cause injury. Never reach inside the WANHAO 3D Printer while it is in operation, and allow time for the printer to cool down after operation. -
Page 9: B Congratulations
CONGRATULATIONS You have just purchased a new and innovative Direct UV-Light Printing (DLP) technology based 3D printer. The direct UV method of printing uses LCD display panel as a matrix of pixels that hardens the liquid in the resin vat with the light from the UV light source. UV-LED ' s at the bottom is used as background lighting. -
Page 10: C Electrical Power
Product exhibits distinct changes in performance that indicates malfunction. Product does not operate normally after following operating instructions. Disposal Instructions Do not dispose of this printer as regular waste. Please minimize pollution to the environment and recycle or return to WANHAO for recycling. AFTER SALES SUPPORT 86-571-63379578 support3@wanhao3dprinter.com... -
Page 11: D Useful Tips
USEFUL TIPS Have adult supervision present when printer is operated by a minor. The resin is a skin and eye irritant. Always wear gloves when coming into contact with the liquid resin. Operate the printer on a stable and level surface, preferably away from direct ambient light. - Page 12 USB PRINTING AND LAN PRINTING There are 2 ways to print through CGR 4K 8.9” Monochrome printer. You are able to slice the file through your computer and print the file by USB flash disk. Or you are able to slice in software Chitu and transfer the data through LAN to your printer and print.
- Page 13 In the Slicing process you can see the printing time Insert the USB and PRINT and other information about the model. You can also slide Copy the sliced .ctb file into USB disk. the slider to up and down and see the layers of the model Insert the disk into the printer.
-
Page 14: Printer Preparation
PRINTER PREPARATION 5.1 Plug the power cord and turn on the printer. Printer shall start to boot and access to home screen. Click the Tool -- Detection -- on the touching screen. The test icon shall project on the printing display. 5.3 Loosen the knob on the building board. - Page 15 5.4 Place a piece of paper on the LCD screen. Then go back to the z-axis and move z-home by clicking on it. 5.5 Please drag the A4 paper back and forth until you can feel the obvious resistance between the building plate and screen which means the building plate is fine leveled. In case still too much distance, you may need to click and to lower or raise the building plate for obvious friction from the dragging paper.
- Page 16 5.6 You need to lift the printing platform.Install the VAT onto the printer. Make sure the 2 locking screw well secure the VAT from moving up and down. 5.7 You need to lift the printing platform.Install the VAT onto the printer. Make sure the 2 locking screw well secure the VAT from moving up and down.
- Page 17 POST PROCESSING 6.0 Place the platform to a washing-up bowl. Remove the objects by sliding the scraper in at their base.Wash off any liquid polymer in alcohol container. You can gently clean it with a soft brush or sponge,take care not to damage it, it will not achieve full hardness until after post exposing in light.
-
Page 18: F Cleaning The Printer And Printed Objects
CLEANING THE PRINTER AND PRINTED OBJECTS Follow these steps to minimize spilling resin so that your machine stays clean. 1. Ensure the base of your object is clear of the vat by moving the print platform up sufficiently. Remove the hood of the print platform and tilt the platform backwards to allow excess resin to drip back into the resin vat. -
Page 19: G Chitu Software Detailed Guide
CHITU SOFTWARE DETAILED GUIDE System Compatibility Chitu is compatible with Windows and Mac operating systems. Key Buttons on the Main Screen Open File:Click to open new files, including .STL, .OBJ, .Zip files. Save File: Click to save the current object as .ctb file. Using a .STL file will allow you to prepare a scene template with supports and positioning that can be printed repeatedly in the future. -
Page 20: Loading A Model
1. Loading a Model Click on “Open File” button and select a file in the following formats: .STL, .OBJ, .Zip. 2. Actions in Scene View Selecting your model Select by clicking on the model or clicking on the File List on the right panel. -
Page 21: Cloning Your Mode
Cloning your model Click on “Load Current Model” and the cloned object will appear in the scene view. 3. Actions in Tool Bar Moving, rotating and mirroring your model. Move: This function allows you “Put on the plate”: This button move your object along the will position the bottom of the X,Y,Z axis through entering in the... -
Page 22: Scaling Objects
4. Scaling objects A model can be scaled (reduced or increased) by selecting it, and using the ‘Scale’ view to enter in a new scaler value. Press the tick button to re-scale your object. 5. Rotating Objects A model can be scaled (reduced or increased) by selecting it, and using the ‘Scale’... -
Page 23: Working With Model Support Tools
8. Working with Model Support tools Using Supports Supports are sometime required to properly attach a model to the build space. Because of the nature of DPP the lower layers must be supported by the supports unless it has a wide surface in the first layers. Adding a single Support A single support can be generated by clicking the manual support button/ Angled Supports... -
Page 24: Slice View
9.Slice view In the Slice View screen we get the following information: You can see the printing time and other information about the model. You can also slide the slider to up and down and see the layers of the model you are going to print. 10.Save files Click on “Export”... -
Page 25: Save A Scene
11. Save a Scene Save File: Click this to save the current object as a .STL file. The .STL format can be used as a template for repeated use with supports and positioning information pre-loaded. After models have been loaded and manipulated on the build platform, the entire scene settings can be save in the .STL model for future use in creating scenes with supports, slicing scenes, and loading without needing to re- slice the object. -
Page 26: Repair And Refurbished Goods Or Parts Notice
WANHAO’s stringent quality specifications. If at any time you are unsatisfied with how your repair is handled, you may escalate your complaint to WANHAO. Please contact us via: Phone: +86-571-2329-0996 (Hours: Mon to Sat from 8:30 AM to 5:00 PM CST China Time) Mail: HANGZHOU BEAN 3D TECHNOLOGY CO.,LTD... - Page 27 Monochrome C.G.R Mini Powered by WANHAO REV1.2...
Need help?
Do you have a question about the CGR Mini Mono and is the answer not in the manual?
Questions and answers