Fermax Duox Plus Veo XS Wifi Installer Manual
Monitor with memory
Hide thumbs
Also See for Duox Plus Veo XS Wifi:
- Quick start manual (44 pages) ,
- Quick start manual (33 pages) ,
- Quick start manual (33 pages)

Related Manuals for Fermax Duox Plus Veo XS Wifi


Summary of Contents for Fermax Duox Plus Veo XS Wifi
- Page 1 Monitor Veo XS wifi Duox Plus con memoria Duox Plus Wifi Veo XS Monitor with memory MANUAL DE INSTALADOR INSTALLER’S MANUAL...
- Page 2 Publicación técnica de carácter informativo editada por FERMAX ELECTRÓNICA S.A.U. FERMAX ELECTRÓNICA, en su política de mejora constante, se reserva el derecho a modificar el contenido de este documento así como las características de los productos que en él se refieren en cualquier momento y sin previo aviso.
-
Page 3: Table Of Contents
ÍNDICE INTRODUCCIÓN INSTALACIÓN -Instalación monitor -Conexiones CARACTERÍSTICAS TÉCNICAS DESCRIPCIÓN DE PRODUCTO - Botones - Leds PROGRAMACIÓN 1. Acceder a menú de administrador y de usuario 2. Botones de navegación y pulsadores del monitor 3. Menu administrador 1. Programacion dirección monitor 2. -
Page 4: Introducción
El monitor VEO XS WIFI DUOX PLUS PLUS permite acceder a nuevos servicios ofrecidos por Fermax a través de su propia nube. Para acceder a dichos servicios, como es el caso de desvío de llamada a móvil o tablet, es necesario que el monitor se encuentre emparejado. -
Page 5: Instalación
INSTALACIÓN INSTALACIÓN MONITOR Conector Cableado en superficie Para instalaciones no empotradas, el conector dispone de dos canales para guiar los cables hasta la regleta de conexión desde suelo o techo. Dos de los tabiques marcados deben eliminarse mediante un alicate de corte para permitir el acceso de los cables desde la cara inferior o superior del conector. -
Page 6: Conexiones
Desmontaje monitor a) Instalado en la pared El conector está diseñado para desmontar el monitor sin necesidad de herramienta alguna. Para ello, basta con tirar de las esquinas inferiores en dirección perpendicular a la pared hasta desbloquear los engarces y alcanzar un ángulo con la pared de 10 grados mínimo. - Page 7 Conectores Monitor: Bin,Bin: Datos, audio y video entrada. Bout,Bout: Datos, audio y video entrada (para conexión en cascada). T, -: Pulsador de llamada puerta vivienda (P1). A+, -: Posibilidad conexión siguientes equipos: • Prolongador de llamada ref. 2040. • Activador de Luces y timbres ref. 2438. Función adicional.
-
Page 8: Características Técnicas
AMPLIACIONES: Activador de luces y timbres Ref. 2438 Ref. 2438 ACTIVADOR DE LUCES ADS REF. 2438 ADS LIGHT COMMANDER Max. 2A 110-240Vac 50-60Hz +A -A F1 2A +A F1 110-240Vac 110-240Vac CARACTERÍSTICAS TÉCNICAS Alimentación (sin polaridad) 18 - 24 Vdc Consumo Consumo en reposo (emparejado y conectado) 1,3 W... -
Page 9: Descripción De Producto
DESCRIPCIÓN DE PRODUCTO Monitor VEO XS WIFI Potenciómetro Botones Leds Bucle inductivo. Viene identificado con esta etiqueta (según modelo). · Incluye un bucle que interactúa con los dispositivos de audición de personas con discapacidad auditiva. Nota: En dispositivos de audición con selección manual de modo, debe estar configurado el Modo Digital. -
Page 10: Leds
Botón Menú. · Para acceder a: - Menú de Programación, se accede cuando el monitor no está programado. Desde este menú, se puede realizar la programación del monitor según necesidades de la instalación. - Menú de Usuario, (una vez programado el monitor). Desde este menú, se puede acceder a los ajustes de usuario para su personalización. -
Page 11: Programación
PROGRAMACIÓN: 1. PROGRAMACIÓN: ACCEDER A MENÚ DE ADMINISTRADOR Y DE USUARIO _ _ : _ _ _ _ : _ _ Pantalla: Menú ADMINISTRADOR Pantalla: Menú USUARIO Los iconos de bucle inductivo, doormatic y no molestar cambiarán dependiendo de si están activados/desactivados. -
Page 12: Botones De Navegación Y Pulsadores Del Monitor
Para acceder al Menú de Administrador cuando el monitor está programado se deben realizar dos pasos: 1. Pulsar el botón MENÚ, se accede a la pantalla del Menú de Usuario. _ _ : _ _ _ _ : _ _ 2. -
Page 13: Menu Administrador
3. PROGRAMACIÓN: Pantalla MENÚ ADMINISTRADOR Existen varias opciones: 1. Programación de la dirección del Monitor. 2. Bucle inductivo. 3. Doormatic. 4. Reset de parámetros. 5. Acerca de. 6. Modo de conversación 3.1 MENÚ ADMINISTRADOR: PROGRAMACIÓN dirección monitor ¡El monitor no funcionará mientras no haya sido programado! Nota: El led azul parpadeando muy lento indica que el monitor está... - Page 14 b) Desde Placa. Opción seleccionada mediante la línea blanca abajo del icono. Pulsar , se escucha un bip en el monitor. Automáticamente el monitor se conecta con la placa de calle activando la cámara. Introducir desde la placa el código de llamada para ese monitor. Dependiendo del tipo de placa instalada: •...
- Page 15 Notas: - El tiempo desde que se escucha el bip de confirmación de entrada en programación del monitor y se produce la llamada desde la placa para programar la dirección del monitor, debe ser inferior a 2 minutos y medio. - La placa desde la que se realiza la programación debe estar como placa máster.
-
Page 16: Menu Usuario
3.5 MENÚ ADMINISTRADOR: ACERCA DE En pantalla se muestra un código QR que permite acceder a la documentación completa del monitor. 3.6 MENÚ ADMINISTRADOR: MODO DE CONVERSACIÓN Dentro del menú de administrador se puede seleccionar entre modo Simplex y Manos Libres. - Page 17 4.1 MENÚ USUARIO: AJUSTE DE VOLUMEN DEL MONITOR Es posible ajustar el volumen de melodía en un rango de diez posibles valores. _ _ : _ _ _ _ : _ _ En primer lugar se muestra y se escucha el volumen actual que podrá...
- Page 18 4.4 MENÚ USUARIO: FUNCIÓN F2 La función F2 envía un comando de activación para poder activar un dispositivo auxiliar. En la pantalla se notificará la acción: F2 ON durante 3 segundos. Esta función está en la pantalla principal del menú de usuario. Se envía por el bus el comando F2 incluyendo la dirección del monitor para activar el dispositivo auxiliar conectado al bus como por ejemplo un relé...
- Page 19 4.5.1 Ajustes parámetros de usuario: SELECCIÓN DE MELODÍAS El monitor permite seleccionar una melodía independiente para las placas y para la conserjería. Las placas son: - Placa 0 del Bloque del monitor. - Placa 1 del Bloque del monitor. - Placa 0 de la Entrada General. Permite asignar entre 5 tonos diferentes de melodías.
- Page 20 Placa 0 de la Entrada General Seleccionando esta opción se puede Una vez seleccionada la opción, muestra cambiar la melodía que se escuchará en y se escucha la melodía actual, pulsando el monitor cuando se realice una llamada el botón + o - se pueden ir seleccionando desde la placa de la calle 0 de la entrada y escuchando las diferentes melodías general.
- Page 21 Así mismo podría obligar a colocar junto a la placa de calle un cartel indicando que el monitor puede capturar imágenes. Puede descargarlo en https://www.fermax.com/spain/ corporate/utilidades.html. MONITOR VEO XS WIFI DUOX PLUS...
- Page 22 4.6 MENÚ USUARIO: CONECTIVIDAD WIFI. EMPAREJAMIENTO. Para utilizar el servicio de desvío de llamadas, el usuario debe poseer un terminal de vivienda DUOX PLUS FERMAX (monitor VEO o VEO-XS WIFI) en su vivienda, el acceso Ver capítulo Funcionamiento: Emparejamiento. inalámbrico y la conexión a Internet.
- Page 23 5. AJUSTES: VIDEO Y AUDIO 5.1 AJUSTES: AJUSTE VIDEO: BRILLO - CONTRASTE - COLOR El monitor permite realizar los ajustes de brillo, contraste y color mientras se haya recibido una llamada (sin descolgar/sin establecer comunicación) o realizando un autoencendido (cámara). Ver capítulo Funcionamiento: Autoencendido.
- Page 24 5.2 AJUSTES: AJUSTE AUDIO Durante el tiempo que está abierto el canal de audio se puede regular el volumen del audio. Para realizar el ajuste de audio, pulsar el botón (menú) y aparecerá en pantalla un menú contextual para dicho ajuste. MONITOR VEO XS WIFI DUOX PLUS...
- Page 25 Manual Usuario: FUNCIONAMIENTO MONITOR VEO XS WIFI DUOX PLUS...
-
Page 26: Funcionamiento
FUNCIONAMIENTO 1. FUNCIONAMIENTO: EMPAREJAMIENTO. Desvío de llamada. El monitor VEO XS WIFI DUOX PLUS permite acceder a nuevos servicios ofrecidos por Fermax a través de su propia nube como el de desvío de llamada. Para poder disfrutar de dicho servicio el primer paso es conectar el monitor a Internet mediante el proceso llamado de emparejamiento. - Page 27 Correspondencia entre pulsadores y menu de navegación. La línea blanca abajo del icono indica en la función en la que nos encontramos. Seleccionar el menú de conectividad en el monitor. _ _ : _ _ _ _ : _ _ Una vez seleccionado el menú...
- Page 28 (siempre y cuando no esté en uso). Auto-on Nota: Este capítulo presenta los conceptos más básicos para la rápida puesta en marcha, para más infor- mación descargar el manual Aplicación DUOX PLUS Blue para móvil cod. 970156 en www.fermax.com. MONITOR VEO XS WIFI DUOX PLUS...
- Page 29 2. FUNCIONAMIENTO: ATENDER A UNA LLAMADA. Recepción de llamada. a) Modo manos libres: Al presionar el pulsador de llamada en la Placa de Calle, se produce un tono de llamada en ésta y en el monitor además de encenderse la pantalla. Se dispone de 30 segundos para contestar antes de que regrese a la situación de reposo.
- Page 30 2.1 Llamada de Video. En el caso de que en la vivienda se reciba una llamada desde una placa de vídeo, el monitor mostrará el vídeo capturado por la cámara en la placa de calle. 2.2 Llamada de Audio. En el caso de que en la vivienda se reciba una llamada desde una placa de audio, el monitor mostrará...
-
Page 31: Activación Manual Del Monitor (Autoencendido)
3. FUNCIONAMIENTO: ACTIVACIÓN MANUAL DEL MONITOR (AUTOENCENDIDO) Con el monitor en reposo pulsar el botón (cámara), para encender manualmente el monitor. Las temporizaciones de previsualización sin audio (30seg.) o conversación (90seg.) en total, aunque se cambie de cámara. Autoencendido en reposo: 1. - Page 32 Autoencendido en estado de llamada recibida: 1. Si la llamada corresponde a una placa de la secuncia descrita en el punto anterior, se prosigue el autoencendiendo a la siguiente placa de la secuencia. 2. Si la llamada NO es de placa, se comienza el autoencendido con la placa de bloque (según disponibilidad de placas), y sigue la secuencia: Placa 1 o Cámara 1 del Bloque Placa 0 o Cámara 0 del Bloque...
-
Page 33: Regulación De Volumen De Llamada (Potenciómetro)
4. FUNCIONAMIENTO: REGULACIÓN DE VOLUMEN DE LLAMADA (POTENCIÓMETRO) Partiendo del estado de reposo, si se desliza el potenciómetro se puede ajustar el volumen de llamada a un valor entre el mínimo y el máximo (Se disponen de 10 niveles de volumen), y se visualiza el ajuste que se está... - Page 34 Aparece un menú contextual: : Para seleccionar/visualizar fotos guardadas. : Para borrar imagenes. : Para cancelar e ir a la pantalla anterior. Si se pulsa la opción de borrado se accede a la pantalla de confirmación de borrado de imágenes, pulsando el icono de confirmar se borrará...
- Page 35 Si por algún motivo se pierde la alimentación en el monitor, la configuración de fecha y hora pasará a ser la configuración por defecto (01/01/2019). Si se captura una imagen sin haber ajustado la fecha y hora, en la visualización de la imagen aparecerá...
- Page 36 Technical publication for information purposes edited by FERMAX ELECTRÓNICA S.A.U. FERMAX ELECTRÓNICA applies a continuous improvement policy, therefore it reserves the right to modify the contents of this document, as well as the product features hereof at any time and without prior notice. Any modification will be reflected in subsequent editions of this document.
- Page 37 INDEX INTRODUCTION INSTALLATION -Monitor installation -Connections TECHNICAL SPECIFICATIONS PRODUCT DESCRIPTION - Buttons - LEDs PROGRAMMING 1. Access administrator and user menu 2. Navigation buttons and monitor push-buttons 3. Administrator menu 1. Monitor address programming 2. Induction Loop 3. Doormatic 4. Reset settings 5.
- Page 38 INTRODUCTION The VEO XS WIFI DUOX PLUS monitor allows access to new services offered by Fermax using its own cloud. To access these services, such as mobile or tablet call forwarding, the monitor must be paired. Pairing involves connecting the monitor to a home wireless network, as well as linking the monitor to a user account using a mobile application (available for Android and iOS) and always through Fermax's own Cloud.
- Page 39 INSTALLATION MONITOR INSTALLATION Connector Surface wiring For non-embedded installations, the connector has two channels to guide the cables to the connection strip from the floor or ceiling. Two of the marked partitions must be removed with cutting pliers to create access for the cables from the bottom or top of the connector.
- Page 40 Dismantling the monitor a) Wall installation The connector is designed to dismantle the monitor without the need for any tools. To do this, simply pull at the lower corners perpendicularly to the wall until the clips are unlocked and a minimum angle of 10 degrees with the wall is reached.
- Page 41 Monitor Connectors: Bin,Bin: Data, audio and video input. Bout,Bout: Data, audio and video output (for cascade connection). T, -: Apartment door call button (P1). A+, -: Option of connection with the following devices: • Call extender ref. 2040. • Light and buzzer commander ref. 2438. Additional function. (Negative output “-” / command transmission, see chapter Buttons: Auxiliary function F1).
- Page 42 EXTENSIONS: Light and buzzer activator Ref. 2438 Ref. 2438 ACTIVADOR DE LUCES ADS REF. 2438 ADS LIGHT COMMANDER Max. 2A 110-240Vac 50-60Hz +A -A F1 2A +A F1 110-240Vac 110-240Vac TECHNICAL SPECIFICATIONS Power supply (without polarity) 18 - 24 Vdc Consumption Consumption at rest (matched and connected) 1.3 W Maximum consumption 6.9 W...
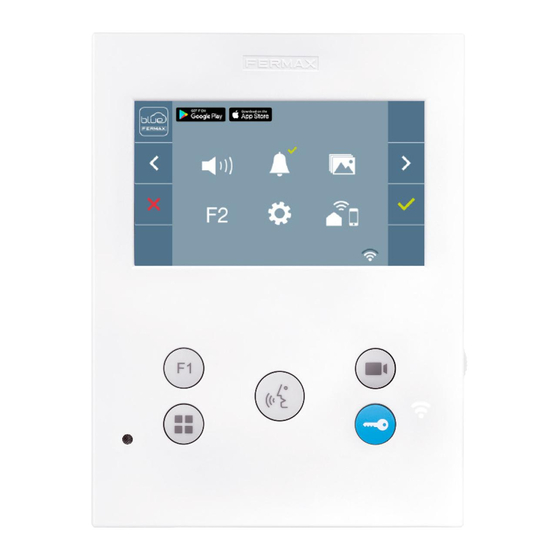
- Page 43 PRODUCT DESCRIPTION WIFI VEO XS Monitor Potentiometer Buttons Leds Induction loop Identified with this label (depending on model). · Includes an induction loop that works with devices worn by people with hearing disabilities. Note: In hearing aids with manual mode selection, the Digital Mode must be set. BUTTONS Button for lock release / calls to the concierge.
- Page 44 Menu Button. · To access: - Programming Menu, it is accessed when the monitor is not programmed. From this menu, you can program the monitor according to your installation needs. - User Menu, (once the monitor is programmed). From this menu, you can access the user settings and customise them as you wish.
- Page 45 PROGRAMMING: 1. PROGRAMMING: ACCESS ADMINISTRATOR AND USER MENU _ _ : _ _ _ _ : _ _ Screen: ADMINISTRATOR menu Screen: USER Menu The Induction Loop, Do Not Disturb and Doormatic icons will change depending on whether they are enabled/disabled. If they are enabled, a green tick will be displayed in the top right-hand corner of the icon, whereas if it is disabled you will see a red cross .
- Page 46 To access the Administrator Menu when the monitor is programmed, two steps must be performed: 1. Press the MENU button to access the User Menu. _ _ : _ _ _ _ : _ _ 2. Whilst on the User Menu, press the following buttons simultaneously: 2.
- Page 47 3. PROGRAMMING: ADMINISTRATOR MENU Screen There are several options: 1. Monitor address programming. 2. Induction loop. 3. Doormatic. 4. Reset settings. 5. About. 6. Conversation mode 3.1 ADMINISTRATOR MENU: Monitor address PROGRAMMING The monitor will not function if it has not been programmed! Note: The blue LED, when blinking slowly, indicates that the monitor is not programmed - once the monitor address is programmed this will be indicated by a continually lit red LED.
- Page 48 B) From the Panel Option selected by the white line below the icon. Pressing this will cause a beep to be heard on the monitor. The monitor is automatically connected to the outdoor panel by activating the camera. Enter the calling code for that monitor from the panel. Depending on the type of panel installed: •...
- Page 49 Notes: - The period between the monitor programming entry confirmation beep and the call from the panel to program the monitor address must be less than 2 and a half minutes. - The panel from which the programming takes place must be designated as the master panel.
- Page 50 3.5 ADMINISTRATOR MENU: ABOUT A QR code is displayed on the screen that allows access to the complete monitor docu- mentation. 3.6 ADMINISTRATOR MENU: CONVERSATION MODE Within the administrator menu, you can select between Simplex and Hands-Free mode. By selecting the icon in conversation mode and pressing the icon you may change from one mode to another.
- Page 51 4.1 USER MENU: MONITOR VOLUME SETTINGS It is possible to adjust the volume of the ringtone within a range of ten possible values. _ _ : _ _ _ _ : _ _ Firstly, the current volume is displayed and can be increased (+) or decreased (-) with the corresponding buttons.
- Page 52 4.4 USER MENU: F2 FUNCTION The F2 function sends an activation command to activate an auxiliary device. An on-screen notification of the action will be shown: F2 ON for 3 seconds. This function is contained in the main screen of the user menu. The F2 command is sent by the bus, including the monitor address, to activate the auxiliary devices connected to the bus, such as for example a duox plus relay, (check with your installer).
- Page 53 4.5.1 User parameter settings: MELODY SELECTION The monitor allows you to select a separate melody for the panels and another for the concierge. The panels are: - Panel 0, monitor block. - Panel 1, monitor block. - Panel 0, General Entrance. You may assign up to 5 different melodies.
- Page 54 Panel 0, General Entrance By selecting this option, you can change Once you have selected the option, you the melody you hear on the monitor when will see and hear the current melody, and by pressing the + or - buttons you can a call is made from the outdoor panel 0 of the General Entrance.
- Page 55 Furthermore, the legislation may force to place a sign next to door stations, indicating that monitors can capture images. You can download it at https://www.fermax.com/intl/ en/corporate/utilities.html. DUOX PLUS WIFI VEO XS MONITOR...
- Page 56 4.5.6 User parameter settings: ENABLE/DISABLE DOORMATIC (According to configuration). 4.6 USER MENU: WIFI CONNECTIVITY. PAIRING. To use the call forwarding service, the user must have a DUOX PLUS FERMAX home terminal (VEO or VEO-XS WIFI monitor) in their home, wireless access and Internet con- nection.
- Page 57 5. SETTINGS: VIDEO AND AUDIO 5.1 SETTINGS: VIDEO SETTINGS: BRIGHTNESS - CONTRAST - COLOUR The monitor allows you to adjust the brightness, contrast and colour while a call is incoming (communication not established) or when auto-on is in progress (camera). See Chapter Operation: Auto-on.
- Page 58 5.2 SETTINGS: AUDIO SETTINGS While it is open, the audio channel can be used to adjust the volume of the audio. To make audio adjustments, press the button (menu) and a shortcut menu for that setting will be displayed. DUOX PLUS WIFI VEO XS MONITOR...
- Page 59 User Manual: FUNCTIONING DUOX PLUS WIFI VEO XS MONITOR...
- Page 60 FUNCTIONING 1. FUNCIONAMIENTO: PAIRING. Call forwarding. The VEO XS WIFI DUOX PLUS monitor allows access to new Fermax services, such as call divert, through its own cloud. To use this service, the monitor must first be connected to the Internet through a pairing process. To do this, use the Blue app, which is available on Google Play or the Apple App Store.
- Page 61 Relationship between buttons and navigation menu. The white line below the icon shows which function is currently selected. Select the connectivity menu on the monitor. _ _: _ _ _ _: _ _ Once the connectivity menu is selected, press to access.
- Page 62 Auto-on Note: This section goes through the most basic steps in quick commissioning. For more information, please download the DUOX PLUS Blue mobile application manual, code: 970156 at www.fermax.com. DUOX PLUS WIFI VEO XS MONITOR...
- Page 63 2. FUNCTIONING: ANSWERING A CALL Receiving a call. A) Hands-free mode: When you press the call button on the Outdoor Panel, a calling tone will be made on that panel and on the monitor, and the screen will switch on. When you receive a call, you have 30 seconds to answer before the device returns to idle.
- Page 64 2.1 Video call. Should the apartment receive a call from a video panel, the monitor will display the video captured by the camera in the outdoor panel. 2.2 Audio call. Should the apartment receive a call from an audio panel, the monitor will display the following screen: 2.3 Calls to concierge.
- Page 65 3. FUNCTIONING: ACTIVATING THE MONITOR MANUALLY (AUTO-ON) With the monitor on standby, press the (camera) button to turn the monitor on manually. The total timings for preview without audio (30 seconds) and conversation (90 seconds) stay the same, even if you change cameras. Auto-on on standby: 1.
- Page 66 Auto-on in incoming call state: 1. If the call corresponds to a panel in the sequence described in the previous point, the auto-on will begin for the next panel in the sequence. 2. If the call is NOT from a panel, auto-on will begin with block panel 0, (depending on panel availability), and follow the sequence: Panel 1 or camera 1 of the...
- Page 67 4. FUNCTIONING: CALL VOLUME CONTROL (POTENTIOMETER) While the device is in its idle state, you may slide the potentiometer to adjust the call volume to a value between the minimum and the maximum (10 volume levels are available), and the volume will be displayed on the monitor screen: Potentiometer Notes: - These adjustments will affect all melodies generated by the monitor, whether those...
- Page 68 A contextual menu will appear: : To select/view the photos stored. : To clear images. : To cancel and go to the previous screen. If you press the Erase option you will be taken to the delete confirmation screen, and by pressing the confirmation icon the selected picture will be deleted. The user can navigate through the saved pho- tos, even when the confirmation window is active.
- Page 69 If the power supply is cut off for any reason, the date and time settings will reset to the default configuration (01/01/2019). If an image is captured without setting the date and time first, this icon appears when the image is displayed, indicating that the date and time settings that appear next to the image are 01/01/2019 00:00 130 / 149 not correct.
- Page 70 DUOX PLUS WIFI VEO XS MONITOR...
- Page 71 DUOX PLUS WIFI VEO XS MONITOR...
- Page 72 Avd. Tres Cruces, 133 46017 Valencia Spain Para más información, visitar www.fermax.com Contacto: tec@fermax.com www.fermax.com/contact For more information, visit www.fermax.com Contact: tec@fermax.com www.fermax.com/contact...
Need help?
Do you have a question about the Duox Plus Veo XS Wifi and is the answer not in the manual?
Questions and answers