Table of Contents
Advertisement
Available languages
Available languages
47HLS18/34/67- Fire Drake
Eng
Installation guide and warranty
Installationsanleitung und Garantie
DE
FR
Guide d'installation et garantie
Guida all'installazione e garanzia
IT
Guía de instalación y garantía
ES
Register your product online - Registrieren Sie Ihr Produkt online
Enregistrez votre produit en ligne - Registra il tuo prodotto online
Registre su producto en línea
http://portal.hotline-fencing.co.uk/Warranty
Advertisement
Table of Contents

Related Manuals for Horizont Hotline Fire Drake HLS18


Summary of Contents for Horizont Hotline Fire Drake HLS18
- Page 1 47HLS18/34/67- Fire Drake Installation guide and warranty Installationsanleitung und Garantie Guide d’installation et garantie Guida all’installazione e garanzia Guía de instalación y garantía Register your product online - Registrieren Sie Ihr Produkt online Enregistrez votre produit en ligne - Registra il tuo prodotto online Registre su producto en línea http://portal.hotline-fencing.co.uk/Warranty...
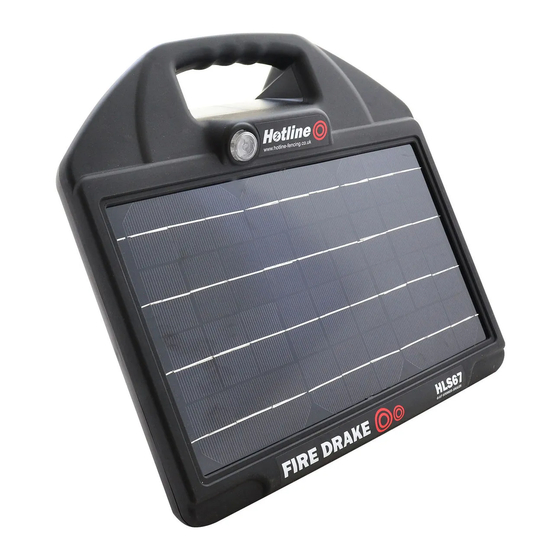
- Page 3 Installation guide - Type: HLS Please read through before installation. Please read safety guidelines leaflet. Getting to know your energiser. Solar panel Switch with pulse/low battery indicator* Ground connection terminal Fence connection terminal Battery access twist knobs Mounting slot Battery box Battery charge socket Ground connection lead Fence connection lead...
-
Page 4: Lead Connection
Connecting it all together HLS energisers include internal 12v batteries and are ready to operate out of the packaging although we do recommend charging the energiser for 12 hours prior to use. Please see section on charging the battery. Lead connection Unscrew the terminals enough to slide in the fork terminals on the earth and fence leads. -
Page 5: Connection To The Fence
Connection to the fence Optional mounting HLS energisers can be mounted on 47ES3 and 47EST1 earth stakes and onto screws and bolts with washers for standard fence posts. Charging the battery Switching on and off Press the switch on the front of the energiser. From time to time the bat- The switch will flash green in time with the tery may need recharging. -
Page 6: Troubleshooting
Trouble shooting You should have a minimum of 3kv on your fence line to be effective. In principle, electric fencing is a simple concept. If your energiser is working then there can only be two other places to look - your fence line or ground system. Checking the energiser Sound and sight - Most energisers emit an audible tick caused by the firing of the output transformer. - Page 7 Installationsanleitung - Typ: HLS Bitte vor der Installation durchlesen. Bitte Merkblatt mit den Sicher- heitshinweisen durchlesen. Lernen Sie Ihr Elektrozaungerät kennen. Legende 1. Solarmodul 2. Schalter mit Impuls-/Schwache-Batterie- Anzeige* 3. Erdungsanschlussklemme 4. Zaunanschlussklemme 5. Drehknöpfe zum Öffnen des Batteriefachs 6. Befestigungsnut 7.
- Page 8 Alles miteinander verbinden HLS-Elektrozaungeräte (Energiser) sind mit internen 12-Volt-Batterien ausgestattet und nach dem Auspacken sofort betriebsbereit, allerdings empfehlen wir, das Elektrozaungerät vor dem Gebrauch für 12 Stunden zu laden. Nähere Einzelheiten siehe Abschnitt „Batterie laden“. Leitungsanschluss Lösen Sie die Anschlussklemmen soweit, bis Sie die Kabelschuhe (in Gabelform) auf die Erdungs- und Zaunleitung schieben können.
- Page 9 Anschluss an den Zaun Optionale Montage gerät tterie Die HLS-Elektrozaungeräte können auf die Staberder 47ES3 und 47EST1 sowie mit Schrauben, Bolzen und Unterlegscheiben Standard- uf die Zaunpfosten montiert werden. Batterie laden Ein- und Ausschalten Von Zeit zu Zeit muss die Batte- Drücken Schalter rie wieder aufgeladen werden.
-
Page 10: Fehlersuche
Fehlersuche Um die Effektivität sicherzustellen, sollten Sie eine Spannung von mindestens 3 kV an Ihrem Zaun anliegen haben. Das Konzept von Elektrozäunen ist grundsätzlich recht einfach. Wenn Ihr Elektrozaungerät funktioniert, gibt es nur zwei andere Stellen, die Sie überprüfen können - Ihre Zaunleitung oder das Erdungssystem. -
Page 11: Guide D'installation
Guide d'installation - Type : HLS Merci de le lire entièrement avant l'installation Veuillez lire le dépliant sur les directives de sécurité Prise en main de votre électrificateur. Légende 1. Panneau solaire 2. Interrupteur avec indicateur* d'impulsion/de batterie faible 3. Borne de raccordement au sol 4. - Page 12 Connexion de l'ensemble Les électrificateurs HLS incluent des batteries 12 V internes et sont prêts à fonctionner en sortant du carton ; néanmoins nous recommandons de charger l'électrificateur pendant 12 heures avant de l'utiliser. Reportez-vous à la section sur le chargement de batterie. Connexion des fils Dévissez les bornes suffisamment pour insérer les bornes à...
-
Page 13: Allumage Et Extinction
Raccordement à la clôture er en Montage en option nt 12 Les électrificateurs HLS peuvent être montés sur des piquets de terre 47ES3 et 47EST1 et avec des vis, boulons et rondelles pour poteaux de rre et clôture standards. Chargement de batterie Allumage et extinction Appuyez sur l'interrupteur sur le devant de La batterie pourra nécessiter... -
Page 14: Dépistage Des Pannes
Dépistage des pannes Pour que la ligne de clôture soit efficace, il faut qu'elle se trouve sous 3 KV minimum. De par son principe, une clôture électrique est un concept simple. Si votre électrificateur fonctionne, il ne peut y avoir que deux autres endroits à vérifier : votre ligne de clôture ou le système de terre. Vérifier l'électrificateur Sonorité... -
Page 15: Guida All'installazione
Guida all’installazione - Tipo: HLS Leggere prima dell’installazione. Leggere l’opuscolo sulle direttive di sicurezza. Familiarizzarsi con il proprio elettrificatore. Legenda 1. Pannello solare 2. Interruttore con indicatore di impulsi/batteria scarica 3. Morsetto di messa a terra 4. Morsetto di collegamento alla recinzione 5. - Page 16 Assemblaggio Gli elettrificatori HLS includono batterie interne da 12V e sono immediatamente pronti per funzionare, sebbene noi raccomandiamo di caricare l’elettrificatore per 12 ore prima dell’utilizzo. Vedete la sezione sulla ricarica della batteria. Collegamento dei conduttori Svitate i morsetti quel tanto che basta per inserire i terminali a forcella nei conduttori di terra e della recinzione.
-
Page 17: Caricamento Della Batteria
Collegamento alla recinzione pronti Montaggio opzionale prima Gli elettrificatori HLS possono essere montati su picchetti di terra 47ES3 e 47EST1 e su viti e bulloni dotati di rondelle per pali di recinzione terra standard. Caricamento della batteria Accensione e spegnimento Premete l’interruttore sul lato anteriore Ogni tanto le batterie potreb- dell’elettrificatore. - Page 18 Ricerca ed eliminazione degli errori Per assicurare l’efficacia della vostra recinzione dovrebbero essere presenti almeno 3kV sulla stessa. In principio, la recinzione elettrificata è un concetto semplice. Se il vostro elettrificatore funziona, allora non restano che altri due posti da controllare - la vostra recinzione o l’impianto di terra. Controllo dell’elettrificatore Suoni e immagini - La maggior parte degli elettrificatori emette un ticchettio udibile causato dall’alimentazione del trasformatore d’uscita.
-
Page 19: Guía De Instalación
Guía de instalación - Tipo: HLS Rogamos lea la guía detenidamente antes de la instalación. Roga- mos lea el folleto de las directrices de seguridad. Conozca su alimentador. Nomenclatura 1. Panel solar 2. Interruptor con indicador de impulsos/ batería baja* 3. -
Page 20: Conexión Del Sistema
Conexión del sistema Los alimentadores HLS incluyen baterías internas de 12 V y están listos para funcionar fuera del embalaje, aunque recomendamos cargar el alimentador durante 12 horas antes de su uso. Consultar la sección sobre la carga de la batería. Conexión de cables Desenroscar los bornes lo suficiente como para deslizar los bornes de horquilla en los cables de tierra y de la cerca. - Page 21 Conexión a la cerca ionar Montaje opcional antes Los alimentadores HLS se pueden montar en postes de tierra 47ES3 y 47EST1 y en tornillos y pernos con arandelas para postes de cerca n los estándar. Carga de la batería Encendido y apagado Presionar el interruptor en la parte frontal De vez en cuando la batería del alimentador.
- Page 22 Resolución de problemas Usted debe disponer de un mínimo de 3 kV en su línea de cercado para que sea efectiva. En principio, el cercado eléctrico es un concepto sencillo. Si su alimentador está funcionando, entonces sólo puede haber otros dos lugares donde buscar: el cercado o el sistema de puesta a tierra Comprobación del alimentador Sonido y vista: la mayoría de los alimentadores emiten una señal acústica causada por el encendido del transformador de salida.
- Page 23 General The customer MUST register their product with Hotline-horizont or authorised dealer to obtain the guarantee. Proof of original purchase may be required in the event of a claim. The original serial number label must be present on the energiser when returned. The customer shall take all reasonable steps to ensure that the energiser is operated in accord- ance with the manufacturers’...
- Page 24 Las baterías recargables suministradas como parte integral del energizador están cubiertas por un período de garantía reducido de 1 año. El producto debe estar registrado en Hotline-horizont Ltd o en un distribuidor autorizado para registrar un producto en un plazo de 28 días a partir de la fecha de compra.
Need help?
Do you have a question about the Hotline Fire Drake HLS18 and is the answer not in the manual?
Questions and answers