Advertisement
Available languages
Available languages
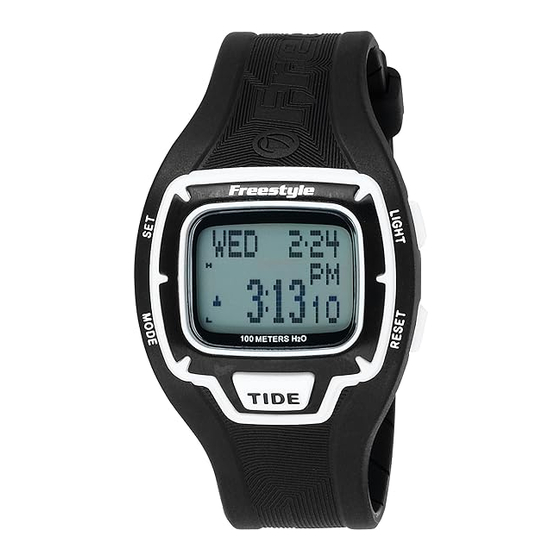
Freestyle- Gromatide Instruction
GROMATIDE
FEATURES:
• Tide data for 75 beaches worldwide
• 180 minute offset
• Displays present and future tide data
• 9 programmable favorite locations
• Optional big time with shark fin
animation
• 100 meters H20
SPECIAL FEATURE
This Freestyle product features unique
Hydro Pushers®: these pushers can be
pressed under water to a dynamic water
pressure (not water depth) of 3 ATM.
CONTROL BUTTONS
S1: Start Button
S2: Stop/Reset Button
S3: Mode Button
S4: Set Button
S5: Light Button
DISPLAY MODE
The watch has six display modes: NORMAL
TIME, TIDE, CHRONO, TIMER, HEAT TIMER
and ALARM.
To change from one display mode to
another, press S3 button once.
NOTE: In any setting mode, if there is no
manipulation for about 120 seconds, the
watch will automatically exit the setting
procedure.
TO SET THE TIME AND CALENDAR
1. Press S3 button to select NORMAL TIME
mode.
2. Press and hold S4 button for two sec-
onds until the "SET" message appears
and the Time Zone blinks on the display.
3. Press S1 button or S2 button to toggle
between Time Zone 1 and Time Zone 2.
4. Press S3 button once, the Hour digits
(including AM / PM for 12-hour format)
will blink.
5. Press S1 button to increase the digits by
one unit, or press S2 button to decrease
the digits by one unit. Holding down
either button will speed up the process.
6. Press S3 button once, the Minute digits
will blink.
7. Press S1 button or S2 button to set the
Minute digits.
8. Press S3 button once, the Second digits
will blink.
9. Press either S1 button or S2 button to
set the Second digits to zero.
10.Press S3 button once, the Month digits
will blink.
11.Press S1 button or S2 button to set the
Month digits.
12.Press S3 button once, the Date digits
will blink.
13.Press S1 button or S2 button to set the
Date digits.
14.Press S3 button once, the Year digits
will blink.
15.Press S1 button or S2 button to set the
Year digits.
16.Press S3 button once, the Time Format
will blink.
17.Press S1 button or S2 button to toggle
between 12-hour and 24-hour Time
Format.
18.Press S3 button once, the Date Format
will blink.
30/01/2010
19.Press S1 button or S2 button to cycle
among MM-DD-YY (month-date-year),
DD-MM-YY (date-month-year) and YY-
MM-DD (year-month-date) to set the
Date Format.
20.Press S3 button once, the Day (of the
week) Language will blink.
21.Press S1 button or S2 button to cycle
among English, French, Portuguese and
Spanish to set the Day Language.
22.Press S3 button once, the Hourly Chime
status will blink.
23.Press S1 button or S2 button to toggle
between ON and OFF of Hourly Chime.
24.Press S3 button once, the Button Beep
status will blink.
25.Press S1 button or S2 button to toggle
between ON and OFF of Button Beep.
26.Press S3 button once, the Big Time Op-
tion status will blink.
27.Press S1 button or S2 button to toggle
between ON and OFF of Big Time Op-
tion.
28.Press S3 button once, the Tide Height
unit will blink.
29.Press S1 button or S2 button totoggle
between feet and meters for Tide Height
unit.
30.After finished making all the settings,
press S4 button to confirm the settings.
NOTE: The date is displayed in the current
Date Format, but the setting sequence
shall always be month, date, and then year,
regardless of the Date Format chosen.
NOTE: The available days of the month
shall be determined by the month setting.
If February is set, the available days of the
month shall be 1 to 29. If February 29 is set
for a year that is not a leap year, the date
shall be corrected to February 28 upon exit
from the setting procedure.
NOTE: For Big Time Option, if OFF is
selected, only date/time and tide/time
formats will be available in NORMAL TIME
mode; if ON is selected, the Big Time
display format shall also be available in
NORMAL TIME mode.
NOTE: The Time Format and Date Format
settings apply only to the selected Time
Zone; while the settings of Day Language,
Hourly Chime, Button Beep, Big Time
Option and Tide Height unit apply to both
Time Zones.
DIFFERENT DISPLAY FORMATS IN
NORMAL TIME MODE
There are three display formats in each
Time Zone in NORMAL TIME mode: date/
time, tide/time and big time.
To change from one Time Zone to another,
press S2 button once.
To change from one display format to
another, press S1 button once.
In date/time display format,
the primary time day and date are shown
in the top of the display; the time in hours,
minutes and seconds is shown in the bot-
tom of the display. The data is shown in the
Date and Time Formats of the displayed
Time Zone, which are set in this mode
along with the date and time.
If there is previous and upcoming tide data,
the left-hand part of the display shows
the tide status for the currently selected
tide location. Otherwise, no graphic is
displayed.
In tide/time display format,
the display is identical to the date/time
format except that the next tide (high or
low) for the currently selected tide location,
the time of the next tide, and its height are
shown in place of the day and the date. The
tide time is shown in the same format as
the primary time. The Tide Height is shown
in the current Tide Height unit selected.
If no previous or upcoming tide data is
available, this format shall be unavailable
and the format shall revert to date/time.
In big time display format,
only the hours and minutes of the primary
time are shown, no AM/PM indication.
A shark fin animation shall occur once per
minutes. For even minutes, the fin shall
move from left to right one dot column at
a time, and for odd minutes, the fin shall
move from right to left.
The big time display format is included only
if the Big Time Option is on.
NOTE: The current tide level and direction
(rising or falling) shall be presented by a
tide status graphic, which is represented by
an arrow head two dots high and three dots
wide. The steps shall appear as follows:
In displays 1 through 10, the tide is rising;
while in display s 11 through 20, the tide
is falling. When the time of day advances
to the minute after the time of high tide,
display 11 is shown; when the time of day
advances to the minute after the time of
low tide, the sequence repeats beginning
with display 1.
TO USE TIDE DATA
For displaying tide information of current
time and location,
1. Press S3 button to select TIDE mode.
The favorite number and the name of
current tide location will appear.
2. After two seconds, the next upcoming
tide (high or low), base on the primary
time, for the current tide location will
be displayed. The date will be displayed
in the top line, the next tide will be dis-
played in the middle line followed by the
time of that tide (with a superscript A/P
representing AM/PM in 12-hour format),
and the height of the next tide will be
displayed in the bottom line (including
minus sign if necessary).
3. Press S1 or S2 button to display the
previous and next tide respectively.
4. Press and hold S1 button or S2 button
until the "SCAN" message appears to
initiate date scanning in the forward or
backward direction respectively.
5. Release either button when the desired
date is displayed.
6. After abandoning the date scanning
procedure, while the "SCAN" message is
still displayed, press S1 button or S2
button to move forward or backward
respectively the displayed date by one
day. Press and hold the correspond-
ing buttons to reinitiate date scanning.
NOTE: If no previous or upcoming tide data
is available, the sentence "NO TIDE DATA
FOR DATE" will be displayed.
NOTE: The date, time and tide height unit
will be displayed in the formats of the
primary time set in NORMAL TIME mode.
NOTE: If the displayed time represents DST
(daylight savings time), which means that
the time was adjusted from the stored tide
data, the DST flag will appear.
NOTE: Scanning shall stop automatically
if the last date for which there is tide data
is reached.
For setting tide location,
1. Press S3 button to select TIDE mode.
The favorite number and the name of
current tide location will appear.
2. Press S4 button, the "SET" message ap-
pears and the FAV (favorite) number
blinks on the display. The default favor-
FS 1064 Gromatide AG7027-INST-R01
27/01/2010
AG7027
2741
ENGLISH
Advertisement

Related Manuals for Freestyle GROMATIDE FS84950


Summary of Contents for Freestyle GROMATIDE FS84950
- Page 1 Freestyle- Gromatide Instruction GROMATIDE FEATURES: • Tide data for 75 beaches worldwide • 180 minute offset • Displays present and future tide data • 9 programmable favorite locations • Optional big time with shark fin animation • 100 meters H20 SPECIAL FEATURE This Freestyle product features unique Hydro Pushers®: these pushers can be pressed under water to a dynamic water pressure (not water depth) of 3 ATM. CONTROL BUTTONS S1: Start Button S2: Stop/Reset Button S3: Mode Button S4: Set Button S5: Light Button DISPLAY MODE The watch has six display modes: NORMAL TIME, TIDE, CHRONO, TIMER, HEAT TIMER and ALARM. To change from one display mode to another, press S3 button once. NOTE: In any setting mode, if there is no manipulation for about 120 seconds, the watch will automatically exit the setting procedure.
- Page 2 Freestyle- Gromatide Instruction ite number is the one for the current location. 3. Press S1 button or S2 button to move forward or backward respectively the favorite number and therefore the corre- sponding location name to be selected. 4. Press S3 button, the geographical RE- GION will blink. 5. Press S1 button or S2 button to move forward or backward respectively the REGION to be selected. 6. Press S3 button, the geographical LOCA TION will blink. 7. Press S1 button or S2 button to move forward or backward respectively the LOCATION to be selected. 8. Press S3 button, the DST (daylight sav- ings time) status will blink. 9. Press S1 button or S2 button to move forward or backward respectively the DST status to be selected. If AUTO is se- lected, the watch shall determine when the location is on DST; if OFF or ON is selected, the DST status is forced to the selected status all the time. Please note that the current DST status is shown with the DST flag. 10.Press S3 button, the custom location selection will blink. 11.Press S1 or S2 button to toggle between YES and NO. If NO is selected, that step...
- Page 3 Freestyle- Gromatide Instruction GROMATIDE CARACTERÍSTICAS • Información sobre la marea en 75 playas del mundo. • Compensación de 180 minutos. • Visualización de información sobre mareas actuales y futuras. • 9 lugares favoritos programables. • Opción de hora en formato grande con animación de aleta de tiburón. • 100 metros H20 CARACTERÍSTICA ESPECIAL Este producto de Freestyle tiene el Hydro Pusher ® original: un botón que se puede pulsar bajo el agua hasta en una presión de agua dinámica (no profundidad en el agua) de 3 ATM. BOTONES DE CONTROL S1: Botón para iniciar S2: Botón para parar/resetear S3: Botón de modo S4: Botón de ajustes S5: Botón de luz MODOS DE VISUALIZACIÓN El reloj tiene seis vistas: HORA NORMAL, MAREA, CRONÓMETRO, TEMPORIZADOR, TEMPORIZADOR DE CALOR Y ALARMA.
- Page 4 Freestyle- Gromatide Instruction NOTA: El escaneo parará automáticamente al encontrar la última fecha para la cual hay datos disponibles sobre las mareas. Para configurar la ubicación de la marea, 1. Pulse el botón S3 para seleccionar el modo de MAREA. Verá el número fa- vorito y el nombre del lugar de la marea actual. 2. Pulse el botón S4. Verá la palabra SET”, y el número FAV (favorito) parpadeando en la pantalla. Verá que el número fa- vorito por defecto es el del lugar actual. 3. Pulse los botones S1 ó S2 para incre- mentar o disminuir el número favorito, y también el nombre del lugar a selec- cionar. 4. Pulse el botón S3. La REGIÓN geográ- fica parpadeará. 5. Pulse los botones S1 ó S2 para buscar la REGIÓN a seleccionar. 6. Pulse el botón S3. El LUGAR geográfico parpadeará. 7. Pulse los botones S1 ó S2 para buscar el LUGAR a seleccionar. 8. Pulse el botón S3. El estado del DST (horario de verano) parpadeará. 9. Pulse los botones S1 ó S2 para cambiar el estatus de DST que quiera selec- cionar. Si selecciona AUTO, el reloj...
- Page 5 Freestyle- Gromatide Instruction GROMATIDE EIGENSCHAFTEN • Gezeitendaten für 75 Meeresstrände weltweit • 180 Minuten Zeitverschiebung • Zeigt aktuelle und zukünftige Gezeiten- daten an • 9 programmierbare Lieblingsorte • Wahlweise große Zeitanzeigeanzeige mit Haiflossen-Animation • 100 Meter H20 SONDERFUNKTIONEN Dieses Freestyle Produkt bietet den einzigartigen Hydro-Drücker ®: Diese Drücker können auch unter Wasser bis zu einem dynamischen Wasserdruck (nicht Wassertiefe) bis zu 3 ATM gedrückt werden. EINSTELLTASTEN S1: Taste „Start” S2: Taste „Stopp/Zurücksetzen” S3: Taste „Modus” S4: Taste „Einstellen” S5: Taste „Licht” ANZEIGEMODUS Die Armbanduhr hat sechs Anzeigemodi: NORMALE ZEITANZEIGE, GEZEITEN, CHRONOGRAPH, TIMER, RUNDENMESS- ER, und WECKER. Drücken Sie Taste S3 einmal um von einer Anzeige zur nächsten zu wechseln. HINWEIS: Wenn etwa 120 Sekunden lang keine Taste gedrückt wird, wird die Uhr den...
- Page 6 Freestyle- Gromatide Instruction HINWEIS: Scan stoppt automatisch falls das letzte Datum, für das Gezeitendaten vorliegen, erreicht wurde. Einstellen des Standortes für die Gezeiten: 1. Drücken Sie Taste S3 um den Modus „GEZEIT“ zu wählen Die Lie- blingsnummer und der Name des aktu- ellen Standortes werden erscheinen. 2. Drücken Sie Taste S4 und die Nachricht „SET“ (Einstellen) sowie die Liebling- snummer (FAV) wird auf der Anzeige blinken. Die Standard-Lieblingsnum- mer ist die Nummer für den aktuellen Standort. 3. Drücken Sie Taste S1 oder S2 um die Lieblingsnummer vorwärtsoder rückwärts zu blättern und somit den entsprechenden Namen des Standortes zu wählen. 4. Drücken Sie Taste S3. Die geografische REGION wird blinken. 5. Drücken Sie Taste S1 oder S2 um in der auszuwählenden REGION vorwärts oder rückwärts zu blättern. 6. Drücken Sie Taste S3. Der geografische STANDORT wird blinken. 7. Drücken Sie Taste S1 oder S2 um im auszuwählenden STANDORT vorwärts oder rückwärts zu blättern. 8. Drücken Sie Taste S3 einmal. Der Sta- tus für Sommerzeit (DST) wird blinken.
- Page 7 Freestyle- Gromatide Instruction GROMATIDE FONCTIONNALITÉS • Données marégraphiques pour 75 plages à travers le monde • Correction jusqu’à 180 minutes • Affiche les données marégraphiques actuelles et futures • 9 spots programmables • Option Big Time avec animation aileron de requin • 100 mètres H20 CARACTERISTIQUE SPECIALE Ce produit Freestyle offre la fonction unique d’Hydro Pusher ® : ces boutons peuvent être pressés dans l’eau sous une pression dynamique (ce qui n’est pas la profondeur sous l’eau) de 3 ATM. BOUTONS POUSSOIRS S1: Démarrer S2: Stop/Remise à Zéro S3: Mode S4: Réglage S5: Rétroéclairage MODES D’AFFICHAGE Cette montre dispose de six modes d’affichage: NORMAL, MARÉE, CHRONO, MINUTEUR, MINUTEUR DE SÉRIE et ALARME.
-
Page 8: Utilisation Du Minuteur
Freestyle- Gromatide Instruction REMARQUE: La date, l’heure et l’unité de mesure de la hauteur de la marée sont affichées aux formats programmés en mode NORMAL. REMARQUE: Si l’heure affichée est ajustée pour prendre en compte l’heure d’été, le témoin DST (heure d’été) s’affiche. REMARQUE: Le balayage s’arrête automa- tiquement à la derniere date pour laquelle il existe des donnees marégraphiques. Pour sélectionner ou entrer la localité pour les données marégraphiques: 1. Appuyez sur S3 pour sélectionner le mode TIDE (MARÉE). Le numéro du spot personnalisé et le nom de la localité s’affichent. 2. Appuyez sur S4: le message “SET” s’affiche et le numéro de spot préféré (FAV) clignote. Le numero par défaut est celui du spot actuellement sélectionné. 3. Appuyez sur S1 ou S2 pour faire défiler les numéros, et par conséquent les noms de localité, en avant ou en arrière respectivement. 4. Appuyez sur S3: la RÉGION- géographique clignote. 5. Appuyez sur S1 ou S2 pour faire défiler les régions, en avant ou en arrière respectivement. 6. Appuyez sur S3: la LOCALITE clignote. 7. Appuyez sur S1 ou S2 pour faire défiler les localités, en avant ou en arrière... - Page 9 Freestyle- Gromatide Instruction GROMATIDE CARATTERISTICHE • Dati delle maree di 75 spiagge nel mondo • 180 minuti fuso orario • Mostra i dati delle maree presenti e future • 9 luoghi preferiti programmabili • Big time opzionale con animazione a pinna di squalo • 100 metri H20 FUNZIONE SPECIALE Questo prodotto Freestyle contiene la fun- zione unica Hydro Pusher ® : questi pul- santi possono essere premuti sott’acqua ad una pressione idrodinamica (non profondità dell’acqua) di 3 ATM. TASTI DI COMANDO S1: Tasto Start S2: Tasto Stop/Reset S3: Tasto Modalità S4: Tasto Impostazione S5: Tasto Luce MODALITÀ DI DISPLAY L’orologio ha sei modalità di display: ORA NORMALE, MAREA, CRONOGRAFO, CRONOMETRO, CRONOMETRO DI IMMER- SIONE e ALLARME.
- Page 10 Freestyle- Gromatide Instruction NOTA: L’unità data, ora e altezza della marea sarà mostrata nei formati dell’impostazione dell’ora principale nella modalità ORA NORMALE. NOTA: Se l’ora mostrata espone DST (daylight savings time) (ora legale), che significa che l’ora è stata regolata in base ai dati della marea memorizzati, apparirà la bandierina DST. NOTA: La scansione si fermerà automati- camente se viene raggiunta l’ultima data in cui ci sono i dati sulle maree. Per impostare il luogo della marea, 1. Premere il tasto S3 per selezionare la modalità MAREA. Appariranno il numero preferito e il nome dell’attuale luogo della marea. 2. Premere il tasto S4, il messaggio“SET” apparirà e il numero FAV (preferito) lampeggerà sul display. Il numero preferito mancante è quello del luogo preferito. 3. Premere il tasto S1 o il tasto S2 per far rispettivamente avanzare o indietreggiare il numero preferito e quindi il corrispondente nome del luogo da selezionare. 4. Premere il tasto S3, e la REGIONE geografica lampeggerà. 5. Premere il tasto S1 o il tasto S2 per far rispettivamente avanzare o indietreg giare la REGIONE da selezionare.
- Page 11 Freestyle- Gromatide Instruction GROMATIDE FUNCIONALIDADES • Dados de maré para 75 praias de todo o mundo • Desvio de 180 minutos • Indica dados presentes sobre marés presentes e futuras • 9 localidades favoritas programáveis • Diversão opcional com animação de barbatana de tubarão • 100 metros H20 CARACTERÍSTICA ESPECIAL Este produto Freestyle apresenta um exclusivo Hydro Pusher ® (Botão de Accio- namento Hidro): estes botões podem ser premidos dentro de água para obter uma pressão de água dinâmica (não profundi- dade de água) de 3ATM. BOTÕES DE CONTROLO S1: Botão Start S2: Botão Stop/Reset S3: Botão Mode S4: Botão Set S5: Botão iluminação MODO DE INDICAÇÃO O relógio tem seis modos de exibição: TEMPO NORMAL, MARÉ, CRONO, TEMPO-...
- Page 12 Freestyle- Gromatide Instruction correspondentes para riniciar o var rimento da data. NOTA: Se nenhuns dados de maré ante- riores ou futuros estiverem disponíveis, a frase “NO TIDE DATA FOR DATE” (“DADOS DE MARÉ INDISPONÍVEIS”) será exibida. NOTA: A data, hora e unidade de altura de maré serão exiidos nos formatos da hora primária definida no modo NORMAL TIME. NOTA: Se a hora mostrada respresentar a hora de Verão (DST), que significa que a hora foi ajustada à hora dos dados arma- zenados, um sinal DST surge no ecrã. NOTA: O varrimento deve parar auto- maticamente para a última data da maré encontrada. Para definir a localidade da maré, 1. Carregue no botão S3 para seleccionar o modo TIDE (maré). O número favorito e o nome da localidade corrente de maré são exibidos. 2. Prima o botão S4, a mensagem “SET” aparece e o número FAV (favorito) aparece intermitente no mostrador. O número favorito por defeito é o definido para a localidade corrente. 3. Carregue no botão S1 ou S2 para avançar ou recuar, respectivamente, pelo número favorito e assim se selec cionar o nome correspondente da locali- dade. 4. Carregue no botão S3, a região geográ fica fica intermitente. 5. Carregue no botão S1 ou S2 para avançar ou recuar, respectivamente, pela selecção da REGIÃO. 6. Carregue no botão S3, a LOCALIDADE geográfica fica intermitente.
- Page 13 Freestyle- Gromatide Instruction GROMATIDE 機能 • 世界各地の海岸75ヶ所の潮汐データ機能 • 180分オフセット機能 • 現在の潮汐データ ・ 予測潮汐データ表示 機能 • お気に入りのロケーションプログラム機能 (9つまで) • ビッグタイ ム表示オプション (シャークのア ニメーション) • 水深100メートル 特別機能 Freestyleの本製品にはHydro Pusher® が搭載されています。 これらのボタンは動水 圧3ATM (水深ではありません) 下で押すこ とができます。 コントロールボタン S1: スタートボタン S2: ストッ プ/リセットボタン S3: モードボタン S4: セットボタン S5: ライトボタン 表示モード...
- Page 14 Freestyle- Gromatide Instruction たフォーマッ トが適用されます。 注: 表示時刻がDST (夏時間) の場合は、 保存 された潮汐データから時刻が調整されている ことを示し、 DSTのフラグが表示されます。 注: 潮汐データがある最も最近の日付が検知 されるとスキャンは自動的に停止します。 潮汐ロケーションを設定する 1. S3ボタンを押してTIDEモードを選択し ます。 お気に入り番号と現在の潮汐ロケ ーション名が表示されます。 2. S4ボタンを 「SET」 の文字が表示される まで長押しします。 FAV (お気に入り) 番 号が点滅します。 デフォルトは現在のロ ケーションに設定されています。 3. S1ボタンを押すとお気に入り番号を進 めることができ、 S2ボタンを押すとお気 に入り番号を戻すことができます。 番号...
- Page 15 Freestyle- Gromatide Instruction WATCH DISPLAY VISUALIZACIÓN UHRANZEIGE AFFICHAGE SUR LA MONTRE DISPLAY OROLOGIO MOSTRADOR DE RELÓGIO 時計のディ スプレイ WEST CST USA Huntingt Trestles Oceansd La Jolla Humboldt Ocean B. Mvricks St. Cruz Morro B. Pismo B. Gaviota Rincon Ventura Malibu...
- Page 16 Freestyle- Gromatide Instruction WATCH DISPLAY VISUALIZACIÓN UHRANZEIGE AFFICHAGE SUR LA MONTRE DISPLAY OROLOGIO MOSTRADOR DE RELÓGIO 時計のディ スプレイ CENTRAL AMERICA Pta Arns Cristobl Libertad PACIFIC ISLANDS Teahup. Tavarua GUAM Agana AUSTRLIA Sydney Bells B. Marg Rvr Phlp Isl Newcastle NEW ZEALAND...
Need help?
Do you have a question about the GROMATIDE FS84950 and is the answer not in the manual?
Questions and answers