Advertisement
Available languages
Available languages
Quick Links
STRIDE
S4
S3
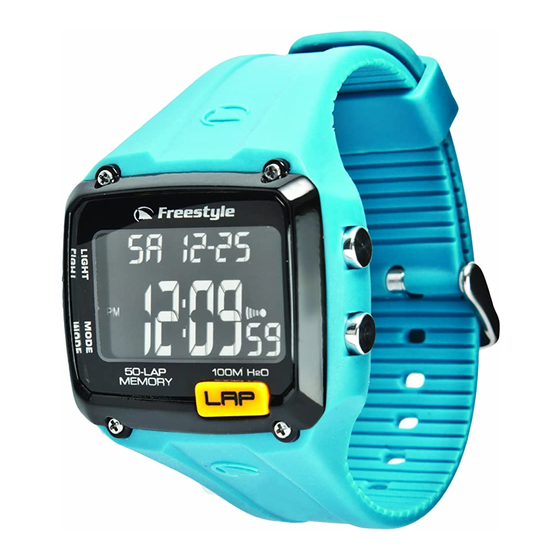
S1- Start/lap Button
S2- Stop/reset Button
S3- Mode/next Button
S4- Light Button
S5- Lap Button
SPECIAL FEATURE:
This Freestyle product features unique
Hydro Pushers®: these pushers can be
pressed under water to a dynamic water
pressure (not water depth) of 3 ATM.
DISPLAY MODES:
The watch has six display modes: NOR-
MAL TIME, CHRONOGRAPH, RECALL,
TIMER, HEAT TIMER and ALARM.
To change from one display mode to
another, press S3 button once.
TO SET THE TIME AND CALENDAR:
1. Press S3 button to select NORMAL
TIME mode.
2. Press and hold S1 button to toggle
between Time Zone 1 (T1) and Time
Zone 2 (T2)
3. Press and hold S2 button, the
message "HOLD TO SET" will be dis-
played for approximately 2 seconds
and the Time Zone setting will blink.
4. Press S1 button to select Time Zone
1 (TIME 1) or Time Zone 2 (TIME 2) to
set.
5. Press S3 button, the hour digits will
blink.
6. Press S1 button to increase the hour
digits by one unit. Holding down the
button will speed up the process.
7. Press S3 button, the minute digits
will blink.
8. Press S1 button to set the minute
digits.
9. Press S3 button, the second digits
will blink.
10. Press S1 button to reset the second
digits to zero.
11. Press S3 button, the month digits
will blink.
12. Press S1 button to set the month
digits.
13. Press S3 button, the date digits will
blink.
14. Press S1 button to set the date
digits.
15. Press S3 button, the year digits will
blink.
16. Press S1 button to set the year
digits.
17. Press S3 button, the time format
setting will blink.
18. Press S1 button to toggle between
12-hour (12HR) format and 24-hour
(24HR) format.
19. Press S3 button, the date setting
®
format will blink.
20. Press S1 button to toggle between
month-date (MM-DD) format and
date-month (DD-MM) format.
21. Press S3 button, the hourly chime
(CHIME) setting will blink.
22. Press S1 button to toggle between
ON and OFF of the hourly chime
S2
setting.
23. Press S3 button once, the button
beep (BEEP) setting will blink.
S1
24. Press S1 button to toggle between
ON and OFF of the button beep set-
ting.
25. When finished making all the set-
S5
tings, press S2 button to confirm.
NOTE: In 12-hour format, the hour
digits are identified by "PM" for 12:00
P.M.-11:59 P.M.
NOTE: The day (of the week) is automati-
cally calculated.
NOTE: The year digits range from 2008
to 2099.
TO USE THE CHRONOGRAPH:
1. Press S3 button to select CHRONO-
GRAPH mode.
2. The maximum number of laps that
can be stored in a new workout will
be displayed. If the lap memory is full,
the message "FULL" will be displayed
and a tune will be emitted.
3. The chronograph will then be dis-
played in its current state- stopped,
running, or reset.
4. To resume a stopped counting, press
S1 button to resume from where it
left off.
5. To start a new counting, reset the
chronograph to zero first. Press and
hold S2 button, the message "HOLD
TO CLR" will be displayed for approxi-
mately 2 seconds and the counter will
be reset to zero.
For changing the chronograph display
format:
In CHRONOGRAPH mode,
1. Make sure the chronograph is in the
reset state and there is no previous
lap record.
2. Press S4 button to toggle between
LAP format or SPL format.
3. If LAP format is selected, the lap time
(individual lap time) will be displayed.
If SPL format is selected, the split
time (cumulative lap time) will be
displayed.
For the measurement of elapsed time:
In CHRONOGRAPH mode,
1. Press S1 button to start counting.
2. To stop counting, press S2 button.
Press S1 button to resume from
where it left off.
3. To reset to zero, press S2 button to
stop counting, then press and hold S2
button, the message "HOLD TO CLR"
will be displayed for approximately 2
seconds and the counter will be reset
to zero.
For the measurement of split time:
In CHRONOGRAPH mode,
1. Press S1 button to start counting.
2. While the chronograph is running,
press S1/S5 button to register a lap.
3. Depends on the chronograph display
format chosen, the individual lap time
of the previous lap (if LAP format is
chosen) or the cumulative lap time
(if SPL format is chosen) will be
displayed. The lap number of the
previous lap will be blinking at the top
line of the display.
After 10 seconds, the current elapsed
time and the current lap number will
be displayed.
4. Repeat the last step until all the laps
have been registered.
5. To stop counting, press S2 button.
The total accumulated lap time will
be displayed.
6. To reset to zero, press and hold S2
button, the message "HOLD TO CLR"
will be displayed for approximately 2
seconds and the counter will be reset
to zero.
For using the 5-second countdown start:
In CHRONOGRAPH mode,
1. Make sure the chronograph is in the
reset state and there is no previous
lap record.
2. Press and hold S2 button, the number
"5" will flash for approximately 2
seconds, and then the 5-second
countdown start will be activated.
3. Press S1 button to initiate the 5-sec-
ond count down.
4. After 5 seconds (count down to zero),
a long beep will be emitted and the
chronograph will be initiated.
NOTE: The chronograph can count
up to a maximum time of 99:59:59:99
(99hours, 59 minutes, 59:99 seconds).
If the chronograph has reached the
maximum time as specified, press and
hold S2 button to reset the chronograph
to zero.
NOTE: You can leave the chronograph
running while switching over to other
operating modes. In NORMAL TIME
mode, the chronograph indicator
appear as a reminder.
For saving the lap record:
In CHRONOGRAPH mode,
1. Upon finishing a counting, press and
hold S4 button, the message "HOLD
TO SAVE" will be displayed for ap-
proximately 2 seconds.
2. If there is sufficient memory, the
lap record will be stored and the
remaining available lap memory will
be displayed.
If there is insufficient memory, the
lap record will be stored along with as
many of the oldest splits as possible
and the message "FULL" will be
displayed.
TO USE THE RECALL MODE:
1. Press S3 button to select RECALL
mode.
2. If there is lap record stored, the data
stamp (showing the day of the week,
date and month) of a stored data will
blink at the upper line of the display.
If there is no lap record stored, the
message "no DATA" will be displayed.
3. Press S1 button to cycle the date
stamp(s) of the corresponding lap
record(s). This has no effect if there is
no lap record stored.
4. When the desired lap record is dis-
played, press S2 button to select.
5. Press S1 button to cycle the details of
the selected lap record in the order of:
ENGLISH
will
Advertisement

Related Manuals for Freestyle FS84951


Summary of Contents for Freestyle FS84951
- Page 1 S2- Stop/reset Button S3- Mode/next Button S4- Light Button S5- Lap Button SPECIAL FEATURE: This Freestyle product features unique Hydro Pushers®: these pushers can be pressed under water to a dynamic water pressure (not water depth) of 3 ATM. DISPLAY MODES:...
- Page 2 TO USE THE BACKLIGHT: Press S4 button to turn on the backlight for approximately 3 seconds. To reduce carbon foot print, these Freestyle instructions are printed with soy inks on recycled paper.
- Page 3 S3 – Botón de modor/siguiente S4 – Botón de luz S5 – Botón de vuelta CARACTERÍSTICA ESPECIAL: Este producto de Freestyle tiene una característica única, Hydro Pushers®: Los pushers se pueden pulsar bajo agua con una presión de agua dinámica (no la profundidad) de 3 ATM.
- Page 4 PARA USAR LA LUZ DE FONDO: Pulse el botón S4 para encender la luz de fondo durante unos 3 segundos. Para reducir la huella del carbono, las instrucciones de Freestyle se han imprimido con tinta de soja en papel reciclado. ESPAÑOL...
- Page 5 S1 – Start/Runde-Taste S2 – Stopp/Rücksetzen-Taste S3 – Modus/Weiter-Taste S4 – Licht-Taste S5 – Runde-Taste BESONDERHEITEN: Dieses Freestyle-Produkt ist mit einzigar- tigen Hydro-Pusher® ausgestattet: Diese Knöpfe können bis zu einem dynamischen Wasserdruck (nicht Wassertiefe) von 3 ATM unter Wasser gedrückt. ANZEIGEMODI:...
- Page 6 ALARM-Modus, sobald die Wecka- larm-Wiederholung aktiviert wurde. UM DIE HINTERGRUNDBELEUCHTUNG ZU BENUTZEN: Drücken Sie Taste S4 um die Hinter- grundbeleuchtung für etwa 3 Sekunden anzuschalten. Diese Freestyle-Gebrauchsanweisung wurde mit Tinte auf Sojabasis auf Recycling-Papier gedruckt um den Kohleausstoß zu reduzieren.
- Page 7 S3 – Bouton mode/suivant S4 – Bouton lumière S5 – Bouton tour FONCTION SPECIALE: Ce produit Freestyle unique offre la fonction unique Hydro Pushers®: ces boutons peu- vent être pressés sous l’eau à une pression dynamique de l’eau (ce qui ne correspond pas à...
- Page 8 MAL DE L’HEURE ou dans le mode ALARME. UTILISATION DU RETRO ECLAIRAGE: Appuyez sur le bouton S4 pour activer le rétro éclairage durant 3 secondes. Pour réduire l’émission de carbone dans l’atmosphère, ces instructions Freestyle sont imprimées avec des encres de soja sur du papier recyclé.
- Page 9 S3 – Tasto modo/successivo S4 – Tasto illuminazione S5 – Tasto giro FUNZIONE SPECIALE: Questo prodotto Freestyle garantisce la caratteristica unica Hydro Pushers®: questi pulsanti possono essere premuti sott’acqua ad una pressione dinamica (non profondità di acqua) di 3 ATM.
- Page 10 ALLARME, quando l’orologio è entrato nel modo ritardo allarme (snooze). COME UTILIZZARE LA RETROILLUMI- NAZIONE: Premere il tasto S4 per accendere la retroil- luminazione per circa 3 secondi. Per ridurre l’impatto ambientale, queste istruzioni Freestyle sono stampate con inchiostri di soia su carta riciclata .
- Page 11 S3 – Botão Modo/Seguinte S4 – Botão de Luz S5 – Botão Volta CARACTERÍSTICAS ESPECIAIS: Este produto Freestyle apresenta os únicos Hydro Pushers®: estes botões de accio- namento podem ser premidos debaixo de água sob uma pressão de água dinâmica (não profundidade de água) de 3 ATM.
- Page 12 ALARME quando o relógio se encontra no modo snooze. UTILIZAR A LUZ POSTERIOR: Prima o botão S4 para ligar a luz posterior cerca de 3 segundos. Para reduzir a emissão de carbono, estas instruções Freestyle foram impressas com tinta de soja em papel reciclado.
- Page 13 STRIDE S1 – スタート/ラッ プボタン S2 – ストッ プ/リセッ トボタン S3 – モード/移動ボタン S4 – ライトボタン S5 – ラッ プボタン 特別機能: Freestyleの本製品にはHydro Pusher®が搭載されています。 これらの ボタンは動水圧3ATM (水深ではありま せん) 下で押すことができます。 表示モード: この時計には次の6つの表示モードがあ ります。 時刻 (NORMAL TIME) 、 クロノグラフ (CHRONO) 、 リコール (RECALL) 、 タイマー (TIMER) 、 ヒ...
- Page 14 アラームをオンにすると、 アラームイ ンジケータ が表示されます。 アラームの作動: アラームがオンの状態で指定時刻にな ると、 アラーム音が鳴りライトが光りま す。 どれかボタンを押すと、 音とライトを 停止します。 ボタンによる停止を行わないでアラーム 音が鳴り終わると、 自動的にスヌーズモー ドに入ります。 この場合、 アラームは5分後 に再作動します。 スヌーズモードを解除するには、 S3ボ タンを押してアラームモードを選択し、 次にS1ボタンを押してアラームを 解 除します。 注意: 時刻モードまたはアラームモードの 状態でスヌーズモードに入ると、 アラーム インジケータ が点滅を続けます。 バックライトを使う: S4ボタンを押すとバックライトが約3秒 間点灯します。 カーボンフッ ト プリントの減少を目的と してFreestyleの取扱説明書は大豆イ ンキとリサイ クル紙を使用しています...
Need help?
Do you have a question about the FS84951 and is the answer not in the manual?
Questions and answers