
Subscribe to Our Youtube Channel
Related Manuals for Adkins Studio Clam


Summary of Contents for Adkins Studio Clam
- Page 1 Studio Clam & Mini Clam Operators Handbook ©2015 a.adkins and sons limited. all rights reserved...
- Page 2 Preface Dear User Welcome to the growing group of Studio Clam Press and Studio Mini Clam Press users. The product you have purchased has been carefully designed and manufactured to ensure that you, the user, will gain the maximum benefit.
-
Page 3: Table Of Contents
Installing the machine Electrical requirements Adjusting the pressure How to operate the Studio Clam Press Studio Mini Clam Press Starting with the Studio Clam Press and Studio Mini Clam Press Working with heat transfer materials Pressing pad assembly Shutting down the machine... -
Page 4: Introduction Studio Clam Press And
They are ideal for medium volume production. The work areas are: Studio Clam Press 38 x 38 cms (15 x 15 ins) and Studio Mini Clam Press 28 x 38 cms (11 x 15 ins). Specifications... -
Page 5: Studio Mini Clam Press 1.2 Safety
If required, our customer service team can arrange maintenance service. The Studio Clam Press and Studio Mini Clam Press meet the European Legislation standard. Under normal conditions accidents are rare. However listed below are some practical points to ensure your safety. -
Page 6: Installation
Ensure that the supply rating on the machine specification plate corresponds with your local supply and that the correct plug is fitted (Europe), OR for 110 volts AC 5%, 15 amps for Studio Clam Press and 10 amps for Studio Mini Clam Press (America). -
Page 7: Adjusting The Pressure
Replacement of the mains cable must be done by a competent service engineer. HEATING ELEMENT The heating element fitted to the Studio Clam Press is rated at 2200 Watts and the element for the Studio Mini Clam Press is rated at 1750 Watts. -
Page 8: How To Operate The Studio Clam
3.1.2 Turn on the Studio Clam Press and Studio Mini Clam Press; the on/off switch is on the side of the machine. Set the machine controls as necessary. See instructions for adjusting the pressure, page 4 and operation of Control Units page 12. -
Page 9: Pressing Pad Assembly
Working with Heat Transfer Materials (cont.) Unload the garment from the table of the machine taking care not to touch the heat plate to avoid risk of a burn. Pressing Pad Assembly The pressing pad normally supplied with this machine is silicone rubber. -
Page 10: Maintenance Of The Machine
Maintenance of the Machine Daily Maintenance For good press results it is important to keep the press surfaces clean. Wipe the surface of the heat plate with a dry cloth before use when the plate is cold. Periodic Maintenance Put a few drops of oil onto the various pivot pins and the pressure adjusting screw every three months. -
Page 11: Machine Drawings And Diagrams
Machine Drawings Diagrams On the following pages are the schematic diagrams for the Studio Clam Press and Studio Mini Clam Press. General Layout………………………….…... Page 9 Exploded diagram and parts list Studio Clam Press………………………….……………… Page 10 Exploded diagram and parts list Studio Mini Clam Press ……………………………... -
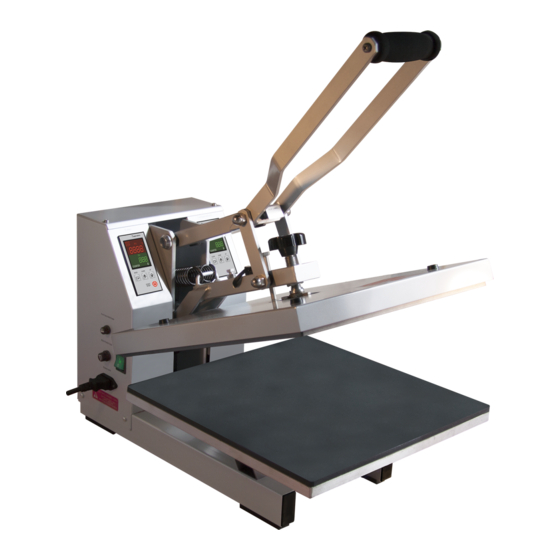
Page 12: General Layout
5.1 Machine General Layout MACHINE OPERATING HANDLE TIME AND TEMPERATURE CONTROLLERS PRESSURE ADJUSTING KNOB HEAT PLATE TABLE ON/OFF SWITCH Page 9... -
Page 13: Exploded Diagram And Parts List - Studio Clam
5.2 Exploded Diagram and Parts List (Studio Clam Press - 38cmx38cm Heat Plate) No. Description Qty. Part No. 1 Pedestal Frame 1 ASCL1 2 Right Body Box 1 ASCL2 3 Left Body Box 1 ASCL3 4 Line Board 1 ASCL4... -
Page 14: Exploded Diagram And Parts List - Studio Mini
5.3 Exploded Diagram and Parts List (Studio Mini Clam Press - 28cmx38cm Heat Plate) No. Description Qty. Part No. Pedestal Frame 1 ASCL1 Right Body Box 1 ASCL2 Left Body Box 1 ASCL3 Line Board 1 ASCL4 Fix Action Board 1 ASCL5 Back Cover Board 1 ASCL6... - Page 15 5.4 Operation Of Control Units, Setting Temperature and Time (The press must always be in the open position before the controller is set) Setting Temperature Switch on machine. HOLD HOLD STOP STOP °C °C Press 'UP' 'DOWN' buttons to change temperature values.
-
Page 16: 5.5 General Electrical Diagram
5.5 General Electrical Diagram Page 13... -
Page 17: 5.6 Detailed Electrical Diagram
5.6 Detailed Electrical Diagram Page 14... -
Page 18: Design Change
Design Change With the policy of constant improvement and/or modification to meet changing conditions, the right is reserved to change the design and/or specifications at any time without prior notification, and therefore specifications may vary and not be in accordance with this manual. Page 15... -
Page 19: Guarantee (Limited Warranty)
“as is”. A. Adkins & Sons Limited does not warrant that the functions of the press will meet the customer’s requirements or expectations. -
Page 20: Declaration Of Conformity
Manufacturer's Name: A. Adkins & Sons Limited Manufacturer's Address: High Cross, 18 Lancaster Road, Hinckley, Leicester, LE10 0AW, United Kingdom. Type of Equipment: Studio Clam Heat Press, Studio Mini Clam Heat Press ..................Model Number: ..................Serial Number: ..................Year of Manufacture: I, the undersigned, hereby declare that the equipment specified above conforms to the above directives and standards.
Need help?
Do you have a question about the Studio Clam and is the answer not in the manual?
Questions and answers