Table of Contents
Advertisement
Quick Links
HEAT PRESS TECHNOLOGY
Operators Handbook
All products within the ADKINS range are labelled with CE marking and are manufactured and tested to comply with EC safety regulations.
All products within the ADKINS range are labelled with CE marking and are manufactured and tested to comply with EC safety regulations.
Rev B - 24/01/19
Rev B - 24/01/19
©2019 A. Adkins & Sons Ltd. All rights reserved. E&OE. V1.0.
©2018 A. Adkins & Sons Ltd. All rights reserved. E&OE. V1.0.
STUDIO 'EZ'-AUTO CLAM
Advertisement
Table of Contents

Related Manuals for Adkins STUDIO EZ AUTO CLAM


Summary of Contents for Adkins STUDIO EZ AUTO CLAM
- Page 1 Rev B - 24/01/19 All products within the ADKINS range are labelled with CE marking and are manufactured and tested to comply with EC safety regulations. All products within the ADKINS range are labelled with CE marking and are manufactured and tested to comply with EC safety regulations.
- Page 2 All A. Adkins & Sons Limited products are specifically designed to ensure ease of use with particular attention to safety requirements. Should you discover any fault or damage upon receipt of this product,...
-
Page 3: Table Of Contents
Contents Introduction Studio 'EZ'-Auto Clam Specifications of the Studio 'EZ'-Auto Clam Safety Installation Transport instructions Installing the machine Electrical requirements Adjusting the pressure How to operate the Studio 'EZ'-Auto Clam Starting with the Studio 'EZ'-Auto Clam Working with heat transfer materials Pressing pad assembly Shutting down the machine Auto shut down feature... -
Page 4: Introduction Studio 'Ez'-Auto Clam
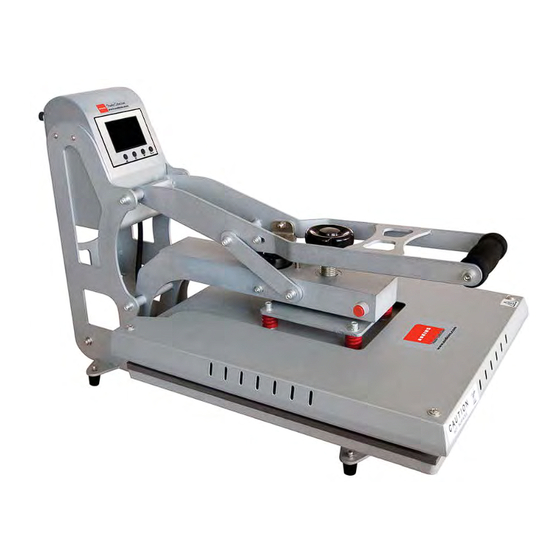
Introduction Studio 'EZ'-Auto Clam Specifications of the Studio 'EZ'-Auto Clam The Studio 'EZ'-Auto Clam is a manually operated heat press for transfer printing and material fusing but with an electro-magnetic opening system. It is ideal for medium volume production. The work area is 40 x 50 cm (15.75 x 19.7 in). Specifications Power consumption 1.8 kW... -
Page 5: Safety
Safety Tips Our customer service department has its own service engineers and, if required, maintenance is available. The Studio 'EZ'-Auto Clam meets the European Legislation standard. Under normal conditions accidents are rare. However listed below are some practical points to ensure your safety. - Page 6 Safety Tips (cont.) MACHINE OPERATION Only persons trained to do so should operate this machine. This is very important because the machine, when set, will open automatically after the transfer cycle is complete. There must be sufficient space for the heat plate to rise from the table without interference.
-
Page 7: Installation
2. Installation Transport instructions The machine comes to you either shrink-wrapped or in a box. If you have to transport the machine at any time it is recommended that you use a similar box and packing method. Please let the machine cool down and lower the handle to the locked position. -
Page 8: Adjusting The Pressure
Electrical requirements (cont.) As the colours of the wires in the mains lead of this apparatus may not correspond with the coloured markings identifying the terminals in your plug, proceed as follows:- The wire coloured green and yellow must be connected to the terminal in the plug that is marked by the letter E, or by the safety earth symbol coloured green, or green and yellow. -
Page 9: How To Operate The Studio 'Ez'-Auto Clam
How to Operate the Studio 'EZ'-Auto Clam Starting with the Studio 'EZ'-Auto Clam 3.1.1 Plug into your supply outlet and switch supply on. N.B. Please ensure the mains plug is easily accessible to the operator so that in the event of a fault the machine can be unplugged. -
Page 10: Pressing Pad Assembly
Working with Heat Transfer Materials (cont.) 3.2.4 Set the time required for the material being used. Close the press by lowering the handle and the pressing cycle is automatically activated. A buzzer will sound when the set time has elapsed and the heat plate will rise automatically from the locked position. -
Page 11: Maintenance Of The Machine
4. Maintenance of the Machine Daily Maintenance For good press results it is important to keep the press surfaces clean. Wipe the surface of the heat plate with a dry cloth before use when the plate is cold. Periodic Maintenance Put a few drops of oil onto the various pivot pins and the pressure adjusting screw every three months. -
Page 12: Machine Drawings & Diagrams
5. Machine Drawings Diagrams On the following pages are the schematic diagrams for the Studio 'EZ'-Auto Clam. General Layout ………………………………...… Page 10 Control Unit Operation ……………………...… Page 11 Exploded diagram and parts list ………….… Page 12 Machine Electrical Schematic ……………...… Page 13 Page 9... -
Page 13: General Layout
5.1 General Layout TIME AND TEMPERATURE CONTROLLER PRESSURE MACHINE ADJUSTING OPERATING KNOB HANDLE HEAT PLATE TABLE AND PAD Page 10... -
Page 14: Control Unit Operation
5.2 Operation Of Control Unit, Setting Time and Temperature (The head must always be in the up position before the controller is set) Temperature Settings Setting Temperature Switch on machine. Press the 'OK' button to enter the temperature setting mode (the ' light will flash). -
Page 15: Exploded Diagram And Parts List
5.3 Exploded Diagram and Parts List No. Part Description Qu. Part No. Machine Frame STEZA/1 Electromagnetic Contact Plate STEZA/2 Feet STEZA/3 Table STEZA/4 Heat Platen STEZA/5 Insulation Cover STEZA/6 Anti-scald Protect Cover STEZA/7 Adapter Plate STEZA/8 Emergency Stop Button STEZA/9 10 Arm STEZA/10 Pressure Adjust Knob... -
Page 16: Machine Electrical Schematic
5.4 Machine Electrical Schematic (GN) SOLID STATE RELAY HEAT PLATE DIGITAL CONTROLLER (GY-06) INDICATOR 12 11 10 9 RECTIFYING TRANSFORMER MAGNETIC CYCLE ELECTROMAGNET SWITCH RELEASE BUTTON N.B. Controller current since 10th Nov 2015 Page 13... -
Page 17: Design Change
6. Design Change With the policy of constant improvement and/or modification to meet changing conditions, the right is reserved to change the design and/or specifications at any time without prior notification, and therefore specifications may vary and not be in accordance with this manual. -
Page 18: Guarantee (Limited Warranty)
“as is”. A. Adkins & Sons Limited does not warrant that the functions of the press will meet the customer’s requirements or expectations. -
Page 19: Declaration Of Conformity
A. ADKINS & SONS LIMITED DECLARATION OF CONFORMITY Application of Council Directives: Machinery, Low Voltage. E.M.C. Standards to which Conformity is BS EN ISO 12100:2010 - Safety of machinery: Basic Technology, Principles of Design. Declared: BS EN 60204-1:2006+A1:2009 - Safety of machinery: Electrical Equipment of Machines.
Need help?
Do you have a question about the STUDIO EZ AUTO CLAM and is the answer not in the manual?
Questions and answers