Table of Contents

Related Manuals for Valeo Beep&Park 632200


Summary of Contents for Valeo Beep&Park 632200
- Page 1 632200 • INSTRUCTION MANUAL INNOVATION FR MANUEL D’INSTRUCTION ES MANUAL DE INSTRUCCIONES IT MANUALE DI ISTRUZIONI DE GEBRAUCHSANWEISUNG FOR EVERYONE NL INSTRUCTIEHANDLEIDING CS NÁVOD K POUŽITÍ PL INSTRUKCJA OBSŁUGI HU HASZNÁLATI ÚTMUTATÓ...
- Page 2 beep&park Parking assistance system ® Thank you for purchasing this product. Please read the manual carefully before commencing installation and using the unit. Instruction manual beep&park Système d’aide au stationnement ® Merci d’avoir acheté ce produit. Lire attentivement la notice avant d’installer et d’utiliser l’appareil. Notice d’utilisation beep&park Asistente de aparcamiento...
-
Page 3: Table Of Contents
Table of contents Sommaire Tabla de contenidos Introduction & Feature ............ 6 Introduction & Caractéristiques ........ 6 Instrucciones & Características ......... 6 Caution ..................11 Mise en garde ...............11 Precaución ................11 Box contents & optionnal upgrade ......15 Contenu du pack & produits complémentaires Contenido de la caja &... - Page 4 Sommario Inhaltsangabe Inhoudsopgave Introduzione & Caratteristiche ........6 Einleitung & Funktionen ..........6 Inleiding en kenmerken ............ 6 Avvertenze ................11 Vorsicht ..................11 Waarschuwing ..............11 Contenuto della scatola & upgrade opzionali ...15 Verpackungsinhalt & optionale Erweiterung ..15 Inhoud verpakking en optionele extra voorzieningen ..............15 Attrezzi necessari .............19 Benötigtes Werkzeug ............19...
- Page 5 Obsah Spis treści Tartalomjegyzék Úvod & funkce ................ 6 Wprowadzenie i funkcje ..........6 Bevezetés & működési jellemzők ......6 Varování ..................11 Uwaga ..................11 Figyelmeztetés ..............11 Obsah balení & možná vylepšení ......15 Zawartość opakowania oraz wyposażenie Csomag tartalma& opcionális frissítés .....15 dodatkowe................15 Potřebné...
-
Page 6: Introduction & Feature
Features REAR MODE Fonctionnalités MONTAGE ARRIÈRE Características MODO TRASERO Funzionalità MONTAGGIO POSTERIORE Funktionen HECKMODUS Kenmerken MONTAGE ACHTER Funkční vlastnosti ZADNÍ REŽIM Funkcje TRYB TYLNY A rendszer működéséről röviden HASZNÁLAT A JÁRMŰVÖN HÁTUL... - Page 7 Features FRONT MODE Fonctionnalités MONTAGE AVANT Características MODO FRONTAL Funzionalità MONTAGGIO ANTERIORE Funktionen FRONTMODUS Kenmerken MONTAGE VÓÓR Funkční vlastnosti PŘEDNÍ REŽIM Funkcje TRYB PRZEDNI A rendszer működéséről röviden JÁRMŰ ELEJÉN AKTÍV MÓDOZAT...
- Page 8 Assisting the driver during the parking Détecte les obstacles en informant les Ayuda al conductor durante las maniobras de maneuvers alerting the driver of detected conducteurs lors de manœuvres par un signal estacionamiento alertando de los obstáculos obstacles with an audible warning. sonore.
- Page 9 Assiste il guidatore durante le manovre di Unterstützung des Fahrers vor erkannten De bestuurder bij parkeermanoeuvres assiteren parcheggio e lo avvisa con un segnale acustico Hindernissen während der Parkmanöver durch voor gedetecteerde obstakels door middel del rilevamento di eventuali ostacoli. akustische Warnsignale.
- Page 10 Asistence řidiči v průběhu parkování, upozorňu- Pomaga kierowcy podczas wykonywania Parkolási manőver közben segíti a járművezetőt jící na výskt překážky pomocí zvukových signálů. manewrów parkingowych, informując kierowcę oly módon, hogy hangjelzéssel figyelmezteti őt Systém může být instalován buď pro detekci o wykrytych przeszkodach za pomocą...
-
Page 11: Caution
Caution Attention Precauciones Raccomandazioni Vorsicht Waarschuwing Varování Ostrzeżenia Figyelmeztetés... - Page 12 à manoeuvrer et se parking. Driving skills, such as slowing garerLa vigilance du conducteur est • Valeo beep & park® ayuda a proporcionar down, use of mirrors etc. are always cependant impérative (utiliser les asistencia en la marcha atrás y essential.
- Page 13 Bohren der Löcher zu überprüfen. • Valeo beep&park® helpt de bestuurder • Valeo beep&park® fornisce assistenza • Valeo beep&park® ist eine Hilfe für bij het achteruitrijden en parkeren. quando si effettua la retromarciamarcia o Parkmanöver. Dieses Produkt ist kein Ersatz Acties van de bestuurder, zoals un parcheggio.
- Page 14 • Zaleca się sprawdzenie • Nyomatékosan ajánljuk a szenzorok umiejscowienia czujników przed helyzetének ellenőrzését a lyukak • Valeo beep&park® pomáhá při couvání wykonaniem otworów w zderzaku. végleges kifúrása előtt. a parkování. Dovednosti řidiče jako je zpomalování, sledování zpětných •...
-
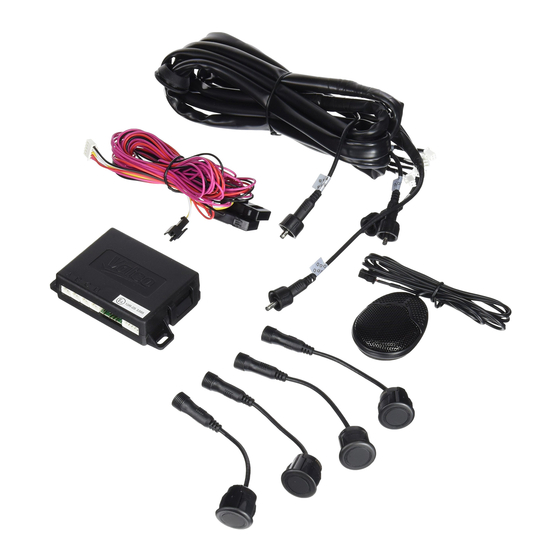
Page 15: Box Contents & Optionnal Upgrade
Box content Contenu du pack Contenido de la caja Contenuto della scatola Verpackungsinhalt Inhoud verpakking Obsah balení Zawartość opakowania A készlet tartalma... - Page 16 Item Quantity Spare part ref Item Quantity Spare part ref 632205 – black (x1) 632206 – black shiny (x1) 632207 – silver (x1) 632208 – dark grey (x1) 18,8 mm Ø 632214 – paintable (x1) 0° x4 4° x4 632226 10°...
- Page 17 Optional spare parts and upgrade Produits complémentaires optionnels Repuestos adicionales y mejoras Parti di ricambio opzionali e upgrade Optionale Ersatzteile und Erweiterungen Optionele reserveonderdelen en extra voorzieningen Volitelné náhradní díly a aktualizace Możliwe funcje dodatkowe Opciós alkatrészek és frissítés...
- Page 18 Item Spare part ref LED display 632215 LCD display 632216 Switch button 632222 Extra cable – 6 m 632220 Kit park vision 632210...
-
Page 19: Tools Needed
Tools needed Outils nécessaires Herramientas necesarias Attrezzi necessari Werkzeuge benötigt Benodigd gereedschap Potřebné nářadí Niezbędne narzędzia Szükséges szerszámok... - Page 20 Ø 3 mm...
-
Page 21: Installation
Set up sensors on bumper (front/rear) Installer les capteurs dans le pare-choc (avant/arrière) Configuración de los sensores en parachoque (delanteros/traseros) Montaggio dei sensori sul paraurti (anteriore/posteriore) Einstellen der Sensoren (Front-/Heckmodus) Montage sensoren op bumper (voor/achter) Nastavení senzoru v nárazníku (přední/zadní) Umieść... - Page 22 REAR & FRONT H>40cm H=50cm H<65cm H>40cm H=50cm H<65cm A = 1/8 L = 22 cm max...
- Page 23 REAR FRONT Ø 18,8 mm Ø 3 mm...
-
Page 25: 2- Choose The Correct Angle Ring
Choose the correct angle ring Choisir la bonne bague correctrice d’angle Elija el anillo angular correcto Scegliere l’anello corretto Wählen Sie den korekten Winkeleinstellring Kies de juiste stelring Výběr vhodné podložky pro nastavení úhlu Wybierz odpowiednią podkładkę kątową Válasszuk ki a helyes dőlésszög beállító gyűrűt... - Page 26 0° / 4° / 10 ° -15° +15° 4° H = 65 cm 10 ° 10 ° H = 50 cm 10 ° 0° 10 ° H = 40 cm 4°...
- Page 27 p. 61 0°/4°/10°...
- Page 29 Check the inclination +/-5° Vérifier l’inclinaison +/-5° Verificar la inclinación +/-5º Verificare l’inclinazione di +/-5° Prüfen Sie die Neigung (+/- 5°) Controleer de hoek (+/- 5°) Kontrola sklonu +/-5° Sprawdź kąt nachylenia +/-5° Ellenőrizzük a +/-5° tartományban a dőlés szögét...
-
Page 31: 3- Set Up The Jumper On Ecu
Set up the jumper on ECU (front/rear mode - tow bar off-set - sensitivity) Positionner les cavaliers sur l’UCE (montage avant ou arrière - correction attache remorque - sensibilité) Configurar el parachoques en la UEC (modo delantero / trasero - ajuste del enganche de remolque - sensibilidad) Predisporre il ponte nella centralina ECU (montaggio anteriore/posteriore - compensazione barra di traino - sensibilità) Wählen Sie die richtige Einstellung des Schalters am Steuergerät(Front- / Heckmodus - Anhängerkupplung - Empfindlichkeit) Jumper correct instellen op de ECU (montage voor/achter - aanwezigheid trekhaak - gevoeligheid) - Page 32 Jumper Front system High sensitivity sensitivity 20 s (default setting) STOP Rear system 30 cm (default setting) STOP (default setting) 50 cm...
-
Page 33: 4- Connect The Ecu (Front/Rear)
Connect the ECU (front/rear) Connecter l’UCE (montage avant/montage arrière) Conectar la UEC (delantero/trasero) Connessione alla centralina ECU (anteriore/posteriore) Verbinden Sie das Steuergerät (Front / Heck) Sluit de ECU aan (voor/achter) Připojení ECU (přední/zadní) Podłącz centralkę ECU (przód/tył) Csatlakoztassuk az ECU-t (elöl/hátul) - Page 34 REAR MODE Optional Connection to trailer plug (See section page 58) Option Connecter à la prise remorque (Voir page 58) Opcional Conexión a remolque (Ver sección página 58) Fakultativ Verbindung zum Anghängeranschluss (Siehe Seite 58) Opzionale Collegamento alla connessione del rimorchio (Vedi la sezione a pagina 58) Optioneel Verbinding met trekhaakaansluiting (zie gedeelte pagina 58) Volitelné...
- Page 35 FRONT MODE 1/ Ground: black 2/ Brake light: white with red stripes 3/ + Reverse: white 4/ +ACC: Pink Reverse light Feu marche arrière Luz de marcha atrás Luce posteriore Rückfahrscheinwerfer Brake light Achteruitijlamp Feu stop Světlo zpátečky Luz de freno Bremslicht Światło cofania Luce del freno...
- Page 36 REAR MODE FRONT MODE...
-
Page 37: 5- Set Up Loudspeaker (Front/Rear)
Set up Loudspeaker (front/rear) Installer le haut-parleur (montage avant/montage arrière) Configuración de altavoz (delantero/trasero) Posizionamento dell’altoparlante (anteriore/posteriore) Einstellung des Lautsprechers (Front/Heck) Montage luidspreker (voor/achter) Nastavení reproduktoru (přední/zadní) Ustaw głośnik (przód/tył) Állítsuk be a hangszórót (elöl/hátul) - Page 38 3 2 1 > 5 s > 5 s...
-
Page 39: 6- Functional Test
Functional tests Essais de fonctionnement Pruebas de funcionalidad Test di funzionamento Funktionstest Functietests Test funkcí Test funkcjonowania Funkció teszt... - Page 40 REAR MODE FRONT MODE...
-
Page 41: 7- False Detection May Occur In Such Cases
False detection may occur in such cases (front/rear) Risque d’erreur de détection dans les cas suivants Falsa detección podría ocurrir en esos casos In questi casi può verificarsi un falso rilevamento dell’ostacolo Eine fehlerhafte Erkennung kann bei folgenden Fällen auftreten Onjuiste detectie kan voorkomen in deze gevallen K chybné... - Page 42 FRONT MODE REAR MODE False detection may occur in such cases: Risque d’erreur de détection dans les cas suivants : Puede darse una falsa alarma en estos casos: In questi casi può verificarsi un falso rilevamento dell’ostacolo: In diesen Fällen können Fehlmessungen erfolgen: In de volgende gevallen werkt het detectiesysteem mogelijk niet optimaal: K chybné...
-
Page 43: 8- Self Diagnosis
Self diagnosis Auto-diagnostique Autodiagnóstico Auto diagnosi Selbstdiagnose Zelfdiagnose Samodiagnostika Autodiagnostyka Öndiagnosztika... - Page 44 When the reverse gear is selected, the system will automatically test the 4 sensors: System OK A Sensor not working B Sensor not working Default system C Sensor not working D Sensor not working Go to page 6 – 7 to locate the default sensor Important note: If 2 consecutives sensors are in default, the full system will be set off...
-
Page 45: 9- Troubleshooting
Troubleshooting Dépannage Solución de problemas Riparazione del guasto Fehlerbehebung Storing zoeken Odstraňování problémů Rozwiązywanie problemów Hibaelhárítás... - Page 46 Troubleshooting Dépannage Once reverse gear is selected, 4- Check the loudspeaker is not on Une fois la marche arrière Le système indique un capteur a sound signal is triggered when enclenchée, l’alerte sonore se défectueux (le haut parleur émet mute mode (go to page 51). there is no obstacle behind the déclenche alors qu’il n’y a pas un bip 3 fois) :...
- Page 47 Solución de problemas Riparazione del guasto Una vez puesta la marcha atrás, 2- Compruebe que los cables del sensor Una volta inserita la retromarcia, Il sistema indica un sensore el pitido suena cuando no hay l’allarme sonoro si disattiva se non difettoso (il cicalino emette un estén enchufados a la centralita obstáculos detrás del vehículo:...
- Page 48 Fehlerbehebung Storing zoeken Sobald der Rückwärtsgang eingelegt Das System weist auf einen defekten Als het voertuig in de Het systeem geeft een defecte sensor ist, wird ein Warnsignal ausgelöst, Sensor hin (der Summer piept dreimal): achteruitrijversnelling is geschakeld aan (de zoemer piept drie keer): obwohl sich kein Hindernis hinter en een geluidssignaal wordt 1- Überprüfen Sie, ob die...
- Page 49 Odstraňování problémů Rozwiązywanie problemów Při zařazení zpátečky se spustí Systém indikuje poškozený senzor Po włączeniu biegu wstecznego System wskazuje wadliwy czujnik zvukový signál informující o tom, (bzučák třikrát pípne): sygnał dźwiękowy uruchamiany jest (brzęczyk odzywa się 3 razy): že za vozidlem není žádná překážka: przy braku przeszkody za pojazdem: 1- Sprawdzić, czy powierzchnia czujnika 1- Překontrolujte, zda je čistý...
- Page 50 Hibaelhárítás A hátramenet kapcsolása után a A rendszer szenzor meghibásodást figyelmeztető jelzés megszólal jelez: (3 berregő hang) annak ellenére, hogy nincs akadály 1- Ellenőrizze, hogy az érzékelő felülete a jármű mögött: tiszta-e. 1- Ellenőrizze, hogy az érzékelők a 2- Ellenőrizze, hogy az érzékelőkből földhöz képest az előírt magasságon kivezető...
-
Page 51: Optional Installation
Set up the radio mute function (optional) Install radio mute function if the autoradio has a mute function Désactiver la radio pendant le recul (option) Vérifier que l’autoradio possède une entrée pour la fonction “Mute” Configuración de la función de silencio Instalación de la función de silencio de radio si el autorradio de la radio (opcional) tiene una función de silenciamiento... - Page 52 Look at your radio installation notice to locate the correct pin for “mute” function (positive/negative trigger). BACK OF THE CD OR RADIO Power and CD Changer Speaker Po•1 Yellow cable Verifier dans la notice d’installation Zie de montage-instructies van de de l’autoradio afin de localiser l’entrée autoradio voor de juiste stekkerpen van de pour la fonction «mute»...
- Page 53 If mute function has signal connect the wire to the If mute function has signal connect the wire to the Si la fonction «Mute»a un signal , il faut alors connecter l’extension sur le Si la fonction «Mute» a un signal à la , il faut alors connecter l’extension sur la Si la función de silencio tiene señal conectar el cable a la...
-
Page 55: 2- Tow Bar
Tow bar Attache remorque Barra de remolque Barre di traino Anhängerkupplung Trekhaak Tažným zařízením Hak holowniczy Vonóhoroggal... - Page 56 10 s X 10 Jumper Rear High system sensitivity sensitivity (default setting) STOP 50 cm (default setting)
-
Page 57: 3- Set Up The Automatic Trailer Detection
Set up the automatic trailer detection (optional) Install the automatic trailer detection function if there is a 13 pins plug install on the vehicle Installer la fonction de détection automatique Installer la fonction de détection automatique de remorque si une prise 13 broches est installée sur le véhicule de remorque (optionnel) Configure la detección automática del remolque Instalar la función de detección automática del remolque... - Page 58 Vehicle side: Connect the white wire with Trailer side: connect pin 10 and 12 red stripe to the pin 12 of the trailer socket together (cable not included in the kit) Côté remorque : connecter ensemble les Côté véhicule : Connecter le cable blanc fiches 10 et 12 (cable non fourni dans le kit) avec rayures rouge sur le fiche 12 de la prise remorque.
-
Page 59: 4- Install The Manual Desactivation
Install the manual product desactivation (optional) Installer un interrupteur de désactivation du sytème (optionnel) Instalar la desactivación manual del producto (opcional) Installare la disattivazione manuale del prodotto (optional) Einrichten der manuelle Produktdeaktivierung (optional) Montage handbediende uitschakeling (optioneel) Instalace ruční deaktivace (volitelné) Ustawianie funkcji manualnego wyłączania (opcjonalnie) Installáljuk a készülék manuális hatástalanítását (opció) - Page 60 pink cable 1/ Ground: black 2/ Auto trailer detection: white with red stripes 3/ + Reverse: white 4/ +ACC: Pink...
-
Page 61: 5- Instructions For Painting The Sensors
Instruction for painting the sensors (optional) Instruction pour peindre les capteurs (optionnel) Instrucciones para pintar los sensores (opcional) Istruzioni per verniciare i sensori (optional) Anleitung zum Lackieren der Sensoren (optional) Instructies voor het spuiten van de sensoren (optioneel) Instrukce pro lakování snímačů (volitelné) Instrukcja lakierowania czujników (opcjonalne) Tájékoztatás a szenzorok festéséhez (opció) - Page 62 Important note: Check that the angle ring is correctly fitted on the sensor. Important: vérifier que la bague correctrice d’angle est bien fixée au capteur. Nota importante: averiguar que el anillo corrector está correctamente ajustado al sensor. Nota importante: Controllare che l’ anello correttore dell’angolo venga correttamente montato sul sensore.
-
Page 63: 6- Possible Upgrading Set Up The Led Display
Possible upgrading Set up the LED display (optional) Installer un écran LED (non-fourni) Posible mejora - Configurar la pantalla LED (opcional) Miglioramenti possibili - Configurare il display LED (optional) Mögliche Aufrüstung: Einrichten der LED-Anzeige (optional) Extra opties - configureren led-display (optioneel) Možné... - Page 64 > 5 s > 5 s inch meter...
-
Page 65: Technical Parameters
Technical Parameters Paramètres techniques Parámetros técnicos Parametri tecnici Technische Daten Technische gegevens Technické parametry Parametry techniczne Műszaki jellemzők... - Page 66 Technical Parameters Paramètres techniques Parámetros técnicos • Rated voltage: from 9 to 16 V • Plage de tension : 9 à 16 V • Tensión nominal: de 9 a 16 V • Sound level: 87dB / 81db / 75db • Volume sonore : 87dB / 81db / 75db •...
- Page 67 Parametri tecnici Technische Daten Technische gegevens • Tensione nominale: da 9 a 16 V • Nennspannung: 9 - 16 V • Nominale spanning: 9 - 16 V • Livello sonoro: 87dB / 81db / 75db • Lautstärke des Warnsignals: 87dB / 81db / 75db •...
- Page 68 Technické parametry Parametry techniczne Műszaki jellemzők • Jmenovité napětí: od 9 do 16V • Napięcie: od 9V do 16V • Névleges feszültség: 9 - 16 V • Hladina zvuku: 87dB / 81db / 75db • Poziom dźwięku : 87dB / 81db / 75db •...
- Page 69 NOTES...
- Page 70 NOTES...
-
Page 71: Wiring Diagram
Sensor cable Mute control (Yellow) Brake light (white/red) Reversing light (white) ACC( +12V ) pink Sensor LED display is optional (P/N 632215) - Page 72 Valeo Service | 70, rue Pleyel | 93285 Saint-Denis Cedex Valeo Service SAS au capital de 12 900 000 € - RCS Bobigny 306 486 408 632200...
Need help?
Do you have a question about the Beep&Park 632200 and is the answer not in the manual?
Questions and answers