Advertisement
Quick Links
Communications Systems
What's Included:
MIC
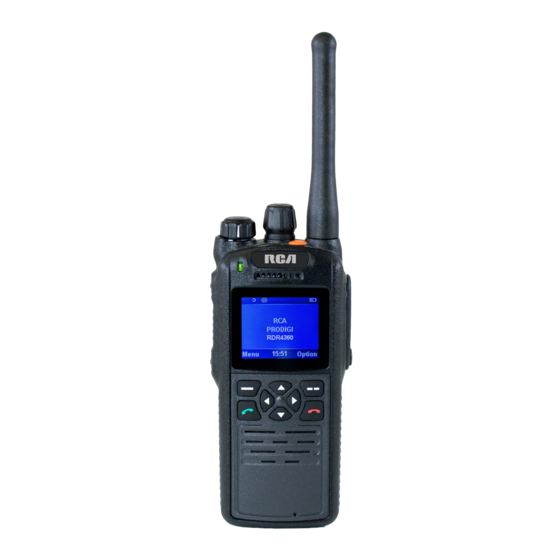
RDR4330
RDR4360
(black)
(black)
Handheld Radio
RDR4365
(blue)
Handheld Radio
Antenna
BC4300
ANH4300U - UHF
Belt Clip
ANH4300V - VHF
4
5
7
8
6
1
2
3
13
RDR4330
RDR4360
(black)
RDR4365
Product Overview
1
P1 Key (hot key)
3
P2 Key (hot key)
5
Antenna
7
Channel Knob
Earpiece
(RDR4360/RDR4365/
9
RDR4390/RDR4395 only)
LCD Display
(RDR4360/RDR4365/
11
RDR4390/RDR4395 only)
13
Speaker
Duplex Microphone
(RDR4360/
15
RDR4365/RDR4390/RDR4395 only)
17
Accessory Jack Cover
19
Belt Clip
21
Battery Pole Piece
Micro SD Encryption Card
23
Cover
RDR4300 I.S. Series
Digital Radios
RDR4390
B4320LI
(black)
RDR4395
Li-Ion Battery
(blue)
Handheld Radio
(2000 mAh)
PS4301
CH4301
Power Supply
Desktop Rapid
Charger
16
9
18
10
19
17
11
20
12
13
14
21
15
RDR4390
(black)
(black)
RDR4395
(blue)
(blue)
2
PTT Key (transmit key)
4
Emergency Call Key
6
LED Indicator
8
Radio On-Off/ Volume Knob
Simplex Microphone
(RDR4360/
10
RDR4365/RDR4390/RDR4395 only)
Function Keypad
(RDR4360/RDR4365/
12
RDR4390/RDR4395 only)
Numeric Keypad
(RDR4360/RDR4365/
14
RDR4390/RDR4395 only)
16
Battery Latch
18
Strap hole
20
Battery
22
Accessory Jack
Complete User Manual at:
Attaching the Antenna:
1. Turn the antenna clockwise to
attach it.
Note: To remove the antenna,
rotate it counter-clockwise.
Removing the Battery:
1
22
23
1. As
shown, hold the radio like
1
this.
2. As
shown, push the battery
2
latch up with the other hand.
3. Slide the battery as
direction shown.
Attaching audio accessory / programming cable:
Function Keypad
(RDR4360 / RDR4365 / RDR4390 / RDR4395 models)
Function/Enter key
Receive/Call key
Programmable Keys
[P1] key, [P2] key, four direction keys,
menu shortcut keys by your RCA dealer. The default state of [P1] and [P2]
shortcuts are for high-low power switching. You only need to press the
corresponding shortcut key to quickly access the needed menu or function.
RCACommunicationsSystems.com
QUICK START GUIDE
Attaching the Battery:
1
2
1. While laying flat, put the battery
into the radio as
1
horizontally push to the top along
the aluminum slot.
2. As
shown, push the battery
2
latch up and slide battery forward
until a click is heard.
Attaching the Belt Clip:
2
3
1. Rotate the screws counter-
clockwise to remove them.
2. Align the screw holes on the
belt clip with those on the
radio's body, then insert and
arrow
3
tighten the screws clockwise.
Note: To remove the belt clip,
loosen the screws.
1. Open the accessory jack cover.
As
shown, align the plug
1
with the accessory jack, then
connect it.
2. As
shown, tighten the screw
1
2
clockwise on the plug.
Note: To remove accessories,
loosen the screw counter-
2
clockwise.
Back/Option key
Hangup key
Direction key
key, can be set as function or
shown,
Advertisement

Related Manuals for RCA RDR4300 I.S. Series


Summary of Contents for RCA RDR4300 I.S. Series
- Page 1 Battery [P1] key, [P2] key, four direction keys, key, can be set as function or menu shortcut keys by your RCA dealer. The default state of [P1] and [P2] Battery Pole Piece Accessory Jack shortcuts are for high-low power switching. You only need to press the Micro SD Encryption Card corresponding shortcut key to quickly access the needed menu or function.
- Page 2 LED indicator and charging status in charger Charging the Battery Charging Operation Steps LED Indication Charging Status Use only the charger and battery specified by RCA Communications LED Flashes Red Slowly Standby (no load) Systems. Charger LED indicates the changing progress. LED Glows Red...