Prestige PE2LEDZ Owner's Manual
Apsrs rf upgrade kit
Hide thumbs
Also See for PE2LEDZ:
- Owner's manual (10 pages) ,
- Owner's manual (15 pages) ,
- Owner's manual (8 pages)
Table of Contents
Advertisement
Quick Links
Owner's Guide
For Models:
PE2LEDZ
PE1M2ECDZ
APSRS
RF Upgrade Kit
IMPORTANT NOTE: The operation of the Security and Convenience System as described in this manual is
applicable to most vehicles. However, due to the configuration of some vehicles, some functions AND/OR
SAFETY PRECAUTIONS may not apply. Please see your installing dealer for more information.
2019 Voxx Electronics Corporation. All rights reserved.
1
Advertisement
Table of Contents

Related Manuals for Prestige PE2LEDZ


Summary of Contents for Prestige PE2LEDZ
- Page 1 Owner’s Guide For Models: PE2LEDZ PE1M2ECDZ APSRS RF Upgrade Kit IMPORTANT NOTE: The operation of the Security and Convenience System as described in this manual is applicable to most vehicles. However, due to the configuration of some vehicles, some functions AND/OR SAFETY PRECAUTIONS may not apply.
-
Page 2: Table Of Contents
Table of Contents Using Your Remote Control ..............3 Locking the Vehicle Doors ..............3 Arming the Security System .............. 3 Unlocking the Vehicle Doors ............. 3 Disarming the Security System ............3 Two Stage Door Unlock (optional) ............. 3 Activating Trunk Release (optional) ........... -
Page 3: Using Your Remote Control
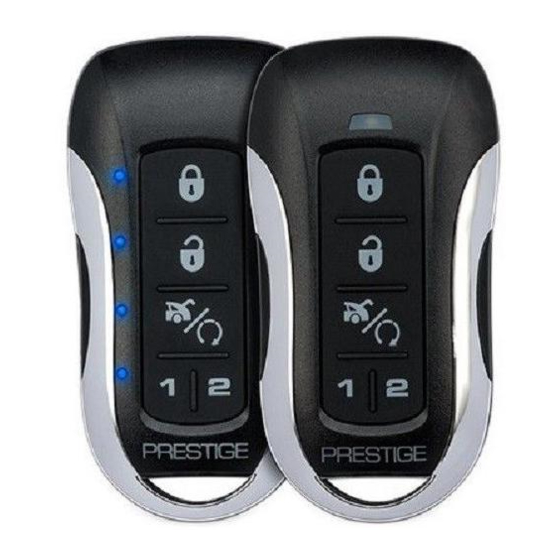
Using Your Remote Control Door Lock To lock the vehicle doors press and release the button. NOTE: The system is equipped with a feature called Silent Choice. If enabled, the system requires a second press of the button to activate an audible arming response from the vehicle. -
Page 4: Using The Personal Protection Alarm
Activating the AUX Ch. 4-7 Output (Optional) AUX channel output is an optional feature and programming is required at the time of installation. Please consult your dealer for more information. Using the Personal Protection Alarm (Panic) Press and hold the button for 3 seconds to activate the personal protection alarm. -
Page 5: Valet Mode
Valet Mode (Optional) When valet mode is activated the status LED will light solid, and all security and remote start functions will be disabled. To enter or exit valet mode simply follow the steps outlined below: Turn the vehicle’s ignition ON. Push and hold the programming/valet button. -
Page 6: Using Your Remote Vehicle Starter
Using Your Remote Starter Remote Starting Your Vehicle To activate the remote start function, press and release the button 2 times within 2 seconds. The system will sound, the parking lights will flash 1 time and the system will check the vehicle to ensure it is safe to start. If all safety parameters are correct, the vehicle will start. -
Page 7: Remote Start Ready Mode
Remote Start Ready Mode must be enabled if your vehicle is equipped with a manual transmission. Remote Start Ready Mode - Manual Transmission Vehicles Only To activate the remote start function, the system must first be in Remote Start Ready Mode. -
Page 8: Using The "Quick-Stop" Feature
Using the “Quick-stop” Feature (Optional) If you want to make a short stop and keep your vehicle running (to keep the interior warm or cool), the quick-stop feature allows you to do this while keeping your vehicle secure and your keys with you. To engage Quick Stop: Stop the vehicle and place the transmission in PARK. -
Page 9: Operating The 2 / 4 Hour Start Up Timer Mode
Operating the 2 / 4 Hour Start Up Timer Mode The system has the ability to start the vehicle every 2 or 4 hours for a 48 hour period. This feature is especially useful in cold climates where the only means to keep the engine and engine fluids warm is to periodically start the engine. -
Page 10: Status Led, Light Flashes And Siren/Horn Indications
Status LED, Light Flashes, and Siren/Horn Indications Status LED Flash Indications LED Flashes Function Unlocked / Disarmed Slow Flash Locked / Armed ON (Solid) Valet Mode 1 Flash / Disarmed Zone 1 Trigger, Shock Sensor 2 Flashes / Disarmed Zone 2 Trigger, Trunk / Hood 3 Flashes / Disarmed Zone 3 Trigger, Door Siren/Horn Chirp Indications... - Page 11 2 Way Remote Control Notifications FUNCTION BEEPS / LED FLASHES Lock 1 Beep / Flash Unlock 2 Beeps / Flashes Trunk Release 2 Beeps / Flashes Remote Start Activation RS Activation Melody Confirm Remote Start 4 Beeps / Flashes Remote Start Running 1 Flash per 5 seconds for duration run time Remote Start Shutdown RS Shutdown Melody...
-
Page 12: Replacing Remote Control Batteries
Replacing Remote Control Batteries 5 Button Remote Control - Model 185SP The CR2032 battery inside each remote control should last approximately 1 year under normal use. When the batteries become weak you will notice the remote control range (the distance from the vehicle the remote control will work) deteriorate and the small LED on the remote control will dim. -
Page 13: Warranty Information
LIMITED LIFETIME WARRANTY Applies to Prestige Series Control Modules, Sirens, Sensors, and Relays. Voxx Electronics Corporation (the Company) warrants to the original purchaser of this product that should this product or any part thereof, (other than transmitters) under nor- mal use and conditions, be proven defective in material or workmanship during the life-... - Page 14 Voxx Electronics Corporation. Customer Service 1-800-225-6074 WWW.VOXXELECTRONICS.COM FCC COMPLIANCE This device complies with Part 15 of the FCC rules and with RSS-210 of Industry Canada. Operation is subject to the following two conditions: 1. This device may not cause harmful interference, and 2.
Need help?
Do you have a question about the PE2LEDZ and is the answer not in the manual?
Questions and answers