
Subscribe to Our Youtube Channel
Related Manuals for Locomarine Yacht Router Mini 4G


Summary of Contents for Locomarine Yacht Router Mini 4G
- Page 1 User Manual Read carefully and DO NOT PANIC. For better understanding check video tutorials on our website. Register your product for software update notifications. version 1.2 www.yachtrouter.com...
-
Page 2: Table Of Contents
..3 DISCLAIMER AND WARNING ..3 DECLARATION OF CONFORMITY ..3 SAFETY AND HAZARD ..4 SAFETY INSTRUCTION ..4 ABOUT YACHT ROUTER MINI 4G ..5 FEATURES ..6 SPECIFICATIONS ..6 10.1. WAN, LAN, Backbone networks ..6 10.2. -
Page 3: Copyright Notice
1. COPYRIGHT NOTICE Locomarine d.o.o. reserves the rights to alter the products described in this manual at any time without prior notice. This document contains proprietary information protected by copyright. All rights are reserved. No part of this manual may be reproduced by any mechanical, electronic, or other means in any form without prior written permission of the manufacturer. -
Page 4: Safety And Hazard
6. SAFETY AND HAZARD Do not operate your Yacht Router: • In areas where blasting is in progress. • Where explosive atmospheres may be present including refuelling points, fuel depots, and chemical plants, near medical equipment, life support equipment, or any equipment which may be susceptible to any form of radio interference. In such areas, the Yacht Router MUST BE POWERED OFF. -
Page 5: About Yacht Router Mini 4G
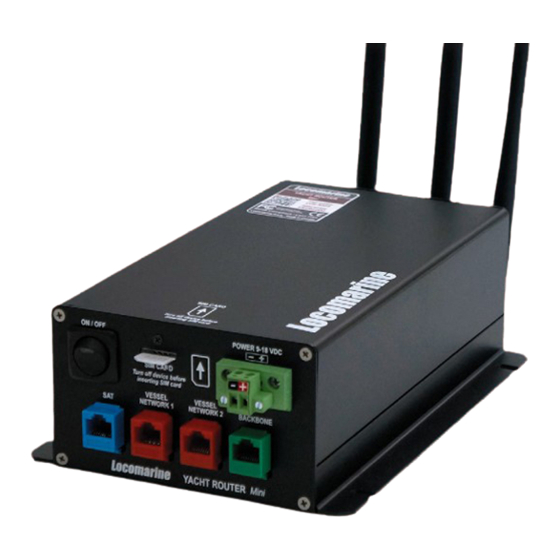
8. ABOUT YACHT ROUTER MINI 4G Yacht Router Mini 4G is intended for installation on smaller boats and yachts with single satellite Internet source (VSAT, Inmarsat, Iridium etc). It will give you ability to establish two vessel WIFI networks (Client-to-Vessel) that you will be able to independently connect to other WIFI networks (e.g. -
Page 6: Features
9. FEATURES - ultra high power Vessel-to-Shore network (1600mW, b/g/n) - high power 4G/3G/2G module (250-2000mW) - 2x Client-to-Vessel WIFI network (b/g) - 1x WAN port (for satellite Internet equipment) - 2x LAN port (100 Mbps) - 1x Backbone LAN port - 1x WIFI/LAN Extender support - flexible assigning of LAN ports to vessel WIFI networks - Online Remote Support... -
Page 7: Mobile Network
10.5. Mobile network Integrated modems: 1 Europe/Africa/Asia/Oceania modem: LTE freq. (MHz): 800 (B20), 900 (B8), 1800 (B3), 2100 (B1), 2600 (B7) WCDMA freq. (MHz): 900 (B8), 2100 (B1) GSM/GPRS/EDGE freq. (MHz): 900, 1800, 1900 Americas modem: LTE freq. (MHz): 700 (B17), AWS (B4), 2100 (B1) WCDMA freq. -
Page 8: Installation Instructions
INSTALLATION INSTRUCTIONS Install Yacht Router Mini 4G in a dry indoor space that will meet Operating environment range specifications (chapter 9.6). Follow the installation procedure as specified in this chapter. WARNING: Exposure to Radio Frequency Radiation! 20 cm minimum distance has to be maintained between the antenna (any) and the occupational user and 75 cm to general public. -
Page 9: Connecting Power Supply
Connecting power supply Yacht Router Mini 4G has wide range DC power supply (9-18 VDC). We strongly suggest you to install proper fuses (3A) on power supply sources cable (not supplied with router). Connect power cable to green power connector as specified where... -
Page 10: Inserting Sim Card
Inserting SIM card Yacht Router Mini 4G will work with any Standard GSM (ID-000) SIM card. If you have Mini or nano SIM card you will have to obtain proper adaptor. Insert SIM card as it is showed on the following photo: 12.4. -
Page 11: Setup Procedure
YR Control Software is developed for Microsoft Windows 7 and Windows 8 operating system but if will probably work on Vista and XP. Locomarine does not offer support for any Yacht Router system that is not installed on Windows 7 or Windows 8 operating system. -
Page 12: Power On Yacht Router
13.5. Power on Yacht Router Once you installed Yacht Router 4G Control Software or connected Touch Screen Controller 4G you can power on Yacht Router. After you turn in on, power LED indicator will light up and you will hear few beeps from Yacht Router. After about half a minute of boot period Yacht Router is ready for use. -
Page 13: Yacht Router 4G Control Software
Once you start Yacht Router 4G Control Software you will see Connected to Yacht Router and button Enter in green colour. In upper right corner you will see Contact Us button that will give you Locomarine Support contacts. If your device is not able to connect to Yacht Router you will see Connecting... message. - Page 14 Shore WIFI, Inmarsat FleetBroadband and 4G Mobile buttons can be represented in three different colours. Each colour has different meaning: GREEN - Internet is available YELLOW - Internet is not available - WAN is disabled If you press Shore WIFI button under Vessel Network 1 drop-down menu will appear. In that manu you can change your Internet source (WAN) for Vessel Network 1.
-
Page 15: Setup Screen
Configurations button Description: open Configuration setup screen. Contact Us button Description: open Contact Us screen with Locomarine contact details. Support Network button Description: open Support Network connections menu. To use this feature Vessel Network 1 must be connected to Internet. You will use this feature if you need support from our Technical support. Please read section REMOTE SUPPORT chapter for remote support request procedure. - Page 16 First value you should setup is Yacht Router Lock Password. IMPORTANT: Set your Lock Password! If you do not set it anyone who is connected to any Vessel Network (WIFI or LAN) with installed Yacht Router 4G Control Software on any of supported device will be able to control Yacht Router. It can cause many unwanted and very expensive consequences (e.g. if someone switch Internet source on your Vessel Network from WIFI Hotspot in marina to your Inmarsat FleetBroadband while you are watching movie on YouTube). To setup Lock Password press Configurations button to open Configurations screen. www.yachtrouter.com...
-
Page 17: Configuration Screen
14.4. Configuration screen Setup screen is divided in three sections: Global Settings section Reset to Factory Default button Description: open menu to Confirm that you want to reset to factory defaults. Revert To Saved Configuration button Description: open menu to Confirm that you want to revert to saved configuration. Save Current Configuration button Description: open menu to Confirm that you want to revert to save current configuration. -
Page 18: Satellite Wan Network Setup
14.5. Satellite WAN Network setup Once you press Satellite WAN Network setup button on Setup screen you will enter setup that consist of: Main section WAN Name field VSAT (changeable) Default value: Description: enter name of your Satellite connection (e.g. VSAT, Inmarsat, Iridium). WAN Status button Description: turn connection to satellite WAN source. - Page 19 If you press ADVANCED button in upper right corner you will get access to advanced setup and info. WAN IP Address configuration section DHCP buttons On (changeable) Default value: Description: enabling or disabling DHCP (Dynamic Host Configuration Protocol), Renew button will renew settings when DHCP is enabled, Refresh button refresh data in IP, SUBNET, GATEWAY, DNS 1, DNS2 fields. IP field Default value: not defined (changeable)
-
Page 20: Mobile Wan Networks Setup
14.6. Mobile WAN Networks setup Once you press Mobile WAN Networks button on Setup screen you will open WAN Network setup screen that consist of: Main section WAN Name field 4G Mobile (changeable) Default value: Description: enter name of your Mobile connection (e.g. Vodafone Greece). WAN Status button Description: turn on or off modem. - Page 21 If you press ADVANCED button in upper right corner you will get access to advanced setup and info. WAN IP Address configuration section DHCP buttons On (changeable) Default value: Description: enabling or disabling DHCP (Dynamic Host Configuration Protocol), Renew button will renew settings when DHCP is enabled, Refresh button refresh data in IP, SUBNET, GATEWAY, DNS 1, DNS2 fields. IP field Default value: not defined (changeable)
- Page 22 To check Mobile Network status and connectivity details click on gray field/button as specified on the following picture. You will get following information: PIN Status, Functionality, Current Operator, Signal Strength, Access Technology, IMEI. Click here to get precise data about mobile network and connectivity status.
-
Page 23: Shore Wifi Wan Networks Setup
14.7. Shore WIFI WAN Networks setup Once you press Shore WIFI WAN Networks button on Setup screen you will open WAN Network setup screen that consist of: Main section WAN Name field Shore WIFI (changeable) Default value: Description: enter name of your Ship-to-Shore connection (e.g. Marina Hotspot). WAN Status button Description: turn on or off connection to Shore WIFI. - Page 24 If you press ADVANCED button in upper right corner you will get access to advanced setup and info. WAN IP Address configuration section DHCP buttons On (changeable) Default value: Description: enabling or disabling DHCP (Dynamic Host Configuration Protocol), Renew button will renew settings when DHCP is enabled, Refresh button refresh data in IP, SUBNET, GATEWAY, DNS 1, DNS2 fields. IP field Default value: not defined (changeable)
- Page 25 To check Shore WIFI Network status and connectivity details click on gray field/button as specified on the following picture. Click here to get precise data about mobile network and connectivity status. You will get following statuses: ssid, band, frequency, wireless protocol, tx rate, rx rate, bssid, signal strength, tx signal strength, noise floor, signal to noise ratio, tx ccq, rx ccq, overall tx ccq, last ip, authentication-type, group encryption, management protection, compression. ssid - Service Set Identifier is name of WIFI network. band - frequency band of WIFI network currently in use.
-
Page 26: Vessel Network Setup
14.8. Vessel Network setup Once you press Vessel Network 1 or Vessel Network 2 button on Setup screen you will open Vessel Network setup screen that consist of: Main section Name field Default value on Vessel Network 1-2: Vessel Network 1-2 (changeable) Description: enter name of each Vessel Network. This name will appear in Main Screen menus. WIFI SSID field Vessel Network 1-2 (changeable) Default value on Vessel Network 1-2:... -
Page 27: Online Remote Support
Each Yacht Router is equipped with Online Remote Support feature that gives our technical support ability to connect to your Yacht Router to check and resolve possible problems. To establish Online Remote Support you have to send an e-mail to support@locomarine.com with following details: 1. Contact details (Name, e-mail, phone number) 2. -
Page 28: Yacht Router Network Details
YACHT ROUTER NETWORK DETAILS Yacht Router Mini 4G has reserved IP ranges that cannot be used by other connected equipment: Support network: 10.10.0.0/16 Reserved range: 10.80.0.0/12 Yacht Router Mini 4G IP reservation details Backbone Network: 10.81.0.1/16 Vessel Network 1: Gateway: 10.81.0.1 Free static range: 10.81.0.3 - 10.81.0.99 DHCP: 10.81.0.100 - 10.81.255.254 DNS: 10.81.0.1, 8.8.8.8... -
Page 29: Yacht Router Configuration Tool
Locomarine manufactures marine electronic products which are marketed and supported worldwide via the Locomarine distributor, dealer and partner network. Each and every Locomarine distributor, dealer and partner is committed to service and support the products in accordance with the market’s needs and requirements. In addition, the Locomarine distributor, dealer and partner networks are obliged to support the products irrespective of who sold and installed the product.
Need help?
Do you have a question about the Yacht Router Mini 4G and is the answer not in the manual?
Questions and answers