Graco TRITON 308 Instructions-Parts List Manual
Pail mount packages; stand mount packages; cart mount packages; wall mount packages;
Hide thumbs
Also See for TRITON 308:
- Instructions-parts list manual (26 pages) ,
- Instructions manual (26 pages) ,
- Instructions and parts list (22 pages)
Table of Contents
Advertisement
Parts
INSTRUCTIONS–PARTS LIST
INSTRUCTIONS
ALUMINUM AND STAINLESS STEEL, 1:1 RATIO
TRITONt 308 Spray Packages
100 psi (0.7 MPa, 7.0 bar) Maximum Air Inlet Pressure
100 psi (0.7 MPa, 7.0 bar) Maximum Fluid Working Pressure
Pail Mount Packages
Stand Mount Packages
Cart Mount Packages
Wall Mount Packages
See the list on page 3 for Models.
Electrostatic packages
This manual contains important
warnings and information.
READ AND KEEP FOR REFERENCE.
GRACO INC. P.O. BOX 1441 MINNEAPOLIS, MN 55440–1441
ECOPYRIGHT 2001, GRACO INC.
Graco Inc. is registered to I.S. EN ISO 9001
First choice when
quality counts.t
Air Spray packages and HVLP packages
309304
Rev. A
ti1004a
Advertisement
Table of Contents

Related Manuals for Graco TRITON 308


Summary of Contents for Graco TRITON 308
- Page 1 Wall Mount Packages See the list on page 3 for Models. Electrostatic packages Air Spray packages and HVLP packages ti1004a GRACO INC. P.O. BOX 1441 MINNEAPOLIS, MN 55440–1441 ECOPYRIGHT 2001, GRACO INC. Graco Inc. is registered to I.S. EN ISO 9001...
-
Page 2: Table Of Contents
..........Graco Standard Warranty . -
Page 3: Models
Models Spray Package Description Pail Mount Stand Cart Mount Wall Mount Mount Aluminum Pump, 233466 233473 233480 233487 No Gun Stainless Steel Pump, 233467 233474 233481 233488 No Gun Aluminum Pump, 233468 233475 233482 233489 Delta Air Spray Gun Stainless Steel Pump, 233469 233476 233483... -
Page 4: Warnings
Symbols Warning Symbol Caution Symbol CAUTION WARNING WARNING This symbol alerts you to the possibility of damage to This symbol alerts you to the possibility of serious or destruction of equipment if you do not follow the injury or death if you do not follow the instructions. corresponding instructions. - Page 5 D This equipment is for professional use only. D Read all the instruction manuals, tags, and labels before operating the equipment. D Use the equipment only for its intended purpose. If you are uncertain about usage, call your Graco distributor.
-
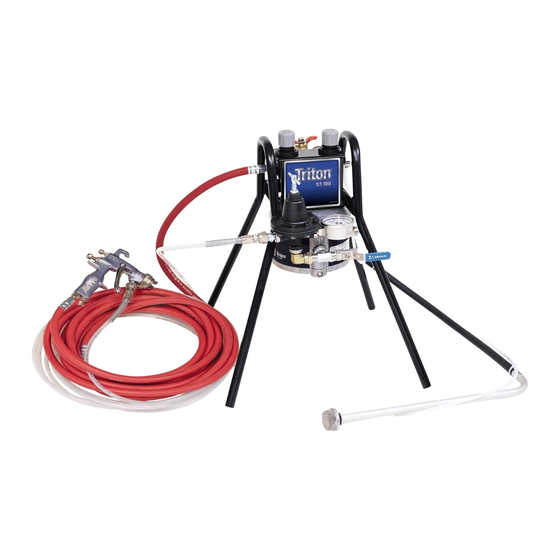
Page 6: Component Identification
Component Identification Stand Mount Air Spray Package Shown TRITON 1:1 Pump Bleed-type master air valve Air supply line (not supplied) Air line filter (not supplied) Air line shutoff valve (not supplied) Pump air regulator G Gun air regulator Fluid pressure regulator (HVLP and electrostatic packages only) Drain/circulation valve Drain tube... -
Page 7: Installation
D Ventilate the spray booth. warnings. General Information WARNING D Always use Genuine Graco Parts and Accessories, To prevent hazardous concentrations of toxic available from your Graco distributor. If you supply and/or flammable vapors, spray only in a properly your own accessories, be sure they are adequately ventilated spray booth. - Page 8 Installation Fluid Filter Accessory Agitator Kit 245081 To install a fluid filter, order a filter (AA), swivel (BB), Part No. 245081 Agitator Kit is available for the and nipple (CC). Refer to Table 1 for the part numbers TRITON Sprayer Packages as an accessory. The kit you must order for an aluminum or a stainless steel must be ordered separately.
- Page 9 Installation Wall Mount Packages Suction Kit Accessories NOTE: Refer to Fig. 3 and to the Wall Mounting Tem- Suction kits are available for the wall mount packages, plate on page 21. as an accessory. The kits must be ordered separately. Refer to Table 2 for information.
- Page 10 Installation Grounding Flush Pump Before First Use The pump was tested in water. If the test solution could contaminate the fluid you are pumping, flush the WARNING pump thoroughly with a compatible solvent. Refer to the Operation Manual 309305 for flushing instructions. To reduce the risk of static sparking, the entire system must be grounded.
-
Page 11: Maintenance
Maintenance See the separate component instruction manuals for individual component maintenance procedures. Daily Maintenance Flushing the System Flush the system at the following times: Check the hoses, tubes, and couplings daily. Tighten all fluid connections before each use. D Before the first-time use D When changing colors D Before fluid can dry or settle out in a dormant system... -
Page 12: Parts List And Parts Drawing Pail Mount
Parts Pail Mount Packages Model 233466 Aluminum pump, no gun Model 233470 Aluminum pump, HVLP gun Model 233467 Stainless steel pump, no gun Model 233471 Stainless steel pump, HVLP gun Model 233468 Aluminum pump, air spray gun Model 233469 Stainless steel pump, air spray gun Model 233472 Stainless steel pump, electrostatic gun Items 56–59 are used on Models 233470, 233471, and 233472 only. - Page 13 Parts Pail Mount Packages Model 233466 Aluminum pump, no gun Model 233467 Stainless steel pump, no gun Model 233468 Aluminum pump, air spray gun Model 233469 Stainless steel pump, air spray gun Model 233470 Aluminum pump, HVLP gun Model 233471 Stainless steel pump, HVLP gun Model 233472 Stainless steel pump, electrostatic gun Ref.
-
Page 14: Stand Mount
Parts Stand Mount Packages Model 233473 Aluminum pump, no gun Model 233477 Aluminum pump, HVLP gun Model 233474 Stainless steel pump, no gun Model 233478 Stainless steel pump, HVLP gun Model 233475 Aluminum pump, air spray gun Model 233476 Stainless steel pump, air spray gun Model 233479 Stainless steel pump, electrostatic gun Items 56–59 are used on Models 233477, 233478, and 233479 only. - Page 15 Parts Stand Mount Packages Model 233473 Aluminum pump, no gun Model 233474 Stainless steel pump, no gun Model 233475 Aluminum pump, air spray gun Model 233476 Stainless steel pump, air spray gun Model 233477 Aluminum pump, HVLP gun Model 233478 Stainless steel pump, HVLP gun Model 233479 Stainless steel pump, electrostatic gun Ref.
-
Page 16: Cart Mount
Parts Cart Mount Packages Model 233480 Aluminum pump, no gun Model 233484 Aluminum pump, HVLP gun Model 233481 Stainless steel pump, no gun Model 233485 Stainless steel pump, HVLP gun Model 233482 Aluminum pump, air spray gun Model 233483 Stainless steel pump, air spray gun Model 233486 Stainless steel pump, electrostatic gun Items 56–59 are used on Models 233484, 233485, and 233486 only. - Page 17 Parts Cart Mount Packages Model 233480 Aluminum pump, no gun Model 233481 Stainless steel pump, no gun Model 233482 Aluminum pump, air spray gun Model 233483 Stainless steel pump, air spray gun Model 233484 Aluminum pump, HVLP gun Model 233485 Stainless steel pump, HVLP gun Model 233486 Stainless steel pump, electrostatic gun Ref.
-
Page 18: Wall Mount
Parts Wall Mount Packages Model 233487 Aluminum pump, no gun Model 233488 Stainless steel pump, no gun Model 233489 Aluminum pump, air spray gun Model 233490 Stainless steel pump, air spray gun Model 233491 Aluminum pump, HVLP gun Model 233492 Stainless steel pump, HVLP gun Model 233493 Stainless steel pump, electrostatic gun Items 56–59 are used on Models 233491, 233492, and 233493 only. - Page 19 Parts Wall Mount Packages Model 233487 Aluminum pump, no gun Model 233488 Stainless steel pump, no gun Model 233489 Aluminum pump, air spray gun Model 233490 Stainless steel pump, air spray gun Model 233491 Aluminum pump, HVLP gun Model 233492 Stainless steel pump, HVLP gun Model 233493 Stainless steel pump, electrostatic gun Ref.
-
Page 20: Technical Data
Technical Data Category Data Maximum fluid working pressure 100 psi (0.7 MPa, 7 bar) Maximum incoming air pressure 100 psi (0.7 MPa, 7 bar) Maximum operating temperature 120_ F (49_ C) Wetted Parts: Pump See pump instruction manual 309303. See gun instruction manuals 308741, 308742, or 307912. Fluid pressure regulator See regulator instruction manuals 307212 or 308325. -
Page 21: Wall Mounting Template
Wall Mounting Template Use this drawing as a template to drill mounting holes in the wall. Verify that the dimensions are exact and the hole locations are level before drilling the holes. Drill four 0.38 in. (9.6 mm) diameter mounting holes 7.00 in. - Page 22 309304...
- Page 23 Notes 309304...
-
Page 24: Graco Standard Warranty
Graco distributor to the original purchaser for use. With the exception of any special, extended, or limited warranty published by Graco, Graco will, for a period of thirty-six months from the date of sale, repair or replace any part of the equip- ment determined by Graco to be defective.
Need help?
Do you have a question about the TRITON 308 and is the answer not in the manual?
Questions and answers