Elmo TT02rx Using
Hide thumbs
Also See for TT02rx:
- Instruction manual (70 pages) ,
- Quick reference manual (9 pages) ,
- Specifications (6 pages)
Advertisement
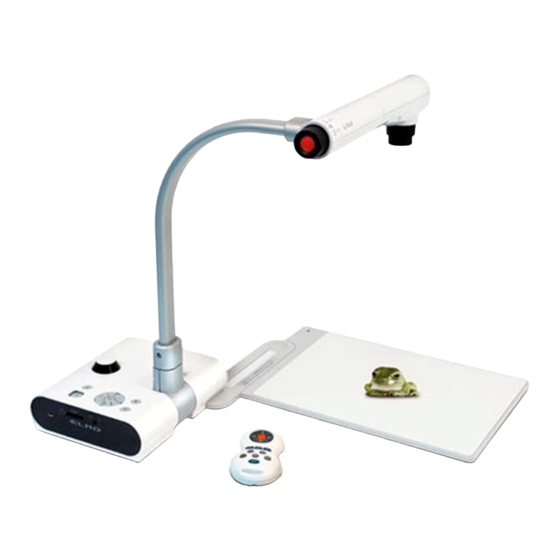
Using the Elmo Document Camera
This document pertains to the ELMO TT02rx
How to Use the Elmo (document camera)
1. Turn on Elmo – The power switch is located on the left rear side of
the base.
2. Turn on Projector or Promethean.
3. Put something on the Elmo stage.
4. Press the button marked with the Elmo icon located on the front of
the Elmo base under Input.
5. If there is no image being projected, see troubleshooting tips below.
Zoom knob
Auto Focus
Button
Using Books, Notes, or 3‐D Objects with Elmo
1. Place item on Elmo stage.
2. Turn on the lamp – On the camera head, slide the lamp switch left, to the "On" position.
3. Adjust Zoom – Zoom in or out using the black zoom knob on the left of the camera head.
4. Adjust Focus – Press the orange button labeled "AF" (auto focus) located in the center of the zoom
knob.
Making annotations with the ELMO
Make sure Elmo is on and that PC is chosen on the ELMO.
If you are in ActivInspire, click on the "Annotate Over Windows" Icon from your toolbar
From the School Menu, navigate to "5. Windows Accessories" and double click on the "Image
Mate for Presentation ‐ ELMO" shortcut to launch the ELMO software (it looks like a P)
When the software launches click on the Play button to view what is on the ELMO, and hit the Full
Screen button and the Promethean tool bar over the image
Department of Technology Innovation
Camera Head
(Only if your ELMO is connected to the computer via a USB cable)
Power Button
Brightness Controls
Light Switch
.
Montgomery County Public Schools
Elmo Icon
Advertisement
Table of Contents

Related Manuals for Elmo TT02rx


Summary of Contents for Elmo TT02rx
- Page 1 Using the Elmo Document Camera This document pertains to the ELMO TT02rx How to Use the Elmo (document camera) 1. Turn on Elmo – The power switch is located on the left rear side of Power Button the base. 2. Turn on Projector or Promethean. 3. Put something on the Elmo stage. 4. Press the button marked with the Elmo icon located on the front of the Elmo base under Input. Elmo Icon 5. If there is no image being projected, see troubleshooting tips below. Brightness Controls Camera Head Zoom knob ...
- Page 2 Additional Resources • Elmo TT‐02s Feature Overview http://www.youtube.com/watch?v=r6L6ELQIw3Y Key points in the video: o Pivot Points @ 1 minute 20 seconds o Zoom/Auto Focus Functions @ 1 minute 40 seconds o How to use the Menu @ 2 minutes 7 seconds o Using the ImageMate Sofware @ 3 minutes 25 seconds • Connecting and Elmo to a Projector http://www.youtube.com/watch?v=hnR91s6Q3X0 This video uses a previous version of the Elmo. There are a few aesthetic differences, but the cable connects in the same place, and the same general principles apply. Key points in the video: o Elmo range of motion @ 20 seconds o Connecting to a projector @ 40 seconds • Using an Elmo with a Microscope http://www.youtube.com/watch?v=4XFOvpffygA&feature=PlayList&p=A863BE250625F099&index=0& playnext=1 Troubleshooting For the issues described below, please follow the suggestions in order. If you are unable to correct your issue, or you have an issue that is not listed below, please contact your ITSS. Problem Suggestions No Power Make sure unit is plugged into cart and/or wall outlet. ...
Need help?
Do you have a question about the TT02rx and is the answer not in the manual?
Questions and answers