Advertisement
Quick Links
Ultrasonic
Bronchoscopy
Simulator
Compatible with
EBUS-TBNA
LM-099
Instruction Manual
Thank you for purchasing the LM-099 Ultrasonic Bronchoscopy Simulator.
Please read this instruction manual carefully to ensure correct use of the product,
and store it in a safe place for easy access.
KOKEN CO., LTD.
1-4-14 Koraku, Bunkyo-ku, Tokyo 112-0004 JAPAN
URL:http://www.kokenmpc.co.jp
E-mail:customer@kokenmpc.co.jp
C-1-993-1-01-00
Advertisement

Related Manuals for KOKEN LM-099


Summary of Contents for KOKEN LM-099
- Page 1 Compatible with EBUS-TBNA LM-099 Instruction Manual Thank you for purchasing the LM-099 Ultrasonic Bronchoscopy Simulator. Please read this instruction manual carefully to ensure correct use of the product, and store it in a safe place for easy access. KOKEN CO., LTD.
- Page 2 Handling and Safety Precautions These precautions should be strictly observed in order to ensure safe, long-term use of the product. The following precautions should be observed particularly strictly: 1. The simulator is made with special silicone rubber to simulate the texture of human skin, so we recommend that it be handled carefully in the same manner as an actual person.
- Page 3 Handling and Safety Precautions These precautions should be strictly observed in order to ensure safe, long-term use of the product. Caring for the simulator after use 1. To clean the simulator and the inside of the case (except the sponge case), wipe with a piece of gauze or soft cloth soaked in water or a mild detergent diluted with water.
-
Page 4: Table Of Contents
Table of Contents 1. Description and Features 2. Components and Configuration 1) Bronchi supporter and bronchi/puncture site box holder attachment positions 2) Puncture site and puncture site box attachment positions 3. Handling the simulator 1) Setting up the simulator 2) Caring for the simulator after use 4. Model configuration 5. Specifications... -
Page 5: Description And Features
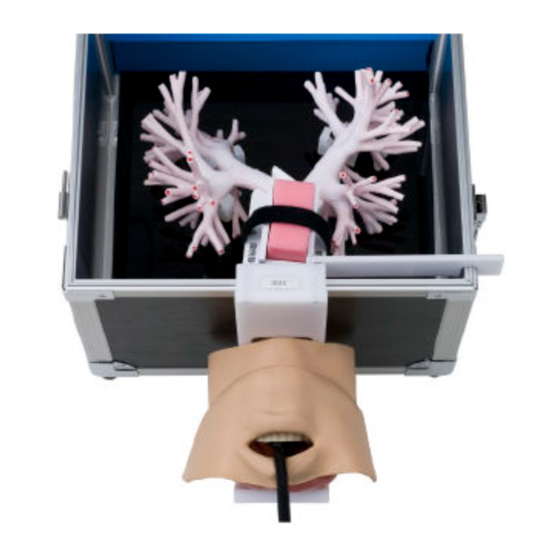
1. Description and Features Description This simulator can be used not only for conventional ultrathin bronchoscope insertion training, but also for endobronchial ultrasound-guided transbronchial needle aspiration (EBUS-TBNA) training. Features 1. This simulator enables practical training for endobronchial ultrasound-guided transbronchial needle aspiration (EBUS-TBNA), in which the target lymph node is punctured while visualizing ultrasonic bronchoscopy images of lymph nodes embedded in the puncture site. -
Page 6: Components And Configuration
2. Components and Configuration 気管支保 黒ケース (スポンジケース付き) スタンド 黒ケース (スポンジケース付き) 部品名称と構成図 部品名称と構成図 部品名称と構成図 部品名称と構成図 2 2 2 2 , , , , 部品名称と構成図 部品名称と構成図 部品名称と構成図 部品名称と構成図 2 2 2 2 , , , , 部品名称と構成図 部品名称と構成図 部品名称と構成図 部品名称と構成図 頭部モデル シリコー 気管支本体... - Page 7 1) Bronchi supporter & bronchi/ puncture site box holder attachment positions * See step 12 of ‘2) Caring for the simulator after use’ on page 15 for details on how to attach the bronchi/puncture site box holder. 1) 気管支保持部品 及び 気管支・穿刺部位 BOX 固定台 取り付け位置 ※...
- Page 8 2) Puncture site and puncture site box attachment positions * See step 13 of ‘2) Caring for the simulator after use’ on page 16 for details on how to attach the 2) 穿刺部位 及び 穿刺部位 BOX 取り付け位置 bronchi/puncture site box holder. 2) 穿刺部位...
-
Page 9: Handling The Simulator
3. Handling the simulator 1) Setting up the simulator * Before inserting a bronchoscope into the simulator, spray the inside of the bronchi and the oral cavity of the head model with the lubricating silicone spray. 3 3 3 3 , , , , 取扱方法 取扱方法... - Page 10 (4) Remove the Velcro tape securing the bronchi/puncture site box holder and place the (4) 気管支・穿刺部位 BOX 固定台のマジックテープを外し、穿刺部位の軟骨側が下向きになる様に (4) 気管支・穿刺部位 BOX 固定台のマジックテープを外し、穿刺部位の軟骨側が下向きになる様に puncture site in the puncture site box so that the white cartilage side is facing downwards. (4) 気管支・穿刺部位 BOX 固定台のマジックテープを外し、穿刺部位の軟骨側が下向きになる様に 穿刺部位...
- Page 11 (7) The silicone spray may not reach the upward-facing peripheral parts of the bronchi when applied via the bronchoscope insertion slot, in which case you can also insert the spray nozzle (7) 上側に向いている気管支末梢部の先端は、シリコーンスプレーが行き渡りにくいので、末梢部の (7) 上側に向いている気管支末梢部の先端は、シリコーンスプレーが行き渡りにくいので、末梢部の directly into the individual openings of the peripheral parts of the bronchi. (7) 上側に向いている気管支末梢部の先端は、シリコーンスプレーが行き渡りにくいので、末梢部の...
- Page 12 (10) Align the laryngeal tube of the head model with the bronschoscope insertion slot on the (10) 頭部モデルの喉頭チューブと気管支側の内視鏡挿入口の位置を合わせて、喉頭チューブを気 (10) 頭部モデルの喉頭チューブと気管支側の内視鏡挿入口の位置を合わせて、喉頭チューブを気 (10) 頭部モデルの喉頭チューブと気管支側の内視鏡挿入口の位置を合わせて、喉頭チューブを気 bronchi side and then insert the tube into the slot. 管支側の内視鏡挿入口に挿入してください。 管支側の内視鏡挿入口に挿入してください。 管支側の内視鏡挿入口に挿入してください。 Insert laryngeal tube into slot 矢印方向に挿入する...
- Page 13 2) Caring for the simulator after use 2) 使用後のお手入れ方法 2) 使用後のお手入れ方法 To clean the bronchi main body, follow the instructions provided below. 2) 使用後のお手入れ方法 気管支本体が汚れた場合は洗浄が可能です。下記の手順で洗浄ができます。 気管支本体が汚れた場合は洗浄が可能です。下記の手順で洗浄ができます。 ※ 付属のシリコーンスプレーをご使用の場合、ほとんど残留物は残りません。 気管支本体が汚れた場合は洗浄が可能です。下記の手順で洗浄ができます。 ※ 付属のシリコーンスプレーをご使用の場合、ほとんど残留物は残りません。 (1) Detach the head model from the case by raising the positioning lever and lifting the ※...
- Page 14 (4) Remove the bronchi main body from the supporters and, with the unit slightly raised, (4) 気管支本体を保持部品から外し、気管支本体を少し上側に持ち上げた状態で気管支・穿刺部位 lift out the bronchi/puncture site box holder. BOX 固定台を上側に持ち上げながら外します。 (4) 気管支本体を保持部品から外し、気管支本体を少し上側に持ち上げた状態で気管支・穿刺部位 (4) 気管支本体を保持部品から外し、気管支本体を少し上側に持ち上げた状態で気管支・穿刺部位 BOX 固定台を上側に持ち上げながら外します。 BOX 固定台を上側に持ち上げながら外します。 (5) Pinch the outer rim of the bronchoscope insertion slot for the main body of the bronchi (5) 気管支本体の内視鏡挿入口を指でつまみ、黒ケース穴の内側に押し込んで外してください。...
- Page 15 (7) Detach the main body of the bronchi from the bronchi supporters of the stand. (7) スタンドの気管支保持部品から気管支本体を取り外してください。 (7) スタンドの気管支保持部品から気管支本体を取り外してください。 (7) スタンドの気管支保持部品から気管支本体を取り外してください。 (8) Clean the inside of the bronchi main body with a mild detergent using a test tube brush, etc. (8) 中性洗剤を使用し、試験管用ブラシなどを用いて気管支本体内の洗浄を行ってください。...
- Page 16 (10) Reattach the main body of the bronchi to the bronchi supporters of the stand. (10) スタンドの気管支保持部品に、気管支本体を取り付けてください。 (10) スタンドの気管支保持部品に、気管支本体を取り付けてください。 (10) スタンドの気管支保持部品に、気管支本体を取り付けてください。 (10) スタンドの気管支保持部品に、気管支本体を取り付けてください。 (11) Place the stand and main body of the bronchi inside the case and push the outer rim of (11) 黒ケースにスタンドと気管支本体一式を入れ、ケースの内側の穴から気管支本体の内視鏡挿...
- Page 17 (13) Place the puncture site box on the bronchi/puncture site box holder, insert the two screws (circled in red) using a screwdriver, and secure with the Velcro tape. (13) 穿刺部位 BOX を気管支・ ・ ・ ・ 穿刺部位 BOX 固定台に乗せて、取り付けネジ 2 本(赤丸囲み部) をドライバーで締め付け、マジックテープで固定します。...
-
Page 18: Model Configuration
4. Model Configuration Chart Product name Quantity Bronchi main body Black case (with sponge case) Stand Bronchi supporters Head model Puncture site Puncture site box Bronchi/puncture site box holder M3 × 8 mm truss head screws Instruction manual Consumable items Product name Product No.
Need help?
Do you have a question about the LM-099 and is the answer not in the manual?
Questions and answers