Advertisement
Quick Links
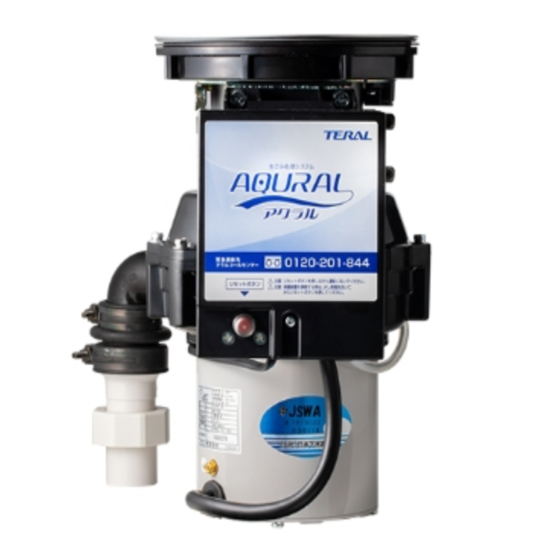
DSP-100H-AWV model
The warranty is on page 25 of this User's Manual.
Please check the entry for customer name, delivery
date, and other information.
Thank you very much for purchasing the Teral
●
Garbage Disposer. In order to use this product both
safely and correctly, please use only after you have
carefully read and fully understood the User's Manual.
Keep this manual in a safe place. It contains the
●
warranty.
(
manual feed type
Table of contents
1.
Configuration of the garbage disposer
2.
3.
4.
5.
Cautions on what to drop
6.
7.
Causes of trouble and troubleshooting
8.
User ' s Manual and Warranty
)
・ ・ ・ ・ ・ ・ ・ ・ ・ ・ ・ ・ ・ ・ ・ ・ ・ ・ ・ ・ ・ ・ ・ ・ ・ ・ ・ ・ ・ ・
・ ・ ・ ・ ・ ・ ・ ・ ・ ・ ・ ・ ・ ・ ・ ・ ・ ・ ・ ・ ・ ・ ・ ・ ・ ・ ・ ・ ・
・ ・ ・ ・ ・ ・ ・ ・ ・ ・ ・ ・ ・ ・ ・ ・ ・ ・ ・ ・ ・ ・
・ ・ ・ ・ ・ ・ ・ ・ ・ ・ ・ ・ ・ ・ ・ ・ ・ ・ ・ ・ ・ ・ ・ ・ ・ ・
・ ・ ・ ・ ・ ・ ・ ・ ・ ・ ・ ・ ・ ・ ・ ・ ・ ・ ・ ・ ・ ・
・ ・ ・ ・ ・ ・ ・ ・ ・ ・ ・ ・ ・ ・ ・
●
Part replacement guidelines
●
・ ・ ・ ・ ・ ・ ・ ・ ・ ・ ・ ・ ・ ・ ・ ・ ・ ・ ・ ・ ・ ・ ・ ・ ・ ・ ・ ・
●
Product specifications
・ ・ ・ ・ ・ ・ ・ ・ ・ ・ ・ ・
●
1
・ ・ ・ ・ ・ ・ ・
2
・ ・ ・ ・ ・ ・
3
6
7
9
14
21
・ ・ ・ ・ ・ ・
23
24
・ ・ ・ ・ ・ ・ ・ ・
25
26
Advertisement

Related Manuals for Teral DSP-100H-AWV


Summary of Contents for Teral DSP-100H-AWV
-
Page 1: Table Of Contents
Maintenance instructions ・ ・ ・ ・ ・ ・ ・ ・ ・ ・ ・ ・ ・ ・ ・ ・ ・ ・ ・ ・ ・ ・ Thank you very much for purchasing the Teral ● Garbage Disposer. In order to use this product both Causes of trouble and troubleshooting ・... -
Page 2: Garbage Disposer
1. Overview of the garbage disposer system Garbage disposer Grinds up and flushes away food waste. Drain pipe Sends crushed food waste and kitchen wastewater down to the wastewater treatment system. It is a single - use pipe only for kitchen wastewater. - Page 3 2. Configuration Name of each component Cover Plug switch Control panel Vacuum breaker Reset button Braided hose Electromagnetic valve Stop cock Water supply pipe (cold water) Earth cable Power plug Trap Plug switch Strainer Disposer opening Joint Stationary blade Accessories Rotating blade Hammer ・Lock release handle Motor ・User's Manual ・Quick Guide...
-
Page 4: Safety Precautions
3. Safety precautions ● Be sure to follow these precautions for safety. This User's Manual contains important information for preventing safety hazards. It is to ensure that this product is used both properly and safely, protecting people and/or property from damage. Fully understand the following (notations and graphic symbols) before reading the main text. - Page 5 Warning ● Eiectrical installation (earth leakage circuit breaker, earth cable) Be sure to install Securely install the earth an earth leakage cable. circuit breaker on Be sure Connect the power source. to follow. earth cable. Not doing so will Not doing so will r e sult in ele c t r ic r e sult in ele c t r ic shock in the event...
- Page 6 3.Safety precautions Caution ● Before, after, and during operation During operation, do not put your hand Do not touch the garbage disposer into the garbage disposer immediately unit immediately after operation. The after removing the plug surface may be hot after continuous Prohibited Prohibited switch. operation. ※ Even after the garbage disposer Doing so will cause burns. has completed its operation, it may rotate for a few seconds due to momentum. Do not remove the plug switch until it has stopped completely. It will cause injury.
-
Page 7: Precautions For Use
4. Precautions for use ● When using the garbage disposer Do not insert anything other than Do not force a large amount of If the garbage disposer has not food waste. food waste into the opening. been used for a long time, perform (See page 8.) a test run before inserting food It will cause waste so as to ensure that the j a m m i n g ... - Page 8 5. What to insert Items that may be inserted Vegetable scraps, fruit scraps, (cooked) rice, fish meat. bones of small Food scraps fish (sardines etc.) , chicken bones such as the upper portion of chicken wings, meat. noodles, bread, fried food, tea leaves, leftovers, etc. The following food waste may be inserted in the Items difficult to process garbage disposer, but may remain inside the grinding...
- Page 9 The following items, if inserted, will damage the garbage Items not to be inserted disposer or remain inside the disposer without being crushed. Type Example Resulting problems if inserted Metals Spoons, forks, T h e y w i l l d a m a g e t h e bottle caps, etc. rotating blade or cause faulty movement. resulting ...
-
Page 10: Operating Instructions
6. Operating instructions Garbage disposer operation flow ❶ Drop food waste. ❷ Insert the plug switch with the △ marking aligned with OFF. ❸ Turn the plug switch to the right until the △ marking is aligned with ON. Buzzer sounds (beep, beep) and 60 seconds after the start water supply starts after 5 seconds,... - Page 11 Insert food waste into the garbage disposer. ● ln this case, do not force a large amount of food waste in. See the d i s p o s a l a m o u n t g u i d e l i n e illustrated below.
- Page 12 6.Operating instructions Turn the plug switch to the right to turn ON. ● Turn the plug switch until its △ marking aligns with the ON position. The buzzer will sound a beep and the water supply to the inside of the garbage dis- poser will start automatically. After 5 seconds, the garbage disposer will start operation. If a metal clank or a very loud sound is heard during operation, immediately Caution turn the plug switch left, to the OFF position, to stop the operation. Do not use the garbage disposer in such a way that the overload Caution protection device is frequently activated. It will cause malfunction. When the sound of grinding food waste stops, turn the plug switch left to the OFF position.
- Page 13 Water supply automatically stops 10 seconds after the disposer stops. When the garbage disposer is not in use, remove the plug switch from the disposer opening and attach the strainer. Foreign objects such as a spoon may fall into the gar- Caution bage disposer if the strai- ner has not been attached to the disposer opening. If the plug switch is left in the disposer opening, Caution wastewater may not drain ef fi ciently.
- Page 14 6.Operating instructions Approximately two to three times a week, flush the garbage disposer all at once with water collected in a bowl or a pot. This will clean the drain pipe. ● This flushing is particularly effective after disposing of egg shells. ● Also flush with collected water all at once before leaving for extended s i t ( n i l , ) Remove the strainer from the disposer opening to drain collected water. After draining collected water, make sure that no foreign objects have Caution fallen into the grinding chamber and attach the strainer to the disposer opening.
-
Page 15: Maintenance Instructions
7. Maintenance instructions How to remove foreign objects If foreign objects (items not to be inserted as described in page 8) enter the grinding chamber of the garbage disposer, be sure to remove them while following the procedures below. If the garbage disposer is operated without removing these objects, jamming, clogged pipes, or other problems will result. - Page 16 7.Maintenance instructions How to clear a jam If overloaded food waste or foreign objects such as spoons cause jamming during grinding, the overload protection device will be activated and the garbage disposer will stop. In this case. a buzzer will sound. Clear jamming with the following procedure: Remove the power plug of the garbage disposer from the outlet.
- Page 17 Insert the enclosed lock release handle from the disposer opening into the grinding chamber with the handle's recess aligned with the nut at the center of the rotating blade. Hook the projection at the tip of the handle onto the hammer of the rotating blade, and turn it either left or right.
- Page 18 7.Maintenance instructions Inser t the power plug of the garbage disposer into the outlet. If the breaker is turned OFF, push the latch up to turn it ON. Press the reset button of the overload protection device on the garbage disposer control box. ※The buzzer will sound a beep and the over- load protection device will be neutralized. Do not operate when the reset button has been pressed. Doing so Warning will result in the burning and damage of moving parts. Insert the plug switch in the disposer opening, turn it to the right, ...
- Page 19 Cleaning interior of the garbage disposer unit The garbage disposer is a machine that processes food waste. Crushed food waste particles left in the grinding chamber will cause bad odors. Clean it periodically (two to three times a week) with the following procedures: Ice cleaning Insert 5 or 6 ice cubes.
- Page 20 7.Maintenance instructions If ice cleaning does not sufficiently eliminate odors or dirt, clean the interior with the following procedure: Remove the power plug of the garbage disposer from the outlet. If the power plug cannot be removed due to the unreachable position of the outlet, push down the branch circuit breaker latch for the garbage disposer on the distribution switchboard to turn it OFF.
- Page 21 Inser t the power plug of the garbage disposer into the outlet. If the breaker is turned OFF, push the latch up to turn it ON. Others ● Wipe off dirt on the garbage disposer unit (exterior) and the control panel using a moist and tightly squeezed cloth.
- Page 22 8. Malfunction causes and solutions If a problem occurs while using the garbage disposer, refer to this section. If that does not fix the problem. contact the Call Center (see page 23 for contact information). Problem Cause Troubleshooting The garbage disposer The plug is not securely in Insert the plug switch again place.
- Page 23 , a n d out even after turning on off from the control panel for contact the Teral call center the switch. the disposer. The strainer of for service instructions.
-
Page 24: After-Sales Services
● Repair during the warranty period Check the manual carefully. If the problem persists, contact the Teral Call Center for repairs. We will conduct repairs according to the warranty description. Be sure to present the warranty when requesting repair. - Page 25 We recommend periodical inspection of products installed over two years ago in order to ensure long-term use at ease. Contact the Call Center to request inspection. ● Repair costs ※ Contact Teral Call Center for repair, parts replacement, or inspection. For repair, parts replacement, and inspection, it will cost Technical fees Parts costs Visit fees.
- Page 26 ● Free-of-charge warranty provision If a product delivered by Teral lnc. fails or is damaged during the warranty period for reasons attributable to the defective design or workmanship of the product, despite normal use according to the User's Manual, we will repair or replace the affected area free of charge during the specified period.
- Page 27 Garbage disposer specification Model DSP-100H-AWV Feed method Batch feed with rotating plug switch Operating liquid Tap water ( 0 to 40℃ ) Installation location Under the sink Installation method Suspended installation Power supply Single phase 1OOV, with both 50Hz and 60Hz...
- Page 28 For inquiries concerning this product 0120-201-844 Teral Call Center TP-383-01E...
Need help?
Do you have a question about the DSP-100H-AWV and is the answer not in the manual?
Questions and answers