Table of Contents
Advertisement
Available languages
Available languages
Quick Links
Advertisement
Table of Contents

Related Manuals for Keysight U1610/20A


Summary of Contents for Keysight U1610/20A
- Page 1 Keysight U1610/20A Handheld Digital Oscilloscope Quick Start Guide...
- Page 2 Caution, risk of electric fully understood and met. shock Category II overvoltage CAT II protection Category III overvoltage CAT III protection For further safety information details, refer to the Keysight U1610/20A Handheld Digital Oscilloscope User’s Guide. Keysight U1610/20A Quick Start Guide...
- Page 3 4 Hand strap (attached on the handheld scope) 4 Neck strap 4 Certificate of Calibration If anything is missing or damaged, contact the nearest Keysight Sales Office. All related documents and software are available for NOTE download at www.keysight.com/find/hhTechLib. Keysight U1610/20A Quick Start Guide...
-
Page 4: Charge The Battery
AC/DC adapter provided. If the battery is fully discharged after subsequent use, charge the battery with the handheld scope turned on. The power key will turn constant yellow when the battery is fully charged. Keysight U1610/20A Quick Start Guide... -
Page 5: Power On The Handheld Scope
Hook up all cables and accessories before applying NOTE power. You can connect/disconnect probes while the handheld scope is turned on. Press and hold for approximately 3 seconds. When the handheld scope display appears, the handheld scope is ready for use. Keysight U1610/20A Quick Start Guide... -
Page 6: Product Outlook
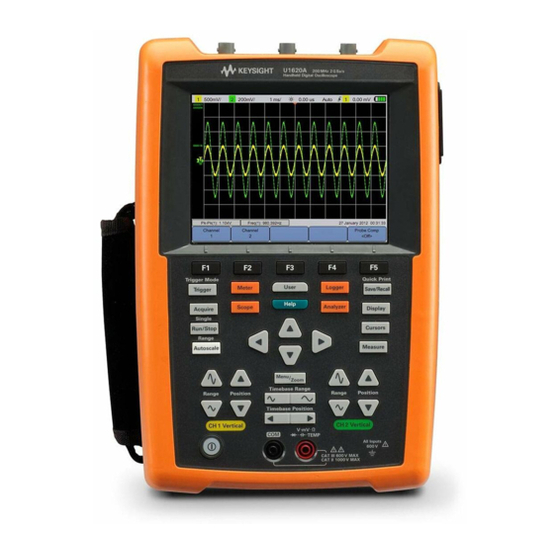
To set the system, and help vertical scaling functions. (volt/div) and vertical offset. Power key Meter terminals Horizontal controls To control the sweep speed (sec/div) and horizontal position of the waveform. Use to zoom into the waveform. Keysight U1610/20A Quick Start Guide... - Page 7 Oscilloscope Display Multimeter Display Keysight U1610/20A Quick Start Guide...
- Page 8 9 Displays the acquisition, start date and time, and duration status. 10 Displays the measurement. 11 Displays the virtual measurement scale. 12 Displays the average, maximum, and minimum values. 13 Indicates the auto or manual ranging mode. 14 Displays the logging graph. Keysight U1610/20A Quick Start Guide...
-
Page 9: Set The Date And Time
Before resetting to factory default settings, you may NOTE want to save the current handheld scope configuration for later use by pressing > For details on using the oscilloscope functions, see NOTE the User’s Guide. Keysight U1610/20A Quick Start Guide... -
Page 10: Data Logging
The data logger acts as a recorder to log and plot input signal trends for both scope and meter measurements. To access the logger mode, press For details on using the logger functions, see the NOTE User’s Guide. Connect Probes to Oscilloscope Terminals Keysight U1610/20A Quick Start Guide... -
Page 11: Connect Test Leads To Meter Terminals
Connect Test Leads to Meter Terminals Keysight U1610/20A Quick Start Guide... -
Page 12: Meter Measurements
Diode Test Continuity Frequency °C °F [a] Frequency measurement works in the autorange mode, and the range that you select applies for V AC. For details on using the meter functions, see the NOTE User’s Guide. Keysight U1610/20A Quick Start Guide... -
Page 13: Compensate The Scope Probe
BNC adapter Use a nonmetallic tool to adjust the trimmer capacitor on the probe for the flattest pulse possible. trimmer capaciitor For details on adjusting the probe compensation for NOTE a channel, see the User’s Guide. Keysight U1610/20A Quick Start Guide... -
Page 14: Access The Quick Help
To view Help in another language, press > NOTE > and use the keys. Press again to exit the selection menu. To access information on using Help, press and hold NOTE for approximately 3 seconds. Keysight U1610/20A Quick Start Guide... - Page 15 Keysight U1610/20A Oscilloscope numérique portable Guide de mise en route...
- Page 16 II satisfaites. Protection contre les CAT III surtensions de catégorie III Pour plus d’informations sur la sécurité, consultez le U1610/20A Oscilloscope numérique portable Guide de l’utilisateur d’Keysight. Keysight U1610/20A Guide de mise en route...
- Page 17 4 Sangle tour de cou 4 Certificat d'étalonnage Si un composant est absent ou endommagé, contactez votre distributeur Keysightle plus proche. Tous les documents et logiciels associés peuvent REMARQUE être téléchargés depuis le site www.keysight.com/ find/hhTechLib. Keysight U1610/20A Guide de mise en route...
-
Page 18: Charge De La Pile
Si la batterie est entièrement déchargée après une utilisation ultérieure, effectuez une charge de la batterie avec l'oscilloscope portable en marche. La touche de mise sous tension s’allumera en continu en jaune lorsque la batterie sera entièrement chargée. Keysight U1610/20A Guide de mise en route... -
Page 19: Mise Sous Tension De L'oscilloscope Portable
Vous pouvez connecter/déconnecter les sondes lorsque l’oscilloscope portable est sous tension. Pressez le bouton et maintenez-le pressé pendant approximativement 3 secondes. Lorsque l’écran de l’oscilloscope portable apparaît, l’oscilloscope portable est prêt à être utilisé. Keysight U1610/20A Guide de mise en route... -
Page 20: Présentation Du Produit
Touche marche/arrêt Bornes d u multimètre Contrôles horizontaux Pour contrôler la vitesse de balayage (sec/div) et la position horizontale de la forme du signal. Utilisation pour zoomer dans la forme du signal. Keysight U1610/20A Guide de mise en route... - Page 21 Ecran de l’oscilloscope Ecran du multimètre Keysight U1610/20A Guide de mise en route...
- Page 22 10 Affiche la mesure 11 Affiche l’échelle de mesure virtuelle 12 Affiche les valeurs moyennes, maximum et minimum. 13 Indique le mode de calibrage automatique ou manuel 14 Affiche la courbe de l'enregistreur Keysight U1610/20A Guide de mise en route...
-
Page 23: Régler La Date Et L'heure
> Pour plus de détails sur l’utilisation des fonctions REMARQUE de l’oscilloscope, référez-vous au Guide d’utilisation. Keysight U1610/20A Guide de mise en route... -
Page 24: Enregistrement De Données
Pour accéder au mode enregistreur, appuyez sur Pour plus de détails sur l’utilisation des fonctions REMARQUE d’enregistreur, référez-vous au Guide d’utilisation. Connecter les sondes aux bornes de l’oscilloscope. Keysight U1610/20A Guide de mise en route... - Page 25 Connecter les cordons de test aux bornes du multimètre Keysight U1610/20A Guide de mise en route...
-
Page 26: Mesures Du Multimètre
[a] La mesure de fréquence s’effectue en mode autorange, et la plage que vous sélectionnez est appliquée pour V CA. Pour plus de détails sur l’utilisation des fonctions REMARQUE du multimètre, référez-vous au Guide d’utilisation. Keysight U1610/20A Guide de mise en route... - Page 27 Condensateur ajustable Pour plus de détails sur le réglage de la REMARQUE compensation de la sonde pour une voie, reportez-vous au Guide de l'utilisateur. Keysight U1610/20A Guide de mise en route...
-
Page 28: Accès À L'aide-Mémoire
> > utilisez les touches Appuyez de nouveau sur pour quitter le menu de sélection. Pour plus d'informations sur l'utilisation de l'aide, REMARQUE appuyez maintenez appuyé le bouton pendant environ 3 secondes. Keysight U1610/20A Guide de mise en route... - Page 29 Keysight U1610/20A Digitales Handoszilloskop Schnellstarthandbuch...
- Page 30 Vorgang nach dem Hinweis VORSICHT nicht fort, wenn Sie die Kategorie II darin aufgeführten Hinweise nicht CAT II vollständig verstanden haben und Überspannungsschutz einhalten können. Kategorie III CAT III Überspannungsschutz Weitere Sicherheitsinformationen finden Sie im Keysight U1610/20A Digitales Handoszilloskop Benutzerhandbuch. Keysight U1610/20A Schnellstarthandbuch...
- Page 31 4 DMM-Messleitungssatz (digitales Multimeter) 4 USB-Kabel 4 Handschlaufe (am Handoszilloskop befestigt) 4 Umhängeband 4 Kalibrierungszertifikat Wenn etwas fehlt oder beschädigt sein sollte, wenden sie sich an das nächste Keysight Sales Office. Alle zugehörigen Dokumente und die Software HINWEIS können unter www.keysight.com/find/hhTechLib heruntergeladen werden.
-
Page 32: Laden Des Akkus
Netzteils, wobei das Handoszilloskop ausgeschaltet ist. Wenn der Akku nach der anschließenden Nutzung völlig entladen ist, laden Sie ihn mit eingeschaltetem Handoszilloskop. Die Einschalttaste leuchtet durchgehend gelb, sobald der Akku vollständig geladen wurde. Keysight U1610/20A Schnellstarthandbuch... -
Page 33: Einschalten Des Handoszilloskops
Schließen Sie alle Kabel und das Zubehör an, bevor HINWEIS Sie das Gerät einschalten. Während das Handoszilloskop eingeschaltet ist, können Sie Sonden anschließen bzw. vom Gerät trennen. Halten Sie für etwa 3 Sekunden gedrückt. Sobald die Handoszilloskop-Anzeige erscheint, ist das Handoszilloskop einsatzbereit. Keysight U1610/20A Schnellstarthandbuch... - Page 34 Steuerelemente Protokollierungs-, Zum Einstellen der System- und vertikalen Hilfefunktionen. Skalierung (Volt/ Div) und des Einschalttaste vertikalen Versatzes. Horizontal-Steuerelemente Zur Steuerung der Multimeteranschlüsse Sweep-Geschwindigkeit (Sek/Div) und horizontalen Position der Wellenform. Verwenden Sie , um die Wellenform zu vergrößern. Keysight U1610/20A Schnellstarthandbuch...
- Page 35 Oszilloskopanzeige Multimeteranzeige Keysight U1610/20A Schnellstarthandbuch...
- Page 36 Uhrzeit sowie Dauer an. 10 Zeigt den Messwert an. 11 Zeigt die virtuelle Messskala an. 12 Zeigt die Durchschnitts-, Höchst- und Mindestwerte an. 13 Gibt den Modus für den automatischen bzw. manuellen Bereich an. 14 Zeigt die Protokollkurve an. Keysight U1610/20A Schnellstarthandbuch...
-
Page 37: Einstellen Von Datum Und Uhrzeit
Drücken Sie auf > Vor dem Zurücksetzen auf die Werkseinstellungen HINWEIS können Sie die aktuelle Handoszilloskop- Konfiguration zur späteren Verwendung speichern. Drücken Sie hierzu auf > Weitere Informationen zur Verwendung der HINWEIS Oszilloskopfunktionen finden Sie im Benutzerhandbuch. Keysight U1610/20A Schnellstarthandbuch... -
Page 38: Verbinden Von Sonden Mit Oszilloskopanschlüssen
Die Datenprotokollierung dient zur Aufzeichnung und grafischen Darstellung des Eingangssignaltrends für sowohl Oszilloskop- als auch Multimetermessungen. Drücken Sie auf , um auf den Datenprotokollierungsmodus zuzugreifen. Weitere Informationen zur Verwendung der HINWEIS Datenprotokollierungsfunktionen finden sie im Benutzerhandbuch. Verbinden von Sonden mit Oszilloskopanschlüssen Keysight U1610/20A Schnellstarthandbuch... -
Page 39: Verbinden Von Testleitungen Mit Messanschlüssen
Verbinden von Testleitungen mit Messanschlüssen Keysight U1610/20A Schnellstarthandbuch... - Page 40 Diodentest Durchgang Frequenz °C °F [a] Frequenzmessungen werden im Modus für die automatische Bereichswahl durchgeführt und es gilt der von Ihnen ausgewählte Bereich für V AC. Weitere Informationen zur Verwendung der HINWEIS Multimeterfunktionen finden sie im Benutzerhandbuch. Keysight U1610/20A Schnellstarthandbuch...
- Page 41 Kompensationssignal zu aktivieren und den Tastkopfdämpfungsfaktor einzustellen. BNC-Adapter Stellen Sie den Trimmkondensator des Tastkopfes mit einem nichtmetallischen Werkzeug auf den flachestmöglichen Impuls ein. Trimmkondensator Nähere Informationen zur Einstellung der HINWEIS Tastkopfkompensation für einen Kanal finden Sie im Benutzerhandbuch. Keysight U1610/20A Schnellstarthandbuch...
-
Page 42: Zugriff Auf Schnellhilfe
Zur Anzeige der Hilfe in einer anderen Sprache HINWEIS drücken Sie auf > > und verwenden die Tasten Drücken Sie erneut auf , um das Auswahlmenü zu verlassen. Um Informationen zur Verwendung der Hilfe HINWEIS anzuzeigen, halten Sie für etwa 3 Sekunden gedrückt. Keysight U1610/20A Schnellstarthandbuch... - Page 43 Keysight U1610/20A Oscilloscopio digitale palmare Guida rapida...
- Page 44 CAT II protezione da sovratensioni indicate non siano state perfettamente comprese e Categoria III per la CAT III soddisfatte. protezione da sovratensioni Per maggiori informazioni sulla sicurezza, consultare il U1610/20A Oscilloscopio digitale palmare Manuale dell'utente Keysight. Keysight U1610/20A Guida rapida...
- Page 45 4 Laccio da polso (legato all'oscilloscopio palmare) 4 Laccio da collo 4 Certificato di calibrazione In caso di componenti mancanti o danneggiati, contattare Keysightl'ufficio vendite più vicino. All'indirizzo www.keysight.com/find/hhTechLib NOTA sono disponibili tutti i documenti inerenti e i software. Keysight U1610/20A Guida rapida...
-
Page 46: Carica Della Batteria
3 ore, mantenendo spento l'oscilloscopio, utilizzando l'adattatore CA/CC in dotazione. Se la batteria è completamente scarica dopo l'utilizzo successivo, ricaricarla con l'oscilloscopio palmare acceso Quando la batteria sarà completamente carica, il tasto di accensione diventerà giallo. Keysight U1610/20A Guida rapida... - Page 47 Prima di accendere lo strumento, collegare tutti i NOTA cavi e gli accessori. Le sonde possono essere collegate/scollegate mentre l'oscilloscopio palmare e accesso. Tenere premuto per circa 3 secondo e mezzo. Quando il display dell'oscilloscopio palmare si accende, l'oscilloscopio palmare può essere utilizzato. Keysight U1610/20A Guida rapida...
-
Page 48: Panoramica Del Prodotto
Guida. e l'offset verticale. Tasto d i accensione Terminali misuratore Comand i orizzontali Consentono di impostare la velocità di sweep (sec/div) e la posizione orizzontale della forma d'onda. Utilizzare ingrandire la forma d'onda. Keysight U1610/20A Guida rapida... - Page 49 Display dell'oscilloscopio Display del multimetro Keysight U1610/20A Guida rapida...
- Page 50 10 Visualizza la misurazione. 11 Visualizza la scala di misurazione virtuale. 12 Visualizza i valori medi, massimi e minimi. 13 Indica la modalità automatica o manuale per l'impostazione della portata. 14 Visualizza il grafico di registrazione. Keysight U1610/20A Guida rapida...
-
Page 51: Impostazione Della Data E Dell'ora
> Prima di reimpostare i valore di fabbrica predefiniti, NOTA è possibile salvare l'attuale configurazione oscilloscopio palmare premendo > e utilizzarla in un altro momento. Per ulteriori dettagli sulle funzioni NOTA dell'oscilloscopio, consultare il Manuale dell'utente. Keysight U1610/20A Guida rapida... - Page 52 Il data logger registra e traccia l'andamento del segnale d'ingresso durante la misurazione in modalità Oscilloscopio e Multimetro. Per accedere alla modalità Logger, premere Per i dettagli sull'utilizzo delle funzioni del logger, NOTA consultare il Manuale dell'utente. Collegamento delle sonde ai terminali dell'oscilloscopio Keysight U1610/20A Guida rapida...
-
Page 53: Collegamento Dei Puntali Di Test Ai Terminali Del Misuratore
Collegamento dei puntali di test ai terminali del misuratore Keysight U1610/20A Guida rapida... - Page 54 Frequenza °C °F [a] La misurazione della frequenza è disponibile in modalità Autorange. La portata selezionata è valida per la misurazione V CA. Per i dettagli sull'utilizzo delle funzioni del NOTA multimetro, consultare il Manuale dell'utente. Keysight U1610/20A Guida rapida...
- Page 55 Adattatore BNC Utilizzare uno attrezzo non metallico per regolare il condensatore di compensazione sull’impulso più piatto possibile. condensatore di compensazione Per dettagli sulla regolazione della compensazione NOTA della sonda per un canale, vedere il Manuale dell'utente. Keysight U1610/20A Guida rapida...
-
Page 56: Accesso Alla Guida Rapida
Per visualizzare la Guida in un'altra lingua, premere NOTA > > e utilizzare i tasti Premere di nuovo per uscire dal menu di selezione. Per accedere alle informazioni sull'utilizzo della NOTA Guida, tenere premuto per circa 3 secondi. Keysight U1610/20A Guida rapida... - Page 57 Keysight U1610/20A Osciloscopio Digital Portátil Guía de inicio rápido...
- Page 58 CAT II totalmente las condiciones de categoría II indicadas. Protección de sobretensión CAT III de Categoría III Para obtener información sobre seguridad más detallada, consulte el Manual del usuario de U1610/20A Osciloscopio Digital Portátil Keysight. Keysight U1610/20A Guía de inicio rápido...
- Page 59 4 Correa de mano (se incluye en el osciloscopio portátil) 4 Correa para el cuello 4 Certificado de calibración Si algo falta o está dañado, comuníquese con la oficina de ventas de Keysight más cercana. Todos los documentos y software relacionados NOTA están disponibles para descarga en www.keysight.com/find/hhTechLib.
-
Page 60: Cargue La Batería
CA/CC proporcionado. Si la batería se descarga por completo luego del utilizar el aparato, cargue la batería con el osciloscopio portátil encendido. La tecla de encendido se pondrá amarillo cuando la batería está completamente cargada. Keysight U1610/20A Guía de inicio rápido... -
Page 61: Encendido Del Osciloscopio Portátil
Conecte todos los cables y accesorios antes de NOTA encenderlo. Puede conectar/desconectar sondas, mientras que el osciloscopio portátil está encendido. Mantenga pulsado por 3 segundos aproximadamente. Cuando aparece la pantalla del osciloscopio portátil, el osciloscopio portátil está listo para usar. Keysight U1610/20A Guía de inicio rápido... -
Page 62: Descripción General Del Diseño Del Producto
Tecla de encend ido Terminales del multímetro Controles Horizontales Para controlar la velocidad de barrido (sec/div) y la posición horizontal de la forma de onda. Use para hacer zoom en la forma de onda. Keysight U1610/20A Guía de inicio rápido... - Page 63 Pantalla del osciloscopio Pantalla del multímetro Keysight U1610/20A Guía de inicio rápido...
- Page 64 10 Muestra la medición. 11 Muestra la escala de medición virtual. 12 Muestra los valores promedio, máximos y mínimos. 13 Indica el modo de rango manual o automático. 14 Muestra el gráfico de registro. Keysight U1610/20A Guía de inicio rápido...
-
Page 65: Configure La Fecha Y Hora
> Para obtener más información sobre el uso de las NOTA funciones de osciloscopio, consulte la Guía del usuario. Keysight U1610/20A Guía de inicio rápido... -
Page 66: Registro De Datos
Para acceder al modo de registro, pulse Para obtener más información sobre el uso de las NOTA funciones de registrador, consulte la Guía del usuario. Conecte las sondas a los terminales del osciloscopio Keysight U1610/20A Guía de inicio rápido... -
Page 67: Conecte Los Cables De Prueba A Los Terminales Del Multímetro
Conecte los cables de prueba a los terminales del multímetro Keysight U1610/20A Guía de inicio rápido... -
Page 68: Mediciones Del Multímetro
[a] La medición de frecuencia funciona en el modo de ajuste automático, y el rango que seleccione se aplica para la V CA. Para obtener más información sobre el uso de las NOTA funciones del multímetro, consulte la Guía del usuario. Keysight U1610/20A Guía de inicio rápido... - Page 69 Para obtener más detalles sobre cómo ajustar la NOTA compensación de la sonda para un canal, consulte la Guía del usuario. Keysight U1610/20A Guía de inicio rápido...
-
Page 70: Acceda A La Ayuda Rápida
Para ver la Ayuda en otro idioma, presione NOTA > > y use las teclas Presione nuevamente para salir del menú de selección. Para acceder a la información sobre el uso de la NOTA Ayuda, mantenga presionado durante aproximadamente 3 segundos. Keysight U1610/20A Guía de inicio rápido... - Page 71 Keysight U1610/20A 手持式數位示波器 快速入門 指南...
- Page 72 險 ( 請參閱儀器手冊 , 以 安全聲明 獲得特定的 「警告」或 「注意」資訊 ) 設備受到 「雙重絕緣」 「注意」通知代表發生危險狀況。它 或 「強化絕緣」的完整 提醒您注意,如果沒有正確執行或 保護 遵守操作程序、作法或相關說明, 可能會導致產品毀損或重要資料遺 失。除非已經完全了解和滿足所指 注意,有電擊的風險 定的條件,否則請不要在出現 「注 意」通知的狀態下繼續進行。 CAT II 類別 II 超壓保護 CAT III 類別 III 超壓保護 如需進⼀步瞭解安全⽅⾯的詳細資訊,請參閱 《Keysight U1610/20A 手持式數位示波器使用者指南》 。 Keysight U1610/20A 快速入門指南...
- Page 73 4 AC/DC 配接器 4 10:1 CAT III 600 V 示波器探頭 4 BNC 轉探頭配接器 4 DMM (數位萬用電表)測試引線套件 4 USB 纜線 4 把手帶 (繫在 手持式示波器 上) 4 頸帶 4 校正證明 如果有任何項目缺失或破損,請聯絡您當地的 Keysight 營業處。 您可 以 從 下 載 www.keysight.com/find/hhTechLib 所有相關文件與軟體。 Keysight U1610/20A 快速入門指南...
- Page 74 為電池充電 在⾸次使用手持式示波器之前或⻑時間存放手持 式示波器之後,需要對電池至少充電 3 小時,充 電時需要使用手持式示波器附隨的 AC/DC 配接 器,並且需要關閉手持式示波器。如果在後續使 用之後電池電量耗盡,可以在手持式示波器開啟 的情況下對電池充電。 電池充滿後,電源鍵 將變為穩定的黃色。 開啟手持式示波器 通電之前連接所有纜線和配件。在開啟手持式示波器 時,您可以連接 / 斷開連接探頭。 按住 大約 3 秒鐘。顯示手持式示波器畫⾯後, 便可使用手持式示波器。 Keysight U1610/20A 快速入門指南...
- Page 75 產品外觀 示波器端子 USB 介面連接 顯示畫面 器和 DC 電源 插孔 功能軟鍵 執行顯示在每個軟 鍵上的功能。 擷取與功能控制項 方向鍵 存取示波器、電錶、 垂直控制項 記錄器、系統和說 明功能。 設定垂直刻度 (volt/div) 和垂 直偏移。 電源鍵 電錶端子 水平控制項 控 制掃 描 速度 (sec/div) 和 波 形的水平位置。使用 放大波形。 Keysight U1610/20A 快速入門指南...
- Page 76 示波器顯示器 萬用電錶顯示器 Keysight U1610/20A 快速入門指南...
- Page 77 記錄器顯示器 1 顯示通道與時間基準的設定資訊。 2 顯示通道輸入波形。 3 顯示取樣率。 4 顯示鍵 / 軟鍵功能功能表。 5 顯示信號擷取模式。 6 顯示電池狀態和為電池充電的 AC 連線能力。 7 顯示信號觸發狀態。 8 顯示日期和時間。 9 顯示擷取、開始日期和時間以及持續狀態。 10 顯示量測值。 11 顯示虛擬量測標度。 12 顯示平均值、最大值和最小值。 13 指示自動或手動選取範圍模式。 14 顯示記錄圖形。 Keysight U1610/20A 快速入門指南...
- Page 78 設定日期和時間 按 下 。按下任 > > 意軟鍵並使用 和 鍵變更值。 僅在 「Scope」模式下可存取。 設定語言 按 下 ,然後使 > > 用 鍵選取域言。 再次按下 可退出選擇功能表。 重設示波器 按下 。 > 重設為原廠設定之前,您可以透過按下 > 來儲存當前的手持式示波器組態,以供日 後使用。 使用者指南 有關使用示波器功能的詳細資訊 , 請參閱 。 Keysight U1610/20A 快速入門指南...
- Page 79 資料記錄 資料記錄器用作記錄和規劃輸入信號趨勢的記錄 器,用於示波器和電錶量測。 若要存取記錄器模式,請按下 。 使用者指南 有關使用記錄器功能的詳細資訊 , 請參閱 。 將探頭連接至示波器端子 Keysight U1610/20A 快速入門指南...
- Page 80 將測試引線連接至電錶端子 Keysight U1610/20A 快速入門指南...
- Page 81 電錶量測 若要存取萬用電錶模式,請按下 。 量測功能 MaxMinAvg 功能 相對 範圍 重新啟動測試 V AC V DC V AC+DC 電阻 電容 二極體測試 導通 頻率 °C °F 頻率量測以自動選取範圍模式進行作業 , 並且您選取的範圍適用於 V AC 。 使用者指南 有關使用電錶功能的詳細資訊,請參閱 。 Keysight U1610/20A 快速入門指南...
- Page 82 補償示波器探頭 當您第⼀次將示波器的被動探頭連接至任何輸入 通道時,請執行示波器探頭補償。探頭特性與手 持式示波器的密合是很重要的。補償不佳的探頭 可能會導致顯著的量測誤差。 要將探頭接觸器與外部觸發器終端連接,需要使 用 BNC 配接器。 按 開啟補償訊 > > 號,並設定探頭衰減係數。 BNC 配接器 使用非金屬工具調整探頭上的修整電容,使脈波 盡可能平坦。 修整電容器 使用者 有關為通道調整探頭補償的詳細資訊,請參閱 指南 。 Keysight U1610/20A 快速入門指南...
- Page 83 存取 「Quick Help」 按下任意功能鍵 / 軟鍵,然後按 可顯示 各自的 「Help」資訊。使用 鍵在 「Help」 內導覽。 若要檢視其他語言的 「Help」 ,請按下 > ,然後使用 鍵。 > 再次按下 可退出選擇功能表。 若要存取有關使用 「Help」 的資訊 , 請按住 約 3 秒鐘。 Keysight U1610/20A 快速入門指南...
- Page 84 本頁預留空白。 Keysight U1610/20A 快速入門指南...
- Page 85 Keysight U1610/20A 手持式数字示波器 快速入门 指南...
- Page 86 “ 警告 ” 或 “ 小心 ” 信息) 设备由双重绝缘或加强 小心标志表示有危险。它要求在执 绝缘保护 行操作步骤时必须加以注意,如果 不正确地执行或不遵守操作步骤, 则可能 导致产品 损坏或 重要数据 小心,电击风险 丢失。在没有完全理解指定的条件 且不满足这些条件的情况下,请勿 CAT II II 类 过电压保护 继续执 行小心标 志所指 示的任何 操作。 CAT III III 类 过电压保护 有关进一步的安全详细信息,请参阅 Keysight U1610/20A 手持式数字示波器用户指南 。 Keysight U1610/20A 快速入门指南...
- Page 87 4 锂离子电池组, 10.8 V (手持式示波器随附) 4 AC/DC 适配器 4 10:1 CAT III 600 V 示波器探头 4 BNC 到探头适配器 4 DMM (数字万用表)测试引线套件 4 USB 电缆 4 腕带 (连接到手持式示波器) 4 挂绳 4 校准证书 如果缺少任何物件或存在已损坏的物件,请联系 离您最近的 Keysight 销售处。 所有相关文档和软件可从以下地址下载: www.keysight.com/find/hhTechLib。 Keysight U1610/20A 快速入门指南...
- Page 88 对电池充电 在首次使用手持式示波器之前或长时间存放手持 式示波器之后,需要对电池至少充电 3 小时,充 电时需要使用手持式示波器附随的 AC/DC 适配 器,并且需要关闭手持式示波器。如果在后续使 用之后电池电量耗尽,可以在手持式示波器打开 的情况下对电池充电。 电池完全充满后,电源键 将变为稳定的黄色。 打开 Handheld Scope 在施加电源之前,连接所有电缆和附件。当手持式示 波器打开时,可以连接探头 / 断开探头连接。 约 3 秒。手持式示波器显示屏显示后, 按住 就可以使用手持式示波器了。 Keysight U1610/20A 快速入门指南...
- Page 89 产品外观 示波器端子 USB 接口连接 显示屏 器 和 DC 电源 插座 功能软键 执行每个软键上方 显示的功能。 采集和功能控件 方向键 访问示波器、万用 垂直控件 表、记录器、系统 和帮助功能。 设置垂直定标 (伏 / 格)和 垂直偏移。 电源键 万用表端子 水平控件 控制扫描速度 (秒 / 格)和波形 的水平位置。 使用 可放 大波形。 Keysight U1610/20A 快速入门指南...
- Page 90 示波器显示屏 万用表显示屏 Keysight U1610/20A 快速入门指南...
- Page 91 记录器显示屏 1 显示通道和时基设置信息。 2 显示通道输入波形。 3 显示采样率。 4 显示键 / 软键功能菜单。 5 显示信号采集模式。 6 显示电池状态和电池充电的 AC 连接。 7 显示信号触发状态。 8 显示日期和时间。 9 显示采集、开始日期和时间以及持续时间状态。 10 显示测量。 11 显示虚拟测量比例。 12 显示平均值、最大值和最小值。 13 指示自动或手动量程模式。 14 显示记录图。 Keysight U1610/20A 快速入门指南...
- Page 92 设置日期和时间 > > 按 。按任意软 键并使用 或 键更改值。 仅在 “ 示波器 ” 模式下才可访问。 设置语言 > > 按 并使用 键选择语言。 再次按 可退出选择菜单。 重置示波器 > 按 。 > 在重置为出厂默认设置之前,可能要通过按 来保存当前的手持式示波器配置。 用户指南 有关使用示波器功能的详细信息,请参阅 。 Keysight U1610/20A 快速入门指南...
- Page 93 数据记录 数据记录器相当于一个录像机,可记录并绘制示 波器和万用表测量的输入信号趋势。 要访问记录器模式,请按 。 用户指南 有关使用万用表功能的详细信息,请参阅 。 将探头连接到示波器端子 Keysight U1610/20A 快速入门指南...
- Page 94 将测试引线连接到万用表端子 Keysight U1610/20A 快速入门指南...
- Page 95 万用表测量 要访问万用表模式,请按 。 测量功能 MaxMinAvg 功能 相对 量程 重新开始测试 V AC V DC V AC+DC 电阻 电容 二极管测试 通断 频率 °C °F [a] 频率测量在自动量程模式中工作,所选的量程适用于 V AC。 用户指南 有关使用万用表功能的详细信息,请参阅 。 Keysight U1610/20A 快速入门指南...
- Page 96 补偿示波器探头 在第一次将无源示波器探头连接到任何输入通道 时,可执行示波器探头补偿。要将探头特征与手 持式示波器匹配,此过程非常重要。一个补偿有 欠缺的探头可能导致显著的测量误差。 要将探头触点与外部触发器端子连接,需要使用 BNC 适配器。 > > 按 可打开补偿 信号功能,然后设置探头衰减因子。 BNC 适配器 使用非金属工具调整探头上的微调电容器,以获 得尽可能平的脉冲。 微调电容器 用户 有关为通道调整探头补偿的详细信息,请参见 指南 。 Keysight U1610/20A 快速入门指南...
- Page 97 访问快速帮助 前面的任何功能键 / 软键可显示相应 按 的帮助信息。使用 键可在帮助中导航。 > > 要以其他语言查看帮助, 请按 ,并使用 键。 再次按 可退出选择菜单。 要访问有关使用帮助的信息,请按住 约 3 秒。 Keysight U1610/20A 快速入门指南...
- Page 98 本页特意留为空白。 Keysight U1610/20A 快速入门指南...
- Page 99 Keysight U1610/20A ハンドヘルド・デジタ ル・オシロスコープ クイック・ スタート・ ガイド...
- Page 100 リードと組み合わせて使用してく 的な警告または注意情 ださい。 報については測定器の マニュアルを参照) 安全に関する注意事項 二重絶縁または強化絶 縁で保護された機器。 注意の表示は、危険を表します。 ここに示す操作手順や規則などを 注意、感電の危険あり 正しく実行または遵守しないと、 製品の損傷または重要なデータの CAT II Category II 過電圧保護 損失を招くおそれがあります。指 定された条件を完全に理解し、そ CAT III Category III 過電圧保護 れが満たされていることを確認す るまで、注意の指示より先に進ま ないでください。 詳細な安全情報については、 Keysight U1610/20A 『 ハンドヘルド・デジタル・オシロスコープ User's Guide 』 を参照してください。 Keysight U1610/20A クイック・スタート・ガイド...
- Page 101 10.8 V(ハンドヘルド・オシロスコープに装 着済み) 4 AC/DC アダプタ 4 10:1 CAT III 600 V オシロスコーププローブ 4 BNC -プローブアダプター 4 DMM(デジタルマルチメータ)テスト・ リード・キット 4 USB ケーブル 4 ハンドストラップ(ハンドヘルド・オシロ スコープに取り付け済み) 4 ネックストラップ 4 校正証明書 欠けている付属品または損傷している付属品が ある場合は、最寄りの Keysight 営業所にお問い 合わせください。 関連するすべてのドキュメントとソフトウェアは、 www.keysight.co.jp/find/hhTechLib からダウン ロードできます。 Keysight U1610/20A クイック・スタート・ガイド...
- Page 102 バッテリの充電 ハンドヘルド・オシロスコープを初めて使用す る前に、または長期間保管した後で使用する場 合は、ハンドヘルド・オシロスコープをオフに した態で付属の AC/DC アダプタを使用して、フ ル充電してください(少なくとも 3 時間かかり ます) 。その後の使用でバッテリが完全に放電し た場合はハンドヘルド・オシロスコープをオン にした状態でバッテリを充電してください。 バッテリが完全に充電されると、電源キー が黄色に常時点灯します。 Keysight U1610/20A クイック・スタート・ガイド...
- Page 103 ハンドヘルド・オシロスコープの電源投入 電源を投入する前に、すべてのケーブルとアクセ サリを接続してください。プローブの接続と取り 外しは、ハンドヘルド・オシロスコープの電源を オンにしたままで行うことができます。 を約 3 秒間押し続けます。ハンドヘルド・ オシロスコープのディスプレイが表示された ら、ハンドヘルド・オシロスコープは使用可能 な状態です。 Keysight U1610/20A クイック・スタート・ガイド...
- Page 104 製品の外観 オシロスコープ端子 USB インタ ディスプレイ画面 フェース・コ ネクタおよび 機能ソフトキー DC 電源入力 各ソフトキーの上 に表示された機能 を実行します。 収集および機能コ 方向キー ントロール 垂直コント オシロスコープ、 ロール メータ、ロガー、 システム、ヘルプ 垂直スケール の各機能にアクセ (V/div)および スします。 垂直オフセット を設定します。 電源キー 水平コントロール メータ端子 掃引速度(s/div)および波 形の水平位置を制御します。 を使用して、 波形に ズームインできます。 Keysight U1610/20A クイック・スタート・ガイド...
- Page 105 オシロスコープ表示 マルチメータ表示 Keysight U1610/20A クイック・スタート・ガイド...
- Page 106 ロガー表示 1 チャネルとタイムベースのセットアップ情 報を表示します。 2 チャネル入力波形を表示します。 3 サンプリング・レートを表示します。 4 キー/ソフトキー機能メニューを表示し ます。 5 信号収集モードを表示します。 6 バッテリの状態と、バッテリ充電のための AC 接続の状態を表示します。 7 信号のトリガ状態を表示します。 8 日付と時刻を表示します。 9 収集の開始日付/時刻、持続時間を表示し ます。 10 測定値を表示します。 11 仮想測定スケールを表示します。 12 平均値、最大値、最小値を表示します。 13 オートレンジまたは手動レンジ・モードを 表示します。 14 ロギング・グラフを表示します。 Keysight U1610/20A クイック・スタート・ガイド...
- Page 107 日付と時刻の設定 > > を押します。 どれかのソフトキーを押し、 または キーを 使用して値を変更します。 はオシロスコープ・モードでのみ使用 できます。 言語の設定 > > を押し、 キーを使用して言語を選択します。 をもう一度押して、選択メニューを終 了します。 オシロスコープのリセット > を押します。 > 工場設定にリセットする前に、 を押すことにより、現在のハンドヘル ド・オシロスコープ設定を後で使用するために保 存できます。 オシロスコープ機能の使用法の詳細については、 『ユーザーズ・ガイド』 を参照してください。 Keysight U1610/20A クイック・スタート・ガイド...
- Page 108 データ・ロギング データ・ロガーはレコーダとして動作し、オシ ロスコープとメータの両方の測定を記録して、 入力信号のトレンドをプロットします。 ロガー・モードを使用するには、 を押し ます。 『ユーザー ロガー機能の使用法の詳細については、 ズ・ガイド』 を参照してください。 オシロスコープ端子へのプローブの接続 Keysight U1610/20A クイック・スタート・ガイド...
- Page 109 メータ端子へのテスト・リードの接続 Keysight U1610/20A クイック・スタート・ガイド...
- Page 110 メータ測定 マルチメータ・モードを使用するには、 を押します。 測定機能 MaxMinAvg 機能 相対機能 レンジ テストのリ スタート V AC V DC V AC+DC 抵抗 キャパシタンス ダイオード・ テスト 導通 周波数 °C °F [a] 周波数測定はオートレンジ・モードで動作し、選択したレンジは V AC に適用されます。 『ユーザー メータ機能の使用法の詳細については、 ズ・ガイド』 を参照してください。 Keysight U1610/20A クイック・スタート・ガイド...
- Page 111 オシロスコープ・プローブの補正 パッシブ・オシロスコープ・プローブをどれか の入力チャネルに初めて接続する場合は、オシ ロスコープ・プローブ補正を実行する必要があ りま。これは、プローブの特性をハンドヘル ド・オシロスコープと整合させるために重要で す。正しく補正されていないプローブにより、 有意な測誤差が導入される可能性があります。 プローブのコンタクト部を外部トリガ端子に接 続するのに BNC アダプタが必要です。 > > を押して、補償 信号をオンにしてプローブの減衰係数を設定し ます。 BNC アダプタ 非金属ツールを使用して、パルスができるだけ 平らになるようにプローブ上のトリマ・コンデ ンサを調整します。 トリマ・キャパシタ チャネルのプローブ補償の調整に関する詳細は、 ユーザーズ・ガイド を参照してください。 Keysight U1610/20A クイック・スタート・ガイド...
- Page 112 クイック・ヘルプの使用 任意のファンクション・キー/ソフトキーを押 した後で を押すと、関連するヘルプ情 報が表示されます。ヘルプ画面を操作するには キーを使用します。 > 他の言語でヘルプを表示するには、 > を押し、 キーを使用し ます。 をもう一度押して、選択メニューを終了 します。 を約 3 秒間 ヘルプの使用法を見るには、 押し続けます。 Keysight U1610/20A クイック・スタート・ガイド...
- Page 113 Keysight U1610/20A 휴대형디지털 오실로스 코프 빠른 시작 설명서...
- Page 114 CAT II 범주 II 과전압 보호 결하기 전에는 주의 고지 이후 내용 으로 넘어가지 마십시오 . CAT III 범주 III 과전압 보호 안전 정보에 대한 자세한 내용은 Keysight U1610/20A 휴대형디지털 오실로스코프 사용 설명서 를 참조 하십시오 . Keysight U1610/20A 빠른 시작 설명서...
- Page 115 4 디지털 멀티미터 (DMM) 테스트 리드 키트 4 USB 케이블 4 핸드 스트랩 ( 휴대용 스코프에 부착됨 ) 4 넥 스트랩 4 교정 인증서 빠졌거나 손상된 품목이 있으면 가까운 Keysight 영업 사무소로 연락하십시오 . 모든 관련된 문서 및 소프트웨어는 www.keysight.com/find/hhTechLib 에서 다운로드...
- Page 116 용 스코프를 끈 상태로 최소 3 시간 배터리를 완 충합니다 . 연속 사용 후에 배터리가 완전히 방전 된 경우에는 휴대용 스코프를 켠 상태로 배터리 를 충전합니다 . 배터리가 완전히 충전되면 전원 키 가 노란색 으로 바뀌고 지속됩니다 . Keysight U1610/20A 빠른 시작 설명서...
-
Page 117: 휴대용 스코프 켜기
전원을 인가하기 전에 모든 케이블과 액세서리를 연 결합니다 . 프로브는 휴대용 스코프이 켜져있는 동 안에도 연결 / 분리할 수 있습니다 . 을 약 3 초간 누른 채로 고정합니다 . 휴대용 스코프 디스플레이가 나타나면 휴대용 스코프 사 용 준비가 끝난 것입니다 . Keysight U1610/20A 빠른 시작 설명서... - Page 118 스코프 , 미터 , 로거 , 수직 제어 시스템 , 도움말 기능 수직 스케일링 액세스 (volt/div) 및 수 직 오프셋 설정 전원 키 미터 터미널 수평 제어 스윕 속도(sec/div) 및 파형의 수평 위치 제어 사 용 파형 확대 Keysight U1610/20A 빠른 시작 설명서...
- Page 119 오실로스코프 디스플레이 멀티미터 디스플레이 Keysight U1610/20A 빠른 시작 설명서...
- Page 120 9 획득 , 날짜와 시간 , 지속 상태를 보여줍니다 . 10 측정을 보여줍니다 . 11 가상 측정 스케일을 보여줍니다 . 12 평균 , 최대 , 최소값을 보여줍니다 . 13 자동 또는 수동 범위 모드를 표시합니다 . 14 로거링 그래프를 보여줍니다 . Keysight U1610/20A 빠른 시작 설명서...
-
Page 121: 오실로스코프 초기화
오실로스코프 초기화 > 를 누릅니다 . > 공장 기본 설정으로 초기화하기 전에 를 눌러 나중을 위해 현재의 휴대용 스코 프 구성을 저장할 필요가 있습니다 . 오실로스코프 기능 사용을 위한 자세한 내용은 를 참조합니다 . 사용자 설명서 Keysight U1610/20A 빠른 시작 설명서... -
Page 122: 프로브를 오실로스코프 터미널에 연결
데이터 로거는 스코프 및 미터 측정 모두를 위한 입력 신호 추세를 기록하고 플롯하는 기록기 역 할을 합니다 . 를 누릅니다 . 로거 모드를 엑세스하려면 사용자 설명서 로거 기능 사용을 위한 자세한 내용은 를 참조합니다 . 프로브를 오실로스코프 터미널에 연결 Keysight U1610/20A 빠른 시작 설명서... -
Page 123: 미터 터미널에 테스트 리드 연결
미터 터미널에 테스트 리드 연결 Keysight U1610/20A 빠른 시작 설명서... - Page 124 V AC+DC 저항 캐패시턴스 다이오드 테 스트 연속성 주파수 °C °F [a] 주파수 측정은 자동범위 모드에서 작동하며 선택한 범위는 V AC 대상 으로 합니다 . 사용자 설명서 미터 기능 사용을 위한 자세한 내용은 를 참조합니다 . Keysight U1610/20A 빠른 시작 설명서...
- Page 125 호를 켜고 프로브 감쇄 팩터를 설정합니다 . BNC 어댑터 비금속 도구를 사용하여 가능한 가장 평평한 펄 스를 얻도록 프로브 상의 트리머 캐패시터를 조 정합니다 . 트리머 캐패시터 사용 채널에 대한 프로브 보정에 대한 자세한 내용은 를 참조하십시오 . 설명서 Keysight U1610/20A 빠른 시작 설명서...
-
Page 126: 빠른 도움말 액세스
키를 사용하여 도움말에서 탐색을 합니다 . > 다른 언어로 도움말을 보려면 > 를 누르고 키를 사용합 니다 . 를 다시 눌러 선택 메뉴 밖으로 나옵니다 . 도움말을 사용하여 정보를 액세스하려면 를 약 3 초동안 누른 채로 유지합니다 . Keysight U1610/20A 빠른 시작 설명서... - Page 127 Keysight U1610/20A Osciloscópio digital portátil Guia de início rápido...
- Page 128 Proteção contra CAT II completamente compreendidas e sobretensão de categoria II atendidas. Proteção contra CAT III sobretensão de categoria III Para mais detalhes sobre segurança, consulte o Guia do Usuário U1610/20A Osciloscópio digital portátil Keysight. Keysight U1610/20A Guia de início rápido...
- Page 129 4 Alça de mão (presa ao osciloscópio portátil) 4 Alça para pescoço 4 Certificado de calibração Se algo estiver faltando ou danificado, entre em contato com o escritório de vendas Keysight mais próximo. Todos os documentos e softwares relacionados NOTA estão disponíveis para download em...
-
Page 130: Carregar A Bateria
CA/CC fornecido. Se a bateria for descarregada completamente após o uso subsequente, carregue a bateria com o osciloscópio portátil ligado. O botão Liga/Desliga ficará aceso em amarelo de forma constante quando a bateria estiver completamente carregada. Keysight U1610/20A Guia de início rápido... -
Page 131: Ligar O Osciloscópio Portátil
É possível conectar/ desconectar pontas de prova enquanto o osciloscópio portátil está ligado. Mantenha pressionado o botão aproximadamente 3 segundo. Quando o mostrador do osciloscópio portátil aparecer, o osciloscópio portátil está pronto para uso. Keysight U1610/20A Guia de início rápido... -
Page 132: Aparência Do Produto
(volt/div) e o desvio vertical. Botão Liga/Desliga Terminais do Controles horizontais multímetro Para controlar a velocidade de varredura (seg/div) e a posição horizontal da forma de onda. para ampliar a forma de onda. Keysight U1610/20A Guia de início rápido... - Page 133 Mostrador do osciloscópio Mostrador do multímetro Keysight U1610/20A Guia de início rápido...
- Page 134 10 Exibe a medição. 11 Exibe a escala de medição virtual. 12 Exibe os valores máximo e mínimo e a média. 13 Indica o modo de escala: automático ou manual. 14 Exibe o gráfico do registro. Keysight U1610/20A Guia de início rápido...
-
Page 135: Definir A Data E A Hora
Antes de redefinir as configurações ao padrão de NOTA fábrica, é possível salvar a configuração atual do osciloscópio portátil para uso posterior pressionando-se > Para obter detalhes sobre como usar as funções do NOTA osciloscópio, consulte o Guia do usuário. Keysight U1610/20A Guia de início rápido... -
Page 136: Registro De Dados
Para acessar o modo de registro, pressione Para obter detalhes sobre como usar as funções de NOTA registro, consulte o Guia do usuário. Conecte as pontas de prova aos terminais do osciloscópio Keysight U1610/20A Guia de início rápido... -
Page 137: Conectar Os Cabos De Teste Aos Terminais Do Medidor
Conectar os cabos de teste aos terminais do medidor Keysight U1610/20A Guia de início rápido... -
Page 138: Medições Do Multímetro
[a] A medição de frequência funciona no modo de escala automática, e a escala selecionada será aplicada para CA V. Para obter detalhes sobre como usar as funções do NOTA multímetro, consulte o Guia do usuário. Keysight U1610/20A Guia de início rápido... - Page 139 Para detalhes sobre como ajustar a compensação NOTA da ponta de prova para determinado canal, consulte o Guia do Usuário. Keysight U1610/20A Guia de início rápido...
-
Page 140: Acessar A Ajuda Rápida
Para visualizar a Ajuda em outro idioma, pressione NOTA > > e use as teclas Pressione novamente para sair do menu de seleção. Para acessar informações sobre como usar a Ajuda, NOTA mantenha a tecla pressionada por cerca de 3 segundos. Keysight U1610/20A Guia de início rápido... - Page 141 This information is subject to change without notice. Always refer to the Keysight website for the latest revision. © Keysight Technologies 2011-2021 Edition 5, March 2021 Printed in Malaysia *U1610-90050* U1610-90050 www.keysight.com...
Need help?
Do you have a question about the U1610/20A and is the answer not in the manual?
Questions and answers