Table of Contents
Advertisement
Quick Links
Advertisement
Table of Contents

Related Manuals for Stern Engineering 280300


Summary of Contents for Stern Engineering 280300
- Page 1 BEHIND MIRROR TOUCH FREE FAUCET INSTALLAT ION AND MAIN TENA NCE GU I DE...
- Page 2 SERVICE CHECK LIST The information in this document reflects products at the date of printing. Stern Engineering Ltd reserves the right, subject to all applicable laws, at any time, at its sole discre- tion, and without notice, to discontinue or change the features, designs, materials and other specifications of its products, and to either permanently or temporarily withdraw any of the forgoing from the market.
-
Page 3: Technical Data
TECHNICAL DATA BTM B BTM E 280310 280300 IP 67 Black battery box for 6x1.5V AA Power supply: Alkaline batteries \ Transformer 0.5-8.0 bar (7-116 PSI) Recommended water pressure: With water pressure of more than 8 bars, use a pressure reducing valve Self adjusting sensor. -
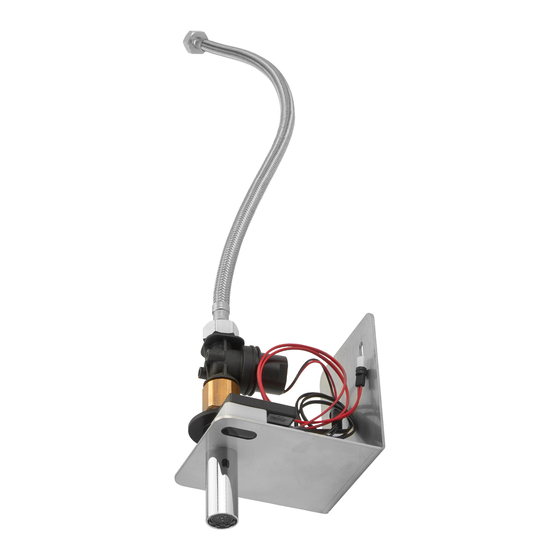
Page 4: Pack Contents
PACK CONTENTS Familiarize yourself with the part names and confirm that the parts are included. IP 67 BLACK BATTERY BOX TRANSFORMER FOR 6X1.5V AA ALKALINE BATTERIES 2 screws up to 5mm (not supplied) 1 x Plate with faucet spout, sensor and solenoid valve... -
Page 5: Pre-Installation Info
PRE-INSTALLATION INFO CHECK CONTENTS Separate all parts from the packaging and check each part with the pack contents section. Pay attention to the variations of the different models. Make sure all parts are accounted for before discarding any packaging material. If any parts are missing, do not attempt to install your electronic faucet until you obtain the missing parts. -
Page 6: Faucet Installation
FAUCET INSTALLATION STEP 1 – PREPARATION FOR INSTALLATION Shut off the water supply. Cut a hole in the bottom of the mirror compartment for the faucet sensor and spout both. The recommended hole size should be 40x60 60 mm 40 mm STEP 2 –... - Page 7 FAUCET INSTALLATION Secure the plate to the wall with 2 screws (not supplied). Connect the flexible pipe to the main water supply. Turn on the central water supply and check for leaks.
- Page 8 FAUCET INSTALLATION STEP 3 – CONNECTING THE POWER SOURCE IMPORTANT: This product includes a self Before adjusting sensor. proceeding, check that The ideal sensor range for the specific no objects are in front location will be set automatically. of the sensor besides the washbasin.
-
Page 9: Settings Adjustment
SETTINGS ADJUSTMENT DETECTION DELAY OUT TIME RANGE TEMPORARY OFF DELAY IN TIME FUNCTION ENTRANCE TO THE SELF ADJUSTMENT RESET MODE 24 HOUR HYGIENE LOCK OUT TIME FLUS ADJUSTING THE SETTINGS WITH THE REMOTE CONTROL If necessary, the sensor settings can be adjusted as follows: Shut off the water supply. - Page 10 SETTINGS ADJUSTMENT DETECTION RANGE: This faucet was supplied with a self adjusting sensor. The ideal detection range for the specific location will be set automatically. Only if necessary, use the remote control to adjust the sensor range as follows: Press the RANGE button. Wait until a quick flashing of the red light in the sensor eye is perceived.
- Page 11 SETTINGS ADJUSTMENT DELAY OUT TIME: This button allows modifying the water flow time after the user removes his hands from the faucet. A delay out time close to 0 will save more water. An increased delay out time will make the user experience more comfortable.
-
Page 12: Battery Replacement
BATTERY REPLACEMENT When the battery weakens, the red indicator light will blink at a constant rate when the user’s hands are within the sensor range. The battery must be replaced within two weeks. Carefully open the battery box place within the mirror compartment, using a screw driver. -
Page 13: Maintenance
MAINTENANCE FILTER CLEANING INSTRUCTIONS The system is provided with one stainless steel filter preventing foreign particles to enter the lines. It is recommended to clean the filters every six (6) months. If the water flow has decreased, this may be because the filter is clogged. The filters can be cleaned as follows: 1. -
Page 14: Spare Parts List
If a defect is found in normal use, Y. Stern Engineering Ltd. will, at its discretion, repair, provide a replacement part or product, or make appropriate adjustments. -
Page 15: Service Checklist
SERVICE CHECK LIST PROBLEM INDICATOR CAUSE SOLUTION No water 1.Sensor flashes coming out continuously of the faucet. when user’s Low battery. Replace battery. hands are within the sensor’s range. 2. Red light in 1. Range is too short. Increase the range. the sensor does not flash once 2. - Page 16 15 Gan Rave Blvd., 81222 Gan Rave, Yavne, Israel Tel: 972-8-9326000, Fax: 972-8-9326025, export@sternfaucets.com www.sternfaucets.com 12.15 01500279...
Need help?
Do you have a question about the 280300 and is the answer not in the manual?
Questions and answers