Advertisement
Available languages
Available languages
Quick Links
Frameless with Wood Basket
Face Frame with Wire Basket
Tools Required
• Drill
• 1/8" Drill Bit
• 5/16" Drill Bit
• Screwdriver
• Tape Measure
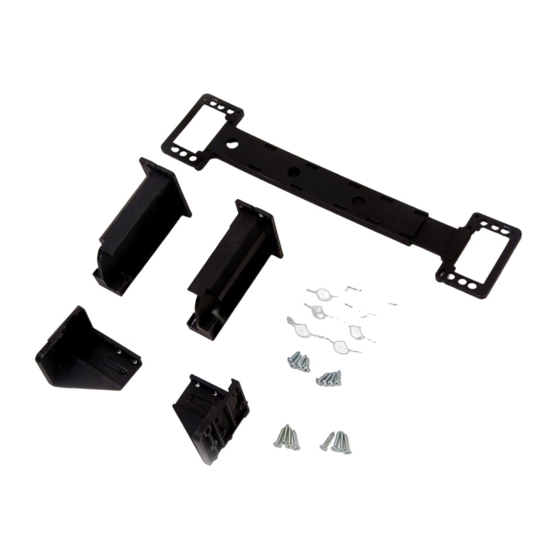
Parts Included
A. Template
B. Rear Mounting Sockets
C. Front Mounting Brackets
D. #6 x 5/8" Pan Head Screws 8
E. #6 x 3/4" Flat Head Screws
A.
B.
C.
E.
Product Assemblies
STACKKIT-R-BLK
2700 Oak Industrial Drive NE
Grand Rapids, MI 49505 USA
800.253.1561 | 616.459.3311
www.kv.com
©2014 Knape & Vogt. All rights reserved.
Knape & Vogt
reserves the right to change specifications without notice.
™
Made in U.S.A.
1.
Determine your preferred height by holding the top basket up in the cabinet, taking into account the drawer contents
and any other obstructions (i.e. hinges).
2.
Measure from the bottom mounting bracket of the basket to the floor of the cabinet. (Fig. 1), and then add 2" to get
Measurement A.
3.
Mark the approximate center of the back wall cabinet at Measurement A. Then at the same height, make a second mark
about 4" to the left of the center. (Fig. 2)
4.
With the installation template arrow pointing up, insert the right rear mounting socket into the template. The "A" side of
the socket should face towards the center of the cabinet as shown. (Fig. 3) The "V" notch on the socket should align
with the "V" notch on the template as shown. (Fig. 4) Press socket firmly until it is seated into the template. Repeat for
the left rear mounting socket.
5.
Press the locking button on the template and extend it to match the width of the basket by selecting 11", 14" or 17".
(Fig. 5)
6.
Peel the film from the sticky tape on the back of the rear mounting sockets.
7.
Align the template with the marks on the back wall of the cabinet and center the template from left to right so there
is equal space on either side. Push the sockets firmly onto the back wall ensuring the tape is attached. (Fig. 6)
8.
If you have a 1/4" thin back wall, continue to Step 9. Otherwise, skip to Step 14.
Fig. 1
Qty.
1
2
2
Height + 2" = Measurement A
8
Fig. 4
D.
Fig. 6
STACK KIT
Installation Instructions
Works with 11.5" to 19.75" wide cabinet openings
Fig. 2
x
x
4"
Fig. 5
"V" Notch
Measurement A
Fig. 3
Press
310371-B_A (0513)
Advertisement

Subscribe to Our Youtube Channel
Related Manuals for Knape & Vogt STACKKIT-R-BLK


Summary of Contents for Knape & Vogt STACKKIT-R-BLK
- Page 1 Height + 2" = Measurement A E. #6 x 3/4" Flat Head Screws Fig. 4 Fig. 5 “V” Notch Product Assemblies Press STACKKIT-R-BLK Fig. 6 Measurement A 2700 Oak Industrial Drive NE Grand Rapids, MI 49505 USA 800.253.1561 | 616.459.3311 www.kv.com ©2014 Knape &...
- Page 2 Mark the center of the holes onto your back cabinet wall. (Fig. 7) Remove rear mounting sockets and template from the cabinet wall then remove sockets from template. Using a 5/16" drill bit, drill holes 1-4. Insert anchors completely into the holes and press the red pin into the anchors by hand to open them, (Fig. 8) then remove red pin. Take left rear mounting sockets and align screw locations with the anchors along the back wall of the cabinet.
- Page 3 Insert the basket into rear sockets at an angle until you reach the desired depth as shown. (Fig. 16) Lower the front steel mounting strap into front mounting brackets and press firmly while supporting the bottom of the mounting brackets until basket snaps into both brackets as shown.
- Page 4 E. Vis à tête plate #6 x 3/4" Hauteur + 5,1 cm = Mesure A Fig. 4 Fig. 5 L'encoche V Ensembles de pièces STACKKIT-R-BLK Appuyez Fig. 6 Mesure A 2700 Oak Industrial Drive NE Grand Rapids, MI 49505 USA 800.253.1561 | 616.459.3311...
- Page 5 Marquez le centre des orifices sur la paroi arrière du meuble. (Fig. 7) Retirez les supports de montage arrière et le gabarit de la paroi de l'armoire, puis retirez les supports du gabarit. Avec une mèche 5/16", percez les trous 1-4. Insérez les chevilles complètement dans les trous et enfoncez à...
- Page 6 Insérez le panier dans les supports arrière à un angle atteignant la profondeur désirée, comme illustré. (Fig. 16) Abaissez le support de montage en acier dans les supports de montage avant et appuyez fermement tout en soutenant le bas des supports de montage jusqu'à ce que le panier s'enclenche dans les deux supports comme indiqué.
-
Page 7: Instrucciones De Instalación
Altura + 5,1 cm = La Medida A Fig. 4 Fig. 5 La muesca en “V” Ensamblajes del producto Presione STACKKIT-R-BLK Fig. 6 La Medida A 2700 Oak Industrial Drive NE Grand Rapids, MI 49505 USA 800.253.1561 | 616.459.3311 www.kv.com ©2013 Knape &... - Page 8 Marque el centro de los orificios en la pared posterior del gabinete. (Fig. 7) Retire los receptáculos de montaje posteriores y la plantilla de la pared del gabinete y, luego, retire los receptáculos de la plantilla. Con una broca de 5/16", perfore orificios del 1 al 4.
- Page 9 Inserte la cesta en los receptáculos posteriores de forma inclinada hasta que alcance la profundidad deseada como se muestra (Fig. 16) Baje la correa de montaje de acero frontal en los soportes de montaje frontales y presione firmemente mientras sostiene la parte inferior de los soportes de montaje hasta que la cesta encaje en ambos soportes como se muestra.
Need help?
Do you have a question about the STACKKIT-R-BLK and is the answer not in the manual?
Questions and answers