Table of Contents
Advertisement
Available languages
Available languages
Quick Links
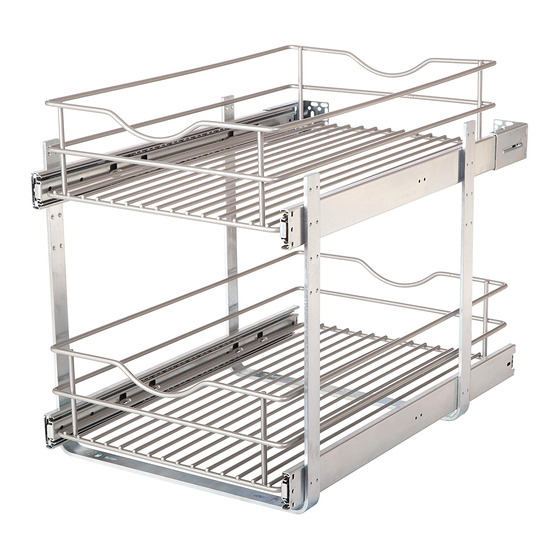
Parts Included
A. Upper Basket (1)
B. Lower Basket (1)
C. Upright Brackets (2)
D. Left Hand Slides (2)
E. Rear Slide Brackets (2)
F. Right Hand Slides (2)
G. #6-32 x 5/16" Screws (16)
H. #8 x 3/4" Wood Screws (4)
I. #6 x 1/2" Wood Screws (7)
A
C
B
D
F
G
H
I
Tools Required
• Phillips Head Screwdriver
• Tape Measure
Product Assemblies:
DBLMUB-11-R-FN
DBLMUB-14-R-FN
DBLMUB-17-R-FN
DBLMUB-20-R-FN
2700 Oak Industrial Drive NE , Grand Rapids, MI 49505 USA
800.253.1561 • 616.459.3311 • www.kv.com
DOUBLE-TIER, MULTI-USE BASKETS
Inspect all parts and read all instructions prior to beginning assembly and installation.
1.
Fully extend slides. Mount 1 – left hand slide and 1 – right hand slide to the bottom slide
mounting holes in the upright brackets using 8 – #6-32 X 5/16" slide mounting screws.
Repeat this process for upper slides (1).
NOTE: There are 4 upper basket mounting locations. Install upper slides at desired height.
2.
Attach rear slide brackets to upper slides by pushing bracket firmly onto slides (2).
NOTE: No rear slide brackets are needed for lower slides.
3.
Place slide and upright bracket assembly into cabinet so that the front edge of the slides are
flush with the front of the cabinet opening on the opposite side of cabinet door hinges.
Extend the upper drawer slide.
1
E
Optional for 1/2
shelf installation.
2
©2015 Knape & Vogt. All rights reserved. Made in USA. Knape & Vogt
Installation Instructions
Left Slide
3
Flush
reserves the right to change specifications without notice.
®
Right Slide
310516_1115
Advertisement
Table of Contents

Subscribe to Our Youtube Channel
Related Manuals for Knape & Vogt DBLMUB-11-R-FN


Summary of Contents for Knape & Vogt DBLMUB-11-R-FN
- Page 1 Left Slide Optional for 1/2 shelf installation. Tools Required • Phillips Head Screwdriver • Tape Measure Product Assemblies: DBLMUB-11-R-FN DBLMUB-14-R-FN DBLMUB-17-R-FN DBLMUB-20-R-FN Flush 2700 Oak Industrial Drive NE , Grand Rapids, MI 49505 USA 800.253.1561 • 616.459.3311 • www.kv.com ©2015 Knape & Vogt. All rights reserved. Made in USA. Knape & Vogt reserves the right to change specifications without notice.
-
Page 2: Installation Instructions
Left Slide Optional for 1/2 shelf installation. Tools Required • Phillips Head Screwdriver • Tape Measure Product Assemblies: DBLMUB-11-R-FN DBLMUB-14-R-FN DBLMUB-17-R-FN DBLMUB-20-R-FN Flush 2700 Oak Industrial Drive NE , Grand Rapids, MI 49505 USA 800.253.1561 • 616.459.3311 • www.kv.com ©2015 Knape & Vogt. All rights reserved. Made in USA. Knape & Vogt reserves the right to change specifications without notice. - Page 3 Holding the middle cabinet member, push the slide back approximately 1/2" so that the mounting hole is accessible. Install 1 – #6 x 1/2" wood screw (4). Ensure that upright brackets are parallel to the front of the cabinet then attach to the base of the cabinet with 4 –...
-
Page 4: Instrucciones De Montaje
Guía deslizante izquierda Herramientas necesarias • Destornillador de estrella • Cinta métrica Montaje de productos: DBLMUB-11-R-FN DBLMUB-14-R-FN DBLMUB-17-R-FN DBLMUB-20-R-FN nivelar 2700 Oak Industrial Drive NE , Grand Rapids, MI 49505 USA 800.253.1561 • 616.459.3311 • www.kv.com ©2015 Knape &... - Page 5 Mientras sujeta el armario por el medio, empuje la guía deslizante hacia atrás, aproximadamente 12.7 mm (1/2"), de manera que pueda acceder al orificio de montaje. Coloque 1 tornillo para madera #6 x 12.7 mm (1/2") (4). Asegúrese de que los soportes verticales están paralelos a la parte frontal del armario cuando los una a la base del armario con 4 tornillos para...
-
Page 6: Pièces Incluses
Outils requis : • Tournevis Phillips • Ruban à mesurer Assemblages de produits : DBLMUB-11-R-FN DBLMUB-14-R-FN DBLMUB-17-R-FN DBLMUB-20-R-FN niveler ©2015 Knape & Vogt. Tous droits réservés. Fabriqué aux É.-U. Knape & Vogt® se réserve le droit de modifier toute spécification sans préavis. - Page 7 Saisissez la partie centrale de la coulisse et refermez la coulisse d'environ 1/2 po afin que le trou d'installation soit accessible. Insérez une vis à bois #6 de 1/2 po (4). Assurez-vous que les supports verticaux sont parallèles à l'avant de l'armoire, puis fixez-les sur la structure de l'armoire au moyen de 4 vis à...
- Page 8 Holding the middle cabinet member, push the slide back approximately 1/2" so that the mounting hole is accessible. Install 1 – #6 x 1/2" wood screw (4). Ensure that upright brackets are parallel to the front of the cabinet then attach to the base of the cabinet with 4 –...
- Page 9 Guía deslizante izquierda Herramientas necesarias • Destornillador de estrella • Cinta métrica Montaje de productos: DBLMUB-11-R-FN DBLMUB-14-R-FN DBLMUB-17-R-FN DBLMUB-20-R-FN nivelar 2700 Oak Industrial Drive NE , Grand Rapids, MI 49505 USA 800.253.1561 • 616.459.3311 • www.kv.com ©2015 Knape &...
- Page 10 Mientras sujeta el armario por el medio, empuje la guía deslizante hacia atrás, aproximadamente 12.7 mm (1/2"), de manera que pueda acceder al orificio de montaje. Coloque 1 tornillo para madera #6 x 12.7 mm (1/2") (4). Asegúrese de que los soportes verticales están paralelos a la parte frontal del armario cuando los una a la base del armario con 4 tornillos para...
- Page 11 Outils requis : • Tournevis Phillips • Ruban à mesurer Assemblages de produits : DBLMUB-11-R-FN DBLMUB-14-R-FN DBLMUB-17-R-FN DBLMUB-20-R-FN niveler ©2015 Knape & Vogt. Tous droits réservés. Fabriqué aux É.-U. Knape & Vogt® se réserve le droit de modifier toute spécification sans préavis.
- Page 12 Saisissez la partie centrale de la coulisse et refermez la coulisse d'environ 1/2 po afin que le trou d'installation soit accessible. Insérez une vis à bois #6 de 1/2 po (4). Assurez-vous que les supports verticaux sont parallèles à l'avant de l'armoire, puis fixez-les sur la structure de l'armoire au moyen de 4 vis à...
Need help?
Do you have a question about the DBLMUB-11-R-FN and is the answer not in the manual?
Questions and answers