EXFO RTU-2 User Manual
Skyran platform
Hide thumbs
Also See for RTU-2:
- User manual (90 pages) ,
- Quick reference manual (2 pages) ,
- User manual (114 pages)
Table of Contents
Advertisement
Quick Links
Advertisement
Table of Contents
Troubleshooting

Related Manuals for EXFO RTU-2


Summary of Contents for EXFO RTU-2
- Page 1 User Guide RTU-2 SkyRAN Platform...
- Page 2 EXFO Inc. (EXFO). Information provided by EXFO is believed to be accurate and reliable. However, no responsibility is assumed by EXFO for its use nor for any infringements of patents or other rights of third parties that may result from its use.
-
Page 3: Table Of Contents
Contents Contents Certification Information ....................... vi 1 Introducing the RTU-2 SkyRAN Platform ............ 1 Main Features .........................1 LED Indicators Description ......................4 Automatic Fan Speed Management ..................6 Product Registration .......................7 Technical Specifications ......................7 Conventions ..........................8 2 Safety Information ..................9 Other Safety Symbols on Your Unit ..................11 Laser Safety Information .......................12... - Page 4 Viewing Disk Space and Managing Files ................114 Freeing Up Disk Space with the Disk Cleanup Utility ............115 8 Maintenance ....................117 Connecting Remotely to Your Unit for Maintenance or Troubleshooting ......117 Managing Windows Updates .....................118 Recalibrating Your Modules ....................120 Replacing Fuses ........................120 Recycling and Disposal .......................122 RTU-2...
- Page 5 Contacting the Technical Support Group ................132 Viewing System Information ....................133 Retrieving the Contact Information ..................136 Transportation ........................137 10 Warranty ....................139 General Information ......................139 Liability ..........................140 Exclusions ...........................140 Certification ........................140 Service and Repairs ......................141 EXFO Service Centers Worldwide ..................142 Index ......................143 SkyRAN Platform...
-
Page 6: Certification Information
Electronic test and measurement equipment is exempt from FCC part 15, subpart B compliance in the United States of America and from ICES-003 compliance in Canada. However, EXFO Inc. makes reasonable efforts to ensure compliance to the applicable standards. The limits set by these standards are designed to provide reasonable protection against harmful interference when the equipment is operated in a commercial environment. -
Page 7: Introducing The Rtu-2 Skyran Platform
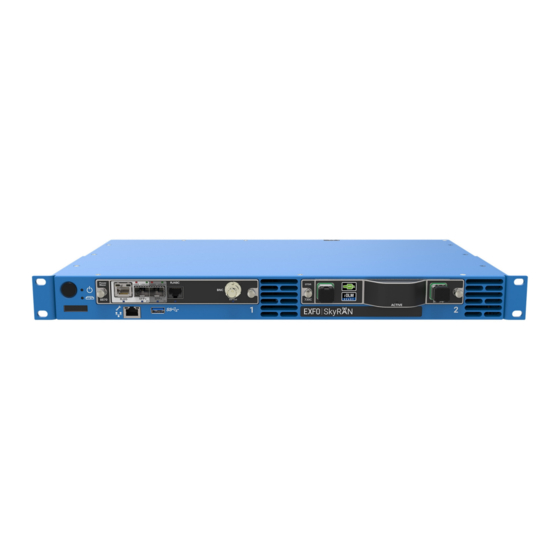
Introducing the RTU-2 SkyRAN Platform Main Features Your unit, which is part of the SkyRAN solution, offers the following: Two module slots Two separated network controllers (one can be used for extended remote management with Intel Active Management Technology –... - Page 8 Introducing the RTU-2 SkyRAN Platform Main Features Front panel On/Off button (see Turning On Your Unit on page 40 and Turning Off Your Unit on page 41) LEDs Module slots USB 3.0 host port Ethernet (RJ-45) management port for local access...
- Page 9 Introducing the RTU-2 SkyRAN Platform Main Features Back panel Dry contact relays (reserved for future use) DC power inlet (dual feed) Main power switch Grounding lug USB 3.0 host ports Ethernet (RJ-45) management port Ethernet (RJ-45) port (for local access)
-
Page 10: Led Indicators Description
Introducing the RTU-2 SkyRAN Platform LED Indicators Description LED Indicators Description There are LED indicators located on the front panel of your unit, providing you with information about the power and system statuses. The table below presents the possible statuses once the initial startup sequence is complete. - Page 11 Introducing the RTU-2 SkyRAN Platform LED Indicators Description Status Meaning Critical hardware error detected. The temperature of the room where the unit is located is critically too low or too high, or there could be a hardware malfunction. System Ensure that the temperature falls within the...
-
Page 12: Automatic Fan Speed Management
Introducing the RTU-2 SkyRAN Platform Automatic Fan Speed Management Automatic Fan Speed Management Your unit will determine the most appropriate fan speed, depending on the power requirements and the type of modules you are using. MPORTANT Fan speed is always determined to cool down the most heat-generating modules. -
Page 13: Product Registration
Product Registration Product Registration You can now register your new EXFO products either online or directly from your unit (if it is connected to the Internet), and benefit from every possible opportunity to optimize their performance. By doing so, you will... -
Page 14: Conventions
Introducing the RTU-2 SkyRAN Platform Conventions Conventions Before using the product described in this guide, you should understand the following conventions: ARNING Indicates a potentially hazardous situation which, if not avoided, could result in death or serious injury. Do not proceed unless you understand and meet the required conditions. -
Page 15: Safety Information
ARNING Use only accessories designed for your unit and approved by EXFO. For a complete list of accessories available for your unit, refer to its technical specifications or contact EXFO. - Page 16 MPORTANT Other safety instructions relevant for your product are located throughout this documentation, depending on the action to perform. Make sure to read them carefully when they apply to your situation. RTU-2...
-
Page 17: Other Safety Symbols On Your Unit
Safety Information Other Safety Symbols on Your Unit Other Safety Symbols on Your Unit One or more of the following symbols may also appear on your unit. Symbol Meaning Direct current Alternating current The unit is equipped with an earth (ground) terminal. The unit is equipped with a protective conductor terminal. -
Page 18: Laser Safety Information
Refer to the user documentation of the different modules for the relevant laser safety information. The modules and instruments that you use with your unit may have different laser classes. Refer to their user documentation for the exact information. RTU-2... -
Page 19: Electrical Safety Information
A readily accessible disconnect device must be installed on the mains (AC or DC circuits). If you intend to connect your RTU-2 to AC power, use only the listed and certified AC/DC power adapter provided by EXFO with your unit. - Page 20 Unless otherwise specified, all interfaces are intended for connection to Safety Extra Low Voltage (SELV) circuits only. Capacitors inside the unit may be charged even if the unit has been disconnected from its electrical supply. RTU-2...
- Page 21 Safety Information Electrical Safety Information AUTION Position the unit so that the air can circulate freely around it. Equipment Ratings Temperature Operation unit connected to DC power: –5 °C to 50 °C (23 °F to 122 °F) unit connected to AC power (with AC/DC power ...
- Page 22 The operation and storage temperatures, as well as the altitude and relative humidity values of some modules may differ from those specified for your unit. In this case, always ensure that you comply with the most restrictive conditions (either module or unit). RTU-2...
-
Page 23: Getting Started With Your Unit
Getting Started with Your Unit Preparing for Installation ARNING Your unit is designed to be installed in a limited access area, for example, Central Offices, Telecommunication Centers, computer rooms, wiring closet, Outside Plant/CELL-Site class 1, and similar type locations and in accordance with local codes. Only trained personnel can perform the unit installation and ... -
Page 24: Installing Your Unit In A Rack
Failure to provide adequate cooling clearance may result in an excessive internal temperature, thus reducing the reliability of your RTU-2 unit. Note: There is no need to leave an empty slot between units when you stack them one on top of the other inside a rack. - Page 25 Mounting of the unit in a rack or cabinet should be such that a hazardous condition is not achieved due to uneven mechanical loading. MPORTANT To let the front USB and management ports free for potential maintenance, EXFO recommends to keep all non-optical connections to the back of the unit. SkyRAN Platform...
- Page 26 To install your unit in a rack: 1. Ensure that your unit is turned off. AUTION You should remove all your modules from the RTU-2 unit before installing it into a rack. Otherwise, they could be damaged or their calibration could be affected.
- Page 27 To ground your unit properly, you must ensure that there is a metal-to-metal contact between the rack and the mounting hardware. For this reason, EXFO recommends to use thread-forming screws, star (tooth) lock washers, or similar hardware that remove any paint or non-conductive coatings.
-
Page 28: Grounding Your Unit
3. Use the two Phillips screws to attach the grounding lug and wire assembly to the back panel of your unit. 4. Ground the other end of the wire as per your local regulation. Your unit is now grounded properly. RTU-2... -
Page 29: Connecting A Monitoring Device To The Dry Contact Relays
Getting Started with Your Unit Connecting a Monitoring Device to the Dry Contact Relays Connecting a Monitoring Device to the Dry Contact Relays Your unit is equipped with dry contact relays that enable you to connect your own monitoring device if you wish to do so. There are three dry contact relays (max. - Page 30 2. When the terminal block is loose, gently pull it toward you to remove it, exposing the pins. 3. Crimp each wire with a terminal (ferrule) or tin each of them. 4. Unscrew the screws (shown in grey) located at the top of the terminal block. RTU-2...
- Page 31 Getting Started with Your Unit Connecting a Monitoring Device to the Dry Contact Relays 5. Connect the wires using the diagram below as a guide. Pin 9 Pin 1 Power relay Application relay Pin 1 - NO = Normally open Pin 7 - NO = Normally open Pin 2 - C = Common Pin 8 - C = Common...
- Page 32 7. Ensure that the terminal block is aligned properly with the bay containing the pins. 8. Slide the terminal block all the way into the bay until it stops. 9. Screw the two screws to secure the terminal block in place. The dry contact relays are now installed properly. RTU-2...
-
Page 33: Inserting And Removing Test Modules
To avoid damaging your unit, use it only with modules approved by EXFO. To insert a module into the RTU-2: 1. Take the module and place it horizontally so that the connector pins are at the back, and the protruding edges are facing downwards. - Page 34 3. Push the module all the way to the back of the slot, until it stops. 4. Turn the two retaining screws clockwise until they are tightened to secure the module into its “seated” position. The faceplate of the module should be flush with the front panel of the unit. Turn retaining screw clockwise RTU-2...
- Page 35 Getting Started with Your Unit Inserting and Removing Test Modules To remove a module from the RTU-2: 1. From ToolBox X, click the button. Note: The button is not available for the RTUe-9110 external switches because they do not support ejection. If you need to remove such a switch from the system, ensure that no test is underway, and then simply disconnect the optical fibers and the USB cable.
- Page 36 Always pull out a module by its casing or the retaining screws. 4. Cover empty slots with the supplied protective covers. AUTION Failure to reinstall protective covers over empty slots will result in ventilation problems. RTU-2...
-
Page 37: Connecting Rtue-9110 External Switches To Your Unit
MPORTANT To let the front USB and management ports free for potential maintenance, EXFO recommends to keep all non-optical connections to the back of the unit. To connect a single switch to your unit: 1. -
Page 38: Connecting Your Unit To A Power Source
To avoid fire hazards and ensure your safety, when you intend to connect your unit to DC power, always select a wire gauge according to the RTU-2 unit’s ratings, cable length, and local electrical code. AUTION For optimum performance and safety, you must either crimp a ... - Page 39 Getting Started with Your Unit Connecting Your Unit to a Power Source To connect your unit to DC power: 1. Ensure that the unit’s main power switch is in the off position. Back panel Main power switch in off position 2.
- Page 40 Getting Started with Your Unit Connecting Your Unit to a Power Source 4. Unscrew the two screws holding the terminal block in place. Screws 5. When the terminal block is loose, gently pull it toward you to remove it, exposing the electrical connectors. RTU-2...
- Page 41 Getting Started with Your Unit Connecting Your Unit to a Power Source 6. Crimp each power lead (maximum 14 AWG) with a terminal (ferrule) or tin each of them. Unscrew the four screws (shown in grey) located at the top of the terminal block. 7.
- Page 42 12. Turn on the disconnect device that is connected to the unit. 13. Flip the unit’s main power switch to the on position. Main power switch You are now ready to turn on the unit (see Turning On Your Unit on page 40). RTU-2...
- Page 43 Getting Started with Your Unit Connecting Your Unit to a Power Source To connect your unit to AC power: 1. Ensure that the unit’s main power switch is in the off position. Back panel Main power switch in off position 2.
- Page 44 5. If necessary, remove the block terminal as follows: 5a. Unscrew the two screws holding the terminal block in place. Screws 5b. When the terminal block is loose, gently pull it toward you to remove it, exposing the electrical connectors. RTU-2...
- Page 45 Getting Started with Your Unit Connecting Your Unit to a Power Source 6. Ensure that the connector of the AC/DC power adapter is aligned properly with the bay containing the electrical connectors. 7. Slide the connector of the AC/DC power adapter all the way into the bay until it stops.
-
Page 46: Turning On Your Unit
Getting Started with Your Unit Turning On Your Unit Turning On Your Unit Before you turn on the unit for the very first time, EXFO recommends that you read the safety and installation instructions. To turn on the unit: 1. If it is not already done, connect your unit to an AC or a DC power source (see the corresponding section for safety information and detailed instructions). -
Page 47: Turning Off Your Unit
Getting Started with Your Unit Turning Off Your Unit Turning Off Your Unit Your unit will shut down when you press the power button. It will perform a complete restart routine the next time you use it, and start in Windows. Note: Should the unit ever stop responding, first try to turn it off normally. -
Page 48: Working With Your Unit For The First Time
However, you can modify them later if you prefer. By starting to use your unit, you implicitly agree to the Microsoft end-user license agreement (EULA), as well all the EXFO and third-party EULAs related to your unit and instruments. For more information on how to view the EULAs, see Accessing the Online Documentation on page 130. - Page 49 Getting Started with Your Unit Working With Your Unit for the First Time 2d. Enter the connection information. The default static IP address is: 192.168.200.1 The default user name is: admin The default password is: !Exfo123 Note: You may have to modify the IP address of the computer to make sure that the computer and unit can “see”...
-
Page 50: Installing Or Upgrading The Applications
When updates are available for an application, you will need to download them from EXFO Apps, either directly on your unit or on a computer. The update files must be copied to the location that has been specified for the deployment packages in Update Manager. - Page 51 Getting Started with Your Unit Installing or Upgrading the Applications To update or reinstall Update Manager: 1. If necessary, retrieve the desired installation files from EXFO Apps at http://www.exfo.com/software/exfo-apps. If you do not intend to download files directly on your unit, you can download them to your computer, and then transfer them to your unit.
-
Page 52: Activating Software Options
However, if you purchase options afterwards, you will have to activate them yourself. Before being able to activate options, you need to contact EXFO with the following information: Purchase order number of the newly purchased options ... - Page 53 Getting Started with Your Unit Activating Software Options 3. Click the Platform Options tab or the Module Options tab, depending on the type of options that you want to activate. 4. Use the Browse button to locate the key file that you want to use. 5.
-
Page 54: Installing Third-Party Software On Your Unit
EXFO does not provide any support for the installation, use or troubleshooting of third-party software. Should you need help, refer to the corresponding third-party software documentation or technical support. -
Page 55: Setting Up Your Unit
Setting Up Your Unit Selecting the Startup Applications You can configure your unit to automatically start any of the available applications as soon as ToolBox X is started. This can save you time, as you do not need to ensure that they are already running before starting your tests. - Page 56 4. Click OK to use the new settings. Click Cancel to exit without using the new settings. Note: The new settings will be taken into account the next time ToolBox X is started. RTU-2...
-
Page 57: Setting Date And Time Formats
Setting Up Your Unit Setting Date and Time Formats Setting Date and Time Formats By default, the dates (short and long) and time are displayed in the formats associated with the global language format (locale). The time can be expressed with a 12- or a 24-hour notation. You can modify the way dates and time are displayed if the default values do not suit your needs. - Page 58 3. Under Clock, Language, and Region, click Change date, time, or number formats. 4. Refine the settings according to your needs. 5. Click Apply to confirm, and then OK to close the window. The new values are taken into account immediately. RTU-2...
-
Page 59: Adjusting The Date, Time And Time Zone
Setting Up Your Unit Adjusting the Date, Time and Time Zone Adjusting the Date, Time and Time Zone Note: Only administrator-level users can adjust the date and time. All users can modify the time zone. The current date and time are displayed at the bottom of the main window. When saving results, the unit also saves the corresponding date and time. - Page 60 Setting Up Your Unit Adjusting the Date, Time and Time Zone 3. Click Clock, Language, and Region. 4. Under Date and Time, click Set the time and date. RTU-2...
- Page 61 Setting Up Your Unit Adjusting the Date, Time and Time Zone 5. If you want to modify the date and time manually or modify the time zone, proceed as follows: 5a. Depending on the settings that you want to modify, click Change date and time or Change time zone.
- Page 62 Adjusting the Date, Time and Time Zone 6. If you want to synchronize the date and time of your unit with a Network Time Protocol (NTP) server, proceed as follows: 6a. Click the Internet Time tab. 6b. Click Change settings. RTU-2...
- Page 63 Setting Up Your Unit Adjusting the Date, Time and Time Zone 6c. Ensure that the Synchronize with an Internet time server check box is selected. 6d. Select the desired server, and then click OK. 7. Click OK to confirm and close the window. The new values are taken into account immediately.
-
Page 64: Setting Toolbox X Behavior
Setting Toolbox X Behavior You can specify how Toolbox X behaves when the application is started, minimized or closed. To set the Toolbox X behavior: 1. From the main window, click the System Settings button. 2. Click ToolBox X Setup. RTU-2... - Page 65 Setting Up Your Unit Setting Toolbox X Behavior 3. Select the items corresponding to the desired behavior. Hide ToolBox X in the notification area when minimized: If this option is selected, the Toolbox X icon appears in the notification area (where the clock is located) when you minimize the window.
-
Page 66: Configuring The Internet Options
Internet connection and that the Internet options are configured properly. If you are not sure about how you should configure your Internet access, contact your network administrator. To configure the Internet options: 1. From the main window, click the System Settings button. 2. Click Control Panel. RTU-2... - Page 67 Setting Up Your Unit Configuring the Internet Options 3. Click Network and Internet. 4. Click Internet Options. SkyRAN Platform...
- Page 68 Setting Up Your Unit Configuring the Internet Options 5. Go to the Connections tab. 6. Modify the settings using the information provided by your network administrator. 7. Click OK to return to the Control Panel window. RTU-2...
-
Page 69: Adding Exceptions To The Firewall
Setting Up Your Unit Adding Exceptions to the Firewall Adding Exceptions to the Firewall Note: Only administrator-level users can add exceptions to the firewall. Your unit is protected by the Microsoft firewall to prevent unauthorized access when it is connected to a network or to the Internet. The firewall has been preconfigured so that all the applications that come with your unit work properly. - Page 70 Setting Up Your Unit Adding Exceptions to the Firewall 3. Click System and Security. 4. Under Windows Firewall, click Allow an app through Windows Firewall. 5. Click the Change settings button. RTU-2...
- Page 71 Setting Up Your Unit Adding Exceptions to the Firewall 6. Click the Allow another app button. 7. Select the desired application from the list, and then click Add. SkyRAN Platform...
- Page 72 Setting Up Your Unit Adding Exceptions to the Firewall 8. Ensure that the Private and Public settings of the added application suit your needs. When you have finished, click OK to confirm the changes and return to the Control Panel window. RTU-2...
-
Page 73: Connecting To A Vpn From Your Unit
MPORTANT EXFO does not provide any VPN clients. You must either use one of the VPN clients available directly in Windows or provide the installation files for another VPN client yourself. - Page 74 Setting Up Your Unit Connecting to a VPN from Your Unit To add a VPN connection: 1. From the main window, click the System Settings button. 2. Click Control Panel. 3. Click Network and Internet. RTU-2...
- Page 75 Setting Up Your Unit Connecting to a VPN from Your Unit 4. Under Network and Sharing Center, click View network status and tasks. 5. Click Set up a new connection or network. SkyRAN Platform...
- Page 76 Setting Up Your Unit Connecting to a VPN from Your Unit 6. Click Connect to a workplace, and then click Next. 7. Follow the on-screen instructions. RTU-2...
- Page 77 Setting Up Your Unit Connecting to a VPN from Your Unit To install a VPN client on your unit: 1. Start the installation of the VPN client using the files and settings provided by your network administrator. 2. Follow the on-screen instructions. Once the installation is complete, all users will now be able to connect to a VPN from the unit.
- Page 78 5. A new window will open. Select the desired VPN connection from the list. 6. Click Connect. 7. Enter your sign-in information to the VPN, and then click OK. If you are not sure about the information that you should provide, contact your network administrator. RTU-2...
-
Page 79: Reconfiguring The Local Access Ports In Lan/Wan Ports
Setting Up Your Unit Reconfiguring the Local Access Ports in LAN/WAN Ports Reconfiguring the Local Access Ports in LAN/WAN Ports By default, the local access ports (one on the front panel of the unit, and one on the back panel), have a static IP address (192.168.200.1), but you can reconfigure this address. -
Page 81: Working With Your Unit
MPORTANT Your unit is part of the SkyRAN solution. To benefit from the full potential of this solution, EXFO recommends that you access your unit using SkyRAN EMS for day-to-day operations. Refer to the SkyRAN EMS user documentation for more information. - Page 82 Remote Desktop as well, you must Each user to whom you specifically grant them access. provide the password will be able to connect to the unit via VNC. RTU-2...
-
Page 83: Working With Remote Desktop
The default Windows user name is RTUAdmin The default password is !Exfo123 For security reasons, EXFO recommends that you change the default password for a password of your choice. Enter the appropriate user name when Remote Desktop application ... - Page 84 1. From the main window, click the System Settings button. 2. Click Remote Session. 3. Under Remote Desktop, select Allow remote connections to this computer. 4. Click OK to confirm the changes and return to the System Settings window. RTU-2...
- Page 85 Working with Your Unit Working with Remote Desktop To access your unit remotely with Remote Desktop: 1. Connect both the computer and your unit to the same network and make sure they can “see” each other as network restrictions might prevent them from communicating.
- Page 86 If you prefer, you could also connect using another user account previously defined. Note: The Windows user accounts are completely independent of AMT user accounts. For this reason, you cannot connect to Windows using AMT user accounts. 7. Click OK to open the session. RTU-2...
- Page 87 Working with Your Unit Working with Remote Desktop Allowing Users with Limited Accounts to Use Remote Desktop By default, only the accounts with administrator rights can use Remote Desktop. However, you can assign extra user rights to accounts with limited rights so that they can also use Remote Desktop. To allow a user with limited accounts to use Remote Desktop: 1.
- Page 88 Working with Your Unit Working with Remote Desktop 3. Under Remote Desktop, select Allow remote connections to this computer. 4. Click Select Users. 5. From the Remote Desktop Users dialog box, click Add. RTU-2...
- Page 89 Working with Your Unit Working with Remote Desktop 6. From the Select Users dialog box, click Advanced. 7. Click Find Now to let the system find and display the list of users. 8. Select the user to which you want to grant access rights, and then click SkyRAN Platform...
- Page 90 10. Repeat steps 7 to 9 with all the users to which you want to grant access rights. 11. From the Remote Desktop Users dialog box, click OK. 12. From the System Properties dialog box, click OK to confirm the changes and return to the System Settings window. RTU-2...
- Page 91 Working with Your Unit Working with Remote Desktop Preventing Users from Connecting with Remote Desktop You can also configure the unit to prevent users to access it using Remote Desktop. However, all users having administrator user rights will be able to modify this setting at any time.
- Page 92 Working with Your Unit Working with Remote Desktop 3. Under Remote Desktop, select Don’t allow remote connections to this computer. 4. Click OK to confirm the changes and return to the System Settings window. RTU-2...
-
Page 93: Working With Vnc
UltraVNC Viewer from the Web for free (http://www.uvnc.com/downloads/ultravnc.html). MPORTANT EXFO does not provide licenses for UltraVNC Viewer. Always ensure that you are entitled to install it on your computer. Before being able to connect to the unit using VNC for the first time, you... -
Page 94: Accessing And Exiting Toolbox X
To access Toolbox X from the Windows environment: Double-click the icon on your desktop. Note: If ToolBox X has been sent to the notification area, from this location, right-click the icon, and then select Restore ToolBox X. To exit Toolbox X: Click RTU-2... -
Page 95: Starting Module Applications
Working with Your Unit Starting Module Applications Starting Module Applications Your modules can be configured and controlled from their dedicated applications in Toolbox X. To start a module application: 1. If necessary, click the Modules button to display the modules window. Status of the module (see Understanding Module Statuses on page 90) Inserted module Applications specific to the module... -
Page 96: Understanding Module Statuses
At startup of the corresponding module application. When the module is controlled from external applications such as EXFO Remote ToolBox. Ejecting The module is being prepared for safe removal from the unit. Once the corresponding eject button is pressed (on the unit or in Toolbox X), the applications that were using the module start preparing it for safe removal. - Page 97 Working with Your Unit Understanding Module Statuses Status Meaning Safe to remove The module can now be safely removed from the unit. The applications have finished preparing the module for removal. If you wish to continue working with a module having this status, you can either: Remove it from the unit, and then reinsert it.
-
Page 99: Working With Intel Active Management Technology
(out-of-band management). To manage your unit out of band, you can install the AMT Remote Access application, provided by EXFO, on a computer (laptop). This application will serve as an entry point to the AMT Web-based application from which you can configure settings, and retrieve information related to your unit. -
Page 100: Installing The Amt Remote Access Application On A Computer
To install the AMT Remote Access application on your computer: 1. Open a Web browser and go to http://www.exfo.com/software/exfo-apps. 2. Under EXFO Apps, click the PC Software category. 3. Look for the AMT Remote Access application for your unit. 4. Download the application. -
Page 101: Connecting To Your Unit Remotely With Amt Remote Access
This could be particularly useful when you turn on your unit for the first time to read the safety information. For day-to-day operation, EXFO recommends that you use Remote Desktop or VNC (see Working with Remote Desktop on page 77 and Working With VNC on page 87). - Page 102 Note: The application is case-sensitive for both the user name and password. Note: The AMT user accounts are completely independent of Windows user accounts. For this reason, you cannot connect to AMT Web-based application using Windows user accounts. RTU-2...
- Page 103 Working with Intel Active Management Technology Connecting to Your Unit Remotely With AMT Remote Access To connect to your unit (Connection mode): 1. Depending on your setup, connect a network cable between your computer and the front Ethernet port. Connect your computer and unit to the same network. Note: You may have to modify the IP address of the computer to make sure that the computer and unit can “see”...
- Page 104 Note: The application only allows one connection at a time with a given user account. 4. Click Connect to access Windows and ToolBox X. 5. Once the connection is established, if Windows prompts you, select the desired Windows user, and then enter the associated password. RTU-2...
- Page 105 Working with Intel Active Management Technology Connecting to Your Unit Remotely With AMT Remote Access To connect to your unit (Management mode): 1. Depending on your setup, connect a network cable between your computer and the front Ethernet port. Connect your computer and unit to the same network. Note: You may have to modify the IP address of the computer to make sure that the computer and unit can “see”...
- Page 106 Note: If you do not want to connect with the admin account, you can connect using any other user account previously defined. Once the connection is established, the System Status window is displayed and you are ready to configure the unit. RTU-2...
-
Page 107: Modifying The Ip Address Of The Local Access (Management) Ports
Working with Intel Active Management Technology Modifying the IP Address of the Local Access (Management) Ports Modifying the IP Address of the Local Access (Management) Ports By default, the local access ports (one on the front panel of the unit, and one on the back panel), have a static IP address: 192.168.200.1. - Page 108 2. From the main window, click Network Settings to set an IPv4 address or IPv6 Network Settings to set an IPv6 address. 3. Set the parameters as needed. 4. Click the Submit button to apply your changes. 5. Restart the unit to refresh the IP address shown on the built-in display. RTU-2...
-
Page 109: Changing The Amt Administrator Password
Changing the AMT Administrator Password By default, the administrator user account (user name: admin), is protected with the !Exfo123 password. For security reasons, EXFO recommends that you change the default password for a password of your choice. To change the AMT administrator password: 1. - Page 110 Working with Intel Active Management Technology Changing the AMT Administrator Password 4. Enter the new password, and then confirm it. 5. Click the Submit button to apply your changes. RTU-2...
-
Page 111: Managing The Amt User Accounts
Working with Intel Active Management Technology Managing the AMT User Accounts Managing the AMT User Accounts By default, there is only one user account defined for the AMT application (admin). This user account allows you to connect as an administrator of the system. - Page 112 Working with Intel Active Management Technology Managing the AMT User Accounts 4. Enter a name and a password for the account, and grant the desired user rights. 5. Click the Submit button to apply your changes. RTU-2...
- Page 113 Working with Intel Active Management Technology Managing the AMT User Accounts To modify a user account: 1. Connect to your unit in management mode (see Connecting to Your Unit Remotely With AMT Remote Access on page 95). 2. From the main window, click User Accounts. 3.
- Page 114 Working with Intel Active Management Technology Managing the AMT User Accounts 4. Click the Change button. 5. Modify the settings as needed. 6. Click the Submit button to apply your changes. RTU-2...
- Page 115 Working with Intel Active Management Technology Managing the AMT User Accounts To delete a user account: 1. Connect to your unit in management mode (see Connecting to Your Unit Remotely With AMT Remote Access on page 95). 2. From the main window, click User Accounts. 3.
-
Page 116: Turning The Unit On Or Off Remotely
No warning message will be sent to the users currently working with the unit before turning it off. If tests are underway, important data could be loss. 3. Select the desired action, and then click the Send Command button. RTU-2... -
Page 117: Performing Other Operations
Working with Intel Active Management Technology Performing Other Operations Performing Other Operations You can also configure other parameters from AMT such as the system name settings, and have access to information such as the system status and the log of events. All these items are accessible from the main window of the AMT Web-based application. -
Page 119: Managing Data
Managing Data You can copy, move, rename, delete files and folders directly on your unit. You can transfer files from your unit to a computer or a USB memory key. You can also transfer data from a computer or a storage device to your unit. Your unit is equipped with the following ports and devices for data transfer: One Ethernet port to connect to a network (for transfer via VNC or ... -
Page 120: Viewing Disk Space And Managing Files
1. From the main window, click the Utilities button. 2. Click File Manager. The file explorer is displayed. Folders Free disk space Note: The free disk space is also visible from the Platform tab (click in the lower right corner of the main window). RTU-2... -
Page 121: Freeing Up Disk Space With The Disk Cleanup Utility
Managing Data Freeing Up Disk Space with the Disk Cleanup Utility Freeing Up Disk Space with the Disk Cleanup Utility If you need to free up disk space on your unit, you can use the Windows Disk Cleanup utility. With this utility, you can clear files such as the Internet temporary files and files from the Recycle bin. - Page 122 7. When the folders are displayed, select the check box corresponding to the desired item. Ensure that all the other check boxes are cleared. 8. Click OK. 9. When the application prompts you to confirm the deletion of the item, click Delete Files. RTU-2...
-
Page 123: Maintenance
Maintenance To help ensure long, trouble-free operation: Always inspect fiber-optic connectors before using them and clean them if necessary. Keep the unit free of dust. Clean the unit casing and front panel with a cloth slightly dampened with water. -
Page 124: Managing Windows Updates
Managing Windows Updates Only the applications from Microsoft will be updated with the automatic Windows update feature. If you want to update EXFO applications, see Installing or Upgrading the Applications on page 44. The third-party applications will need to be updated manually. - Page 125 Maintenance Managing Windows Updates 3. Select Windows Update. 4. Under Update status, click Check for updates. 5. Follow the on-screen instructions. SkyRAN Platform...
-
Page 126: Recalibrating Your Modules
Maintenance Recalibrating Your Modules Recalibrating Your Modules When they are used exclusively in a system based on the RTU-2, the FTBx-8870 Optical RF and FTBx-730C OTDR modules have a recommended calibration interval of three years. This value takes precedence over the recommended interval specified in their respective user guides. - Page 127 Maintenance Replacing Fuses 3. Gently pull on the fuse carrier to remove it from the unit. 4. Repeat with the second fuse carrier. 5. Check and replace the fuses, if necessary. 6. Insert the new fuse into the fuse carrier. Fuse carrier Fuse 7.
-
Page 128: Recycling And Disposal
This symbol on the product means that you should recycle or dispose of your product (including electric and electronic accessories) properly, in accordance with local regulations. Do not dispose of it in ordinary garbage receptacles. For complete recycling/disposal information, visit the EXFO Web site at www.exfo.com/recycle. RTU-2... -
Page 129: Troubleshooting
Troubleshooting Solving Common Problems Before calling EXFO’s technical support, you may want to consider the following solutions to problems that could occur. Problem Possible Cause Solution My unit does not start. There is a problem related If your unit is connected ... - Page 130 Disconnect, then reconnect switch that I have just detected. the switch. connected is not working. Ensure that the RTU-2 unit is on and that its System LED ) is green and not blinking. The unit does not recognize Module application is not Install the corresponding a test module.
- Page 131 No network cable is Ensure that a network cable connected to your unit. is properly connected to your unit. The RTU-2 unit is restarting. Wait for the unit to complete the restart operation. The RTU-2 unit is not Contact your network reachable.
-
Page 132: Restoring Your Unit To Normal Operation
AMT Remote Access in Connection mode (see Connecting to Your Unit Remotely With AMT Remote Access on page 95). MPORTANT To avoid problems, always use the wizard provided by EXFO to revert your unit to a previous state, not the recovery tools provided by Microsoft. - Page 133 Troubleshooting Restoring Your Unit to Normal Operation To reset your unit to its factory settings: 1. Connect to your unit with AMT Remote Access in Connection mode. 2. If desired, back up your data. 3. From the taskbar, click the Start button ( ), and then Settings ( 4.
- Page 134 Troubleshooting Restoring Your Unit to Normal Operation 6. Under Advanced Startup, click Restart now. 7. Under Choose an option, click Troubleshoot. RTU-2...
- Page 135 Troubleshooting Restoring Your Unit to Normal Operation 8. Click Platform Imaging Utility to display the corresponding application. 9. From the Platform Servicing and Imaging Utility wizard, select Reset this unit to factory settings, and then click Next. SkyRAN Platform...
-
Page 136: Accessing The Online Documentation
PDF viewer. Note: The user guides of all products are available from the My EXFO section of the EXFO Web site (www.exfo.com) for download in PDF format. Note: The EXFO license agreement is available in the C:\Program Data\Metrino\General License folder. - Page 137 Troubleshooting Accessing the Online Documentation To view the online help: From ToolBox X or an instrument application, click (or the equivalent). To view the documentation in PDF format: 1. From the main window, click the Utilities button. 2. Click the icon corresponding to the type of document that you want to view.
-
Page 138: Contacting The Technical Support Group
Contacting the Technical Support Group To obtain after-sales service or technical support for this product, contact EXFO at one of the following numbers. The Technical Support Group is available to take your calls from Monday to Friday, 8:00 a.m. to 7:00 p.m. -
Page 139: Viewing System Information
ToolBox X and hardware components, or network interfaces information directly from your unit. You can also find the contact information if you ever need to reach EXFO. Retrieving the Serial Number of Your Unit The serial number of your unit is easily accessible from ToolBox X. - Page 140 You can view the version of ToolBox X as well as those of the system image and hardware components that are installed on your unit. To retrieve the ToolBox X version: 1. In the lower right corner of the main window, click 2. Click the About tab. The version number is displayed. RTU-2...
- Page 141 Troubleshooting Viewing System Information To retrieve the version numbers of the system image and hardware components: 1. In the lower right corner of the main window, click 2. Click the Platform tab. The version numbers are displayed. SkyRAN Platform...
-
Page 142: Retrieving The Contact Information
Troubleshooting Retrieving the Contact Information Retrieving the Contact Information All the information necessary to contact EXFO is available from your unit. To retrieve the contact information: 1. In the lower right corner of the main window, click 2. Click the About tab. -
Page 143: Transportation
Troubleshooting Transportation Transportation Maintain a temperature range within specifications when transporting the unit. Transportation damage can occur from improper handling. The following steps are recommended to minimize the possibility of damage: Pack the unit in its original packing material when shipping. ... -
Page 145: 10 Warranty
10 Warranty General Information EXFO Inc. (EXFO) warrants this equipment against defects in material and workmanship for a period of two years from the date of original shipment. EXFO also warrants that this equipment will meet applicable specifications under normal use. -
Page 146: Liability
Liability Liability EXFO shall not be liable for damages resulting from the use of the product, nor shall be responsible for any failure in the performance of other items to which the product is connected or the operation of any system of which the product may be a part. -
Page 147: Service And Repairs
5. Return the equipment, prepaid, to the address given to you by support personnel. Be sure to write the RMA number on the shipping slip. EXFO will refuse and return any package that does not bear an RMA number. -
Page 148: Exfo Service Centers Worldwide
Fax: +86 (755) 2955 3101 Xintian Avenue, support.asia@exfo.com Fuhai, Bao’An District, Shenzhen, China, 518103 To view EXFO's network of partner-operated Certified Service Centers nearest you, please consult EXFO's corporate website for the complete list of service partners: http://www.exfo.com/support/services/instrument-services/ exfo-service-centers. RTU-2... -
Page 149: Index
Index Index cabinet installation ........18 capacitors ............ 14 adapter..........13 capacity, storage ........114 connection........3, 33, 37 cascading external switches......31 power ........22, 32, 37 caution requirements ........15, 16 of personal hazard ........8 accessing of product hazard ........8 online help........... - Page 150 114 power ............4 first startup ........... 42, 94 system............4 flashing LED ..........4 lug, grounding ..........22 freeing disk space........115 front panel, cleaning ......... 117 fuse replacement........14, 120 type ............. 120 RTU-2...
- Page 151 ......103, 105 reverting unit to factory settings ..126, 127 pinout of the relays ........23 RJ-45 port............3 plugging unit ..........32 RTU-2, installing .......... 20 ports Ethernet......... 2, 3, 96 USB............2, 3 SkyRAN Platform...
- Page 152 141 service centers ........... 142 setting date and time......51, 53 unit shipping to EXFO ........141 connecting to AC power ......37 short and long formats, date ...... 51 connecting to DC power ......33 shutdown mode.......... 41 covers ............
- Page 153 Index warranty certification ......... 140 exclusions ..........140 general ..........139 liability..........140 null and void........139 Windows update of applications....118 wizard, configuration......42, 94 yellow LED............. 4 SkyRAN Platform...
- Page 156 Tel.: 1 978 367-5600 · Fax: 1 978 367-5700 EXFO FINLAND Elektroniikkatie 2 FI-90590 Oulu, FINLAND Tel.: +358 (0) 403 010 300 · Fax: +358 (0) 8 564 5203 TOLL-FREE (USA and Canada) 1 800 663-3936 © 2018 EXFO Inc. All rights reserved. Printed in Canada (2018-01) ...
Need help?
Do you have a question about the RTU-2 and is the answer not in the manual?
Questions and answers