
Subscribe to Our Youtube Channel
Related Manuals for DIG ECO1 MVA


Summary of Contents for DIG ECO1 MVA
- Page 1 Ambient Light Powered, Irrigation Controller ECO1 MVA ECO1 ASV.075 I N S T R U C T I O N M A N U A L...
-
Page 2: Table Of Contents
TABLE OF CONTENTS INTRODUCTION ……………………………………………………………… 3 1. About the controller …………………………………………………… 3 2. Component identification ……………………………………………… 4 2.1 ECO 1.ASV with anti-siphon valve …………………………………… 4 2.2 ECO 1MVA manual valve actuator …………………………………… 5 3. System components …………………………………………………… 6 4. Anti-siphon valve installation …………………………………………… 7 4.1 Changing actuator adapters …………………………………………... -
Page 3: About The Controller
1. ABOUT THE CONTROLLER The is a one-station, ambient light (solar) powered controller that uses a patented energy management system to power the controller day and night. The controller requires no batteries, AC power or direct sunlight and can be installed above grade anywhere in the landscape. -
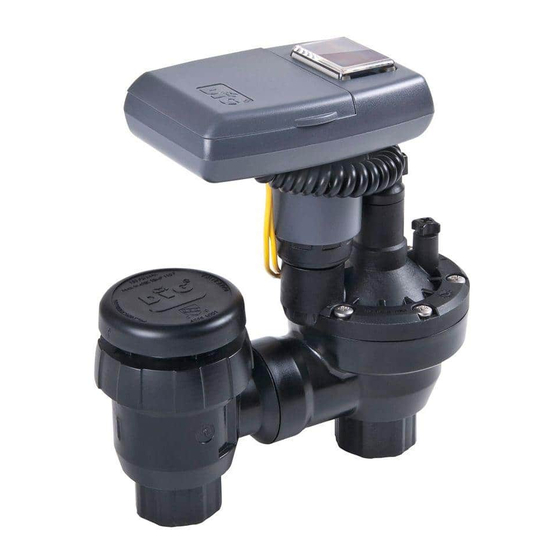
Page 4: Component Identification
2. COMPONENT IDENTIFICATION 2.1 ECO1 ASV WITH ANTI - SIPHON VALVE 6. Collapsible 10. Anti-siphon cap 1. Solar PVM solenoid wire 11. Pipe thread outlet 2. LCD screen 7. Manual flow control 12. Pipe thread inlet 3. 7 button keypad 8. -
Page 5: Eco 1Mva Manual Valve Actuator
ECO1 MVA MANUAL VALVE ACTUATOR See section 4.1 to change adapters from the factory 3/4 in. assembly to the 1 in. assembly. 1. Solar PVM 2. LCD screen 3. Quick reference label 4. 7 button keypad 5. Rain sensor connection 6. -
Page 6: System Components
3. SYSTEM COMPONENTS LCD Display 1. Time and Date - Indicates current time and day 2. Set Watering Days - Choose either specific days, odd/even days, or up to once every 30 days 3. Start Time - Up to 5 start times per day available 4. -
Page 7: Anti-Siphon Valve Installation
Control Buttons Select programming mode Turn ON/OFF program Start/stop a manual cycle Move left/right to select a value Raise/lower the selected value ANTI - SIPHON VALVE INSTALLATION The ECO1 ASV.075 can be installed directly to PVC pipe. (Inlet 3/4 in. FNPT, outlet 3/4 in. - Page 8 4. Turn the main water supply on and pressurize the system. 5. To test the ECO 1 , press the button. A click will be heard, indicating the ™ valve is open. An icon of a droplet on the upper left of the screen and the run time remaining will appear on the display in 5 seconds.
-
Page 9: Changing Actuator Adapters
CHANGING ACTUATOR ADAPTERS The ECO 1 with actuator is factory set to fit a 3/4 in. brass manual anti-siphon ™ valve. To install the controller with actuator on a 1 in. manual anti-siphon valve the 3/4 in. seat washer and adapter must be removed and replaced with the 1 in. adapter and seat washer, which are included in this box. - Page 10 5. Install the 1 in. threaded adapter by pushing it onto the actuator stem and making sure the notch on the adapter lines up with the notch on the stem of the actuator (see Figure D). FIGURE D 6. Spread the retainer clip with your thumbs and push the retainer into the adapter until it clicks (see Figure E).
-
Page 11: Manual Valve Actuator Installation
4.2 MANUAL VALVE ACTUATOR INSTALLATION Operating pressure: 10 to 125 PSI Recommended operating pressure: 10 to 80 PSI 1. Shut off main water supply. 2. Remove the manual stem from the existing valve and temporarily remove the anti-siphon cap (Figure A). 3. - Page 12 5. Turn actuator flow control knob clockwise until it stops to shut off flow (Figure D). 6. Turn on main water supply. 7. Activate the solenoid through the controller, a click will be heard indicating the valve is open. (The manual symbol will appear on the display.) 8.
-
Page 13: Programming
5. PROGRAMMING In order to program the ECO 1 , you must first let the unit sit out in the light to ™ charge. Please see page 3 on charging the ECO 1. This section explains the programming features, and the steps necessary to assign irrigation schedules. - Page 14 2. If the current time has not been set and needs to be updated press and the hour digit starts blinking. 3. To set the current hour, press (note AM and PM designations). 4. To set the minutes, press again and the minute digit starts blinking. Press to set the current time in minutes.
-
Page 15: Setting Watering Day Schedules
6. Press to proceed to the next step SET DAYS or review the program. Press to move backward. 7. SETTING WATERING DAY SCHEDULES Option 1 - Setting Specific Days of the Week: This setting determines which days the ECO 1 controller will operate. - Page 16 and the underscore under Sa (Saturday) starts blinking. 8. Press and the underscore under Sa disappears. Saturday is de-selected. 9. Press 10. Press the button to proceed to the next step or to set even/odd days. Option 2 - Setting Even or Odd Days: To select EVEN days, ODD days or cyclical days from one day up to every 30 days refer to the following example.
-
Page 17: Setting Watering Start Time
5. To return to a weekly schedule, Press and the program returns to the weekly schedule for selecting the day of the week. 6. Press the button to proceed to the next step START TIME or to review the program. 8. - Page 18 3. To set the desired first start time hour (note AM and PM designations), press 4. Press and the minutes start blinking. 5. Press and set the desired start time minutes. 6. Press again, the second start time and OFF (or the last start time programmed) appear blinking.
-
Page 19: Setting Watering Run Times
9. SETTING WATERING RUN TIMES Note: If you have already set a SimpleSmart ET preset (example: SP02) and then ™ change the run time, your SimpleSmart program will be turned OFF. You must ™ reactivate the SimpleSmart programming each time you adjust your run time ™... -
Page 20: Setting The Simplesmart ™ Option
™ and drip irrigation based on three years of historical evapotranspiration (ET) from various climate regions. How DIG’s ECO 1 controller operates using Historical Evapotranspiration (ET): ™ After programming the watering schedule, watering start time and watering duration,... - Page 21 reactivate the SimpleSmart programming each time you adjust your run time ™ (see section 10). NOTE: If using one of the SimpleSmart presets we recommend evaluating ™ the plants’ health for the first month and making adjustments to the system as needed.
- Page 22 SP12 Dry Inland Valleys Sprinkler Systems SP13 Tropical Wet & Dry Drip Systems SP14 Tropical Wet & Dry Sprinkler Systems SP15 Tropical Wet Drip Systems SP16 Tropical Wet Sprinkler Systems SP17 Semi-Arid Drip Systems SP18 Semi-Arid Sprinkler Systems SP19 Arid Drip Systems SP20 Arid...
-
Page 23: Setting Seasonal Adjustment (Monthly Budget)
11. SETTING SEASONAL ADJUSTMENT ( MONTHLY BUDGET ) The amount of water required by plants varies throughout the year. The Seasonal Adjustment percentage feature can be utilized to alter the programmed watering run time on a monthly basis. This program features two options: A. -
Page 24: Rain Delay Setting
12. RAIN DELAY SETTING The Rain Delay setting is used to temporarily suspend all irrigation for a defined number of days. For example, during rainy weather regularly scheduled programs can be turned off from 1-99 days. At the end of the designated period, regularly scheduled programming will resume automatically. -
Page 25: Events Off Setting
Note: OFF appears in between numeric value of 99 and 1. Press the button to proceed to the next step EVENTS OFF or to review the program. 13. EVENTS OFF SETTING This mode allows the user to program the timer to not water during specific months of the year, or to program the timer to not water on specific days of the week during a specific month. -
Page 26: Manual Watering
3. When On is flashing for the desired month to turn off, push the button and the word OFF will appear. The selected month is now turned off, and no watering will occur during the entire month. The controller is now fully programmed. Press the button to review the program or to return to the home screen. -
Page 27: Connecting A Rain Sensor
The controller will open the valve and in 10 seconds a count down of the remaining irrigation duration appears, showing when the controller will close the valve. 2. Press the button to end manual run. 3. After 10 seconds the display will revert to the current time screen. 15. -
Page 28: Maintenance, Troubleshooting And Repairs
Use waterproof wire connectors to secure the connections. 4. Follow the sensor manufacturer’s instructions for calibrating the sensor. 5. When the sensor is active and preventing automatic operation, a icon will appear on the display. Icon will only appear when sensor is active. SENSOR YELLOW SENSOR WIRES... - Page 29 SCREWS BONNET ASSEMBLY AIR VENT WITH POPPET ASSEMBLY SPRING AIR VENT SEAT DIAPHRAGM ASSEMBLY INLET OUTLET FIGURE B PROBLEM: Water is flowing out under the anti-siphon cap. CAUSE: Valve is not installed at least 6 in. above the highest outlet on the system SOLUTION: Raise valve up so it is at least 6 in.
- Page 30 CAUSE: Flow control handle is turned down SOLUTION: Open flow control handle on valve or actuator PROBLEM: Valve/actuator functions in manual mode but not automatically CAUSE: Controller is set to OFF mode SOLUTION: Verify that controller does not show OFF in current time mode CAUSE: AM/PM not set correctly in current time mode SOLUTION: Check current time, change AM/PM if necessary CAUSE: AM/PM not set correctly in start time mode...
-
Page 31: Warranty
SOLUTION: Change start time 2,3,4, and 5 to OFF 17. WARRANTY DIG CORPORATION warrants these products to be free from defects in material and workmanship for a period of three years from date of purchase. This warranty does not cover damage resulting from accident, misuse, neglect, modification, improper installation or subjection to line pressure in excess of 80 lbs. -
Page 32: Technical Assistance
Repair of damaged units not otherwise within warranty may be refused or done at a reasonable cost or charge at the option of DIG CORPORATION. This warranty gives you specific legal rights, and you may also have other rights, which vary from state to state. - Page 34 SimpleSmart Regional Pre ™ Mapa de ajustes previos regionales Simple Find your location then match the region color with the preset Busque su ubicación luego encuentre el color de la region correspondiente Washington North Dakota Montana Minnesota Oregon Idaho South Dakota Wyoming Iowa Nebraska Nevada Utah Colorado Kansas Missouri California Oklahoma Arizona New Mexico Arkansas New Mexico Texas Louisia Hawaii...
- Page 35 eset Map For Drip Systems Para sistemas de goteo eSmart ™ Region SimpleSmart ™ number from the appropriate key. Color Preset Color de Ajustes previos con el numero de la gráfica apropiada. la región SimpleSmart ™ SP01 SP03 SP05 SP07 Maine SP09 SP11 SP13 N.H. SP15 Wisonsin Mass.
Need help?
Do you have a question about the ECO1 MVA and is the answer not in the manual?
Questions and answers