Table of Contents
Advertisement
Advertisement
Table of Contents

Related Manuals for Sonicware LIVEN XFM


Summary of Contents for Sonicware LIVEN XFM
- Page 1 User's Manual LVN-020-UM-01-EN...
- Page 2 Moreover, information in this document could be changed without notice. SONICWARE retains the right to change product specifications and programs at any time. SONICWARE will bear no responsibility for any errors depicted in this document. SONICWARE will bear no responsibility for any losses resulting from the use of this information, functions or performance, regardless of contracts, lack of caution or other conduct.
- Page 3 Be sure to insert the batteries with +/ - ends oriented correctly. Do not use new and old batteries together. Do not use batteries of different types together. Remove the batteries when they will not be used for a long time. If a leak occurs, thoroughly wipe the battery compartment and battery terminals to remove the leaked fluid.
-
Page 4: Table Of Contents
Contents Preparing to play ……………………………………………………………………… 5 Recording parameter locking automation in real time ……………………18 Part names …………………………………………………………………………… 5 Recording sound locking automation to steps………………………………18 Connecting …………………………………………………………………………… 5 Turning parameter locking automation on/off ………………………………18 Preparing for startup ……………………………………………………………… 6 Initializing parameter lock automation …………………………………………19 Starting up ……………………………………………………………………………... -
Page 5: Preparing To Play
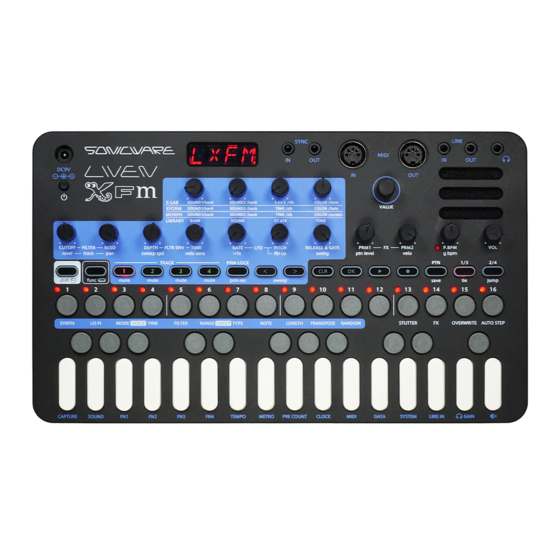
Preparing to play Part names DC9V Main knobs Display SYNC SYNC MIDI MIDI LINE LINE Headphone POWER switch jack 1–4 jack Speaker VALUE knob Knobs TEMPO Buttons Step LEDs Step buttons Keyboard Connecting Note : Use cables that are 3 m or shorter. -
Page 6: Preparing For Startup
Patterns have four tracks, and different sounds can be set for each track. In addition, sequences can be • To power the LIVEN XFM using batteries, open the created for each track. cover on the bottom and install 6 AA batteries. -
Page 7: Basic Operations
Basic operations This section explains basic operations. • The parameter value is shown on the display. Adjusting the overall volume • The setting range is 0 – 127. ① Turn the VOL knob. Sweeping notes while playing • The level is shown on the display. ①... -
Page 8: Track Settings
Track settings This section explains how to adjust track settings, • CLR will appear on the display. including for the synth engine, filter, LFO, envelope • When track sound settings are reloaded, the sound generator (EG) and effects. is restored to its last saved state. •... -
Page 9: Changing The Filter Type
Track settings Changing the filter type • The setting range is 0 – 127. ① While pressing the button, press the button • The resonance can be changed in a range of 0.1 – to select the type. LED will light. •... -
Page 10: Adjusting The Lfo Speed
Track settings • The time can be changed in a range of 0 – 8000 • The parameter value is shown on the display. • The setting options are OFF and 1 – 127. Adjusting the LFO speed • This changes it in a range of 0 – 100%. ①... -
Page 11: Changing Track Pitch By Semitone (Transposing)
Track settings Changing track pitch by semitone Changing the arpeggiator type (transposing) ① While pressing the button, press the button, and select ARP. ① While pressing the button, press the button, and change the pitch. ② While pressing the button, press the button, and select the arpeggiator type. -
Page 12: Changing Track Levels
Track settings • Parameter values are shown on the display. • The channel is shown on the display. • The setting range is 0 – 127. • The setting range is OFF and CH.01 – CH.16. • From 85 – 127, the release time becomes longer •... -
Page 13: Pattern Playback And Settings
Pattern playback and settings This section explains how to play patterns and make clearing edited settings. settings for them. Pattern playback Changing pattern volume ① Press the button. ① While pressing the button, turn the ptn level knob. • Press the button again to stop playback. -
Page 14: Initializing Patterns
Pattern playback and settings Initializing patterns TRML ① While pressing the button, press the button. Send effects: CHRS, FLNG, S.DLY, RVB, M.RVB Changing effect parameters • When pattern initialization has completed, will appear on the display. ① Turn the SPEED and AMOUNT knobs. -
Page 15: Setting The Global Bpm
• The setting range is 0 – 15. Synchronizing the tempo with another device connected to the SYNC IN Setting a pre-count ① Connect the LIVEN XFM SYNC IN to the sync output ① While pressing the button, press the of the connected device. -
Page 16: Synchronizing Tempo With An Elz_1 Or
Pattern playback and settings Synchronizing tempo with an ELZ_1 or Example 3 : Pocket Operator as master synchronizes LIVEN XFM Pocket Operator (PO) ① Connect the LIVEN XFM headphone out to the Master Synchronized ELZ_1 AUX IN or PO input. LINE ②... -
Page 17: Track Sequencing
Track sequencing This section explains sequence input and settings for keys will overwrite notes on steps. (See “Recording individual tracks. sound locking automation to steps” on p.18.) • Notes cannot be tied from the last page to the first page. Step recording •... -
Page 18: Directly Inputting Notes On Steps
Track sequencing • To input tied notes, while pressing the button, simultaneously. press the button to enable the tie function. • When sound locking is activated, playing keyboard keys will overwrite notes on steps. (See “Recording Recording parameter locking automation sound locking automation to steps”... -
Page 19: Initializing Parameter Lock Automation
Track sequencing Initializing parameter lock automation • Notes can be set to 1/1, 1/2, 1/.4, 1/4, 1/.8, 1/2T, 1/8, 1/.16, 1/4T, 1/16, or 1/32. (“.” ① Select the pattern on which to clear parameter indicates a dotted note, and “T” indicates a triplet locks. -
Page 20: Sound Editing
Sound editing This section explains how to create and edit sounds. ⑦ Use the buttons and VALUE knob to select the save destination. Editing sounds ① While pressing the button, press the EDIT key., and use the included sound editing panel overlay. •... -
Page 21: Changing Sound Names
Sound editing Capturing synth engine sounds (capture mode) • The save destination can also be selected by pressing a step button. ① While pressing the button, press the CAPTURE key. • The bank name is shown on the display while an button is being pressed. -
Page 22: Creating Sounds With Operators Using The Editing Overlay
Creating sounds with operators using the editing overlay This section explains how to edit sound parameters. ② Press the button. ③ Press an OP/MIXER RECEIVE LEVEL 1 – 4 button. Use the included sound editing panel overlay when The OP/MIXER RECEIVE LEVEL 1 –... -
Page 23: Setting Operator Levels
Creating sounds with operators using the editing overlay Setting operators to fixed mode can only change the value to 0.5 or a whole number, while the FINE knob can change it by decimal ① Press an OPERATOR button to select that operator. values.) ②... -
Page 24: Setting Operator Envelope Curves
Creating sounds with operators using the editing overlay settings. ② Press the button. ③ Press the button. ③ Press an envelope generator button. LED will light. The LED for that envelope generator button will light. • The setting value is shown on the display. •... -
Page 25: Setting The Operator Keyboard Gain Scaling Curves (Left/Right)
Creating sounds with operators using the editing overlay ③ Press the button. ④ Turn the VALUE knob to set the scaling position. LED will light. • The scaling position is shown on the display. • The setting value is shown on the display. •... -
Page 26: Setting Operator To Mixer Connection Levels
Creating sounds with operators using the editing overlay • The setting range is 0 – 127. ① While pressing the button, press the button. • Both the encoder and potentiometer VALUE knobs can be used. buttons will light. Setting operator to mixer connection levels •... -
Page 27: Changing The Voice Mode And Playing During Sound Editing
Creating sounds with operators using the editing overlay • Both the encoder and potentiometer VALUE knobs can be used. • Press the button to end algorithm selection. ③ Press the button to select the algorithm and end algorithm selection. Changing the voice mode and playing during sound editing ①... -
Page 28: External Input Settings
External input settings This section explains settings related to external input. Changing the FX send amount ① While pressing the button, press the button, and set the send amount. LED will light for any setting other than OFF. • The send amount is shown on the display. •... -
Page 29: Midi Settings
MIDI settings Turning MIDI clock output on/off This section explains settings related to MIDI. ① While pressing the func button, press the MIDI button, and select TX.CK. Setting the MIDI channels for pattern ② Turn the VALUE knob to turn this ON/OFF. parameters ①... - Page 30 MIDI settings • ON/OFF will appear on the display. ...
-
Page 31: Saving And Loading User Data
Backing up user data ① While pressing the 4 button, press the POWER switch to turn on the LIVEN XFM. • Regardless of data transmission status, the ② Turn the VALUE knob to select EXPT. button can be pressed to cancel. -
Page 32: Restoring User Data
(The default value is 0.) Restoring user data ① While pressing the button, press the POWER switch to turn on the LIVEN XFM. ② Turn the VALUE knob to select IMPT. ③ Press the button, and start data transmission from the other device. -
Page 33: System Settings
• The clock source is shown on the display. • Four types of clock sources can be selected. 1. INTERNAL (INT on display): Use LIVEN XFM • Automatic power off has four settings. internal clock 1. OFF: Automatic power off is disabled. -
Page 34: Enabling/Disabling Speaker Output
If the value is higher, they appear to be flowing right. The farther away the value is, the faster they flow.) • The LIVEN XFM will start up, and F.RST will appear on the display. Enabling/disabling speaker output ①... - Page 35 System settings • The step LEDs will light to show the progress. (100% when step LED 16 is reached.) • If the update occurred properly, DONE will appear. (If a problem occurred, an error code will appear.) ④ Restart the unit.
-
Page 36: Appendix
Appendix Figure 1. Sound architecture Table 1. Synthesizer engine parameter list shift Synth engine Main Knob 1 Main Knob 2 Main Knob 3 Main Knob 4 button Sound 1 Sound 2 Combination Combination color RED、ORNG、 Sounds 1 to 16 of Sounds 1 to 16 of <63 ~... - Page 37 Appendix shift Synth engine Main Knob 1 Main Knob 2 Main Knob 3 Main Knob 4 button Sound 1 Sound 2 LFO rate LFO shape SINE(sine wave) 、 SAQR(square wave) 、TRI (triangle wave) 、 SAW(sawtooth wave) 、R.SAW Sounds 1 to 16 of Sounds 1 to 16 of 0 ~...
Need help?
Do you have a question about the LIVEN XFM and is the answer not in the manual?
Questions and answers