Table of Contents
Advertisement
Quick Links
Advertisement
Table of Contents

Subscribe to Our Youtube Channel
Related Manuals for Sonicware LoFi-12 XT


Summary of Contents for Sonicware LoFi-12 XT
- Page 1 Manual Rev.1 TRK-030-UM-01-EN...
- Page 2 —Consult the dealer or an experienced radio/TV technician for help. Legal disclaimers Sonicware Inc. (hereafter, "SONICWARE" ) strives to assure that this document is as accurate and current as possible, but will bear no responsibility for any compensation claims or losses due to content included in this document.
- Page 3 Important safety precautions You must read the following precautions in order to use the product safely and prevent accidents. < WARNING > Failure to follow these precautions could result in serious harm to the user or even death. ・Operation using an AC adapter Do not do anything that could exceed the ratings of outlets and other electrical wiring equipment.
-
Page 4: Key Features Of The Lofi-12 Xt
Introduction Thank you very much for purchasing a SONICWARE Lofi-12 XT. The Lofi-12 XT is an 8-track compact groovebox that can make any sound into a pleasant lo-fi / low-res sound. We hope you enjoy using it for many years. -
Page 5: Table Of Contents
Sample File Setup -Converting- …… 15PADs …………………………………… Sample File Setup - Importing - …… PARAMETER PAD ……………………… Importing files that can be used with Lofi-12 XT 47 TRACK PAD ……………………………… Sample File Setup - Loading into Sample Lofi-12XT Project Structure ………... - Page 6 Editing songs …………………………… Creating Patterns SONG EDIT operations ………………… Step Sequencer Overview …………… Overview …………………………………… Renaming songs ………………………… Lofi-12 XT step sequencer features Clearing songs …………………………… Copying a song ………………………… Creating Sequences - Step recording Basic operations ………………………… Managing Projects ……………………… 121 Selecting steps 17 and higher ………...
- Page 7 Contents Testing card performance …………… Changing POWER Settings ………… 142 Battery setting …………………………… Automatic power off function ………… Resetting the unit to the factory default state ………………………………………… 144 System information …………………… 145 Checking system version information 145 Firmware updates ……………………… 146 Appendix ……………………………………...
-
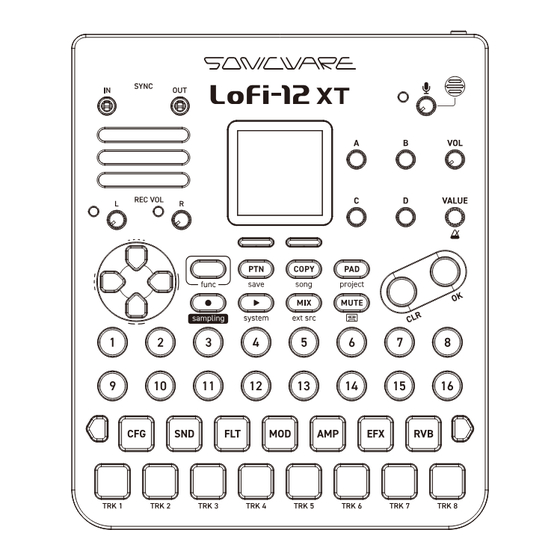
Page 8: Names Of Parts
Names of parts Right side Rear Front... - Page 9 MIDI signal. supply. audio output. can be connected to a Dynamic Microphone. 23:USB Connector 24:Storage Card 25:Headphone Out Connect to PC, it can be Lofi-12 XT internal data Stereo headphones managed data and use storage card output. Audio Interface function.
-
Page 10: Connection Example
Connection example... -
Page 11: Basic Operations - General
( → P.142) Starting up Press and hold the POWER switch until Lofi-12 XT appears on the display. Turning the unit off Press and hold the POWER switch until the display turns off. -
Page 12: Basic Operations
Basic Operations Adjusting the overall volume The volume from the speaker, headphones and the LINE OUT can be adjusted. Master Level This can be adjusted from −∞ VALUE 0 - 1 27 to +3 dB with 0 dB as the middle value (100). -
Page 13: Control And Value Knobs
If a parameter has a control knob with a downward pointing arrow, that parameter can be turned on/off or switched functions, by pushing it. Function button Some Lofi-12 XT buttons have two functions. In the example above, the secondary functions of the COPY buttons are “save”... -
Page 14: 15Pads
Basic Operations 15PADs PARAMETER PAD Pressing these 7 parameter pads will open parameter editing pages. Some pages have sub-pages that can be opened by pressing the Auxiliary buttons. These sub-pages can also be opened by pressing the same parameter pad again. TRACK PAD Pressing any of the 8 track pads to select a track and trigger the sample assigned to the track. -
Page 15: Lofi-12Xt Project Structure
Lofi-12XT Project Structure Project Pattern 1 Sample Sample Slot Pool Sound Sound Sound Sound Sound Sound Sound Sound Sample Sample 12k/16bit 12k/16bit Sequence Sequence Sequence Sequence Sequence Sequence Sequence Sequence Sample Sample 12k/16bit 12k/16bit Track 1 Track 2 Track 3 Track 4 Track 5 Track 6... -
Page 16: Project Overview
Project overview Projects are collections of patterns, songs and sample slots, which will be explained later. All data used by the Lofi-12 XT are saved in projects. Up to 256 samples (64 MB maximum) from the pool on the card can be added into each project for use. -
Page 17: Pattern Playback And Basic Functions
Pattern Playback and Basic Functions Common display items on the screens The Lofi-12 XT has a different screen display depending on the selected function, but the following display items are common. Built-in Speaker and Playback Page and Step Microphone Tempo... -
Page 18: Selecting Patterns
Pattern Playback and Basic Functions Selecting patterns Playing patterns Press to open Press PATTERN SELECT. Press PLAY it again to stop. Press STEP. This selects a pattern. (STEP 1 for pattern 1… STEP 16 for pattern 16) Press the button to enter a pattern. Selecting pattern 17 and higher Press Page switches and TRACK PAD after procedure 1 to change... -
Page 19: Reloading Patterns
Pattern Playback and Basic Functions Reloading patterns Press Press Auxiliary right button RELOAD. Select the item to reload and press the button. RELOAD Reloading STEP DATA stored in the SEQUENCE sequencer. PARAMETER Reloading track settings. Reloading all settings and sequences in the pattern. -
Page 20: Play A Pattern From Another Project
Pattern Playback and Basic Functions Play a pattern from another project Press project to open the PROJECT MENU. func Select SELECT/NEW in the PROJECT MENU. Select one of the preset projects and press the button. Select YES to save the current project and press button. -
Page 21: Changing The Tempo
Pattern Playback and Basic Functions Changing the tempo Press VLUE to open TEMPO MENU. Turn A - D knobs to edit. TEMPO MENU 40 - 250: A knob Set the pattern tempo A (Push) Set Tempo by tapping 0% - 75%: B knob SWING Set the SWING amount... -
Page 22: Changing Tempo
Pattern Playback and Basic Functions • Select global BPM mode to maintain a consistent tempo during the jam session. Use pattern BPM mode when you want the tempo to change with each pattern. • Press Auxiliary right button RELOAD to reload the pattern's TEMPO settings. -
Page 23: Mixer
Pattern Playback and Basic Functions MIXER Press the button to open the MIXER page. Press a TRACK PAD to select that track for editing. Adjusting the mixer MIXER 0 - 127: A knob LEVEL Track level L63 - L1, CTR, R1 - R63: B knob Track panning 0 - 127:... -
Page 24: Setting The Master Effect
Pattern Playback and Basic Functions Setting the master effect The Lofi-12 XT has a master effect that is applied after the mixer. MASTER FX Change the effect type FILTER: A knob TYPE Filter COMP: Compressor B knob ON/OFF Turn ON/OFF Master FX OFF:... - Page 25 Pattern Playback and Basic Functions SC COMP 1/2 0 - 127: C knob RATIO Compressor ratio value 0 - 127: D knob THRSHOLD Compressor threshold value SC COMP 2/2 0 - 127: A knob ATTACK Compressor attack time 0 - 127: B knob RELEASE Compressor release time...
-
Page 26: External Input Function
Pattern Playback and Basic Functions External input function Lofi-12 XT can not only use USB and external input audio for sampling, but also use it as a track. It can be also send the USB and analog inputs to Reverb/Delay effects individually. - Page 27 Pattern Playback and Basic Functions • If the USB is used for both the recording source and the EXT IN & USB in sampling, the EXT IN setting has priority and the recording source setting is ignored. • When using analog inputs, use the REC VOL knob to adjust the input level.
-
Page 28: Track Operations
Track Operations With the Lofi-12 XT, select 8 tracks and use 6 track parameters and 1 send effect parameter to perform the opration. Pressing a TRACK PAD will select the corresponding track and simultaneously play the loaded sample. Selecting samples Press the TRACK PAD to select the track. -
Page 29: Muting Tracks
Track Operations Muting tracks Press the button. MUTE Press the TRACK PAD(s) you want to mute. TRACK PAD(s) for muted tracks light yellow. Press the TRACK PAD(s) lit yellow to unmute that track(s). Press (lit yellow)to exit MUTE mode MUTE ●... -
Page 30: Muting Selected Tracks At Once
Track Operations Muting selected tracks at once Press to activate MUTE mode. MUTE Hold and press TRACK PAD to select tracks to mute. func Release to mute selected tracks. func ● ❷ ● ❶ ● ❸ ● ❷... -
Page 31: Setting Global Mute
Track Operations Setting Global mute Press to activate MUTE mode. MUTE While pressing button, press the TRACK PAD(s) you want to mute. The muted TRACK PAD(s) light bright yellow. The globally muted tracks will remain muted after pattern switching. Press (lit yellow) to exit MUTE mode. -
Page 32: Using The D-Pad Roll
Track Operations Using the D-pad Roll The D-pad Roll can be played by pressing a TRACK PAD while pressing D-pad direction buttons. This operation can be also recorded in the sequencer. D-PAD Right 8th note Down + right Quarter note triplet Down 16th note Down + left... -
Page 33: Playing In Pad Mode
Track Operations Playing in PAD mode Press to enter the PAD mode. Press on the SOUND page to display the PAD page. While in the PAD mode, you can play the sample in a scale with the 15 PADs. The root note of the scale will light pink each octave. - Page 34 Track Operations PAD MODE A knob SCALE Select the scale shown for the 15 PADs. C,Db,D,Eb,E,F,Gb,G,Ab,A,Bb,B: B knob Set the root note shown for the 15 PADs. -11 - 11, ± 1OCT, ± 2OCT: SWEEP Amount of sweep C knob Negative values will sweep down, while RANGE positive values will sweep up.
-
Page 35: Changing Scale
Track Operations Changing scale Operate A knob on the PAD page. The scales that can be selected are as follows. SCALE CHROMATIC Chromatic scale C,Db,D,Eb,E,F,Gb,G,A,Ab,B MAJOR Major scale C,D,E,F,G,A,B, MINOR Minor scale C,D,Eb,F,G,Ab,Bb HARM Harmonic minor C,D,Eb,F,G,Ab,B scale .MINOR MELO Melodic minor scale C,D,Eb,F,G,A,B .MINOR DORIAN... - Page 36 Track Operations SCALE Major pentatonic MAJ .PENTA C,D,E,G,A scale Minor pentatonic MIN .PENTA C,Eb,F,G,Bb scale RAGA1 RAGA1 C,Db,E,F,G,Ab,B RAGA2 RAGA2 C,Db,E,Gb,G,A,B RAGA3 RAGA3 C,Db,Eb,Gb,G,Ab,B ARABIC Arabic scale C,D,E,F,Gb,Ab,Bb SPANISH Spanish scale C,Db,Eb,E,F,G,Ab,Bb GYPSY Gypsy scale C,Db,E,F,G,Ab,B MINOR Minor Gypsy scale C,D,Eb,Gb,G,Ab,B GYPSY EGYPTIAN...
- Page 37 Track Operations SCALE WHOLE Whole tone scale C,D,E,Gb,Ab,Bb TONE WHOLE Whole-half scale C,D,Eb,F,Gb,A,Ab,B HALF 5TH INT. 5th interval • For the scales except the chromatic scale, the 15 PADs are filled in order with only the notes of the scale.
-
Page 38: Sample File Setup
Sample File Setup Sample files that can be used with Lofi-12 XT The Lofi-12 XT is a Lo-fi/Low-res sampler that only supports 12kHz or 24kHz/16bit mono WAV files. All the presets are included in the above file formats. There are three ways to create sample files for use with the Lofi-12 1. -
Page 39: The Folder Structure In Lofi-12 Xt
Sample File Setup The folder structure in Lofi-12 XT The folder structure on cards used in the Lofi-12 XT is as follows. Card Lofi-12 XT The folder for putting audio files to be converted by Convert the Lofi convert engine. -
Page 40: Sample File Setup -Sampling
Sample File Setup -Sampling- Sampling Press button + sampling to open SAMPLING page. func Turn A - D knobs to set sampling settings. SAMPLING A knob Selecting the recording source B knob Adjusting monitoring level B (Push) Monitoring ON/OFF C knob Recording source settings D knob Normalize ON/OFF... -
Page 41: Selecting The Recording Source
Sample File Setup -Sampling- Selecting the recording source REC SRC Uses built-in microphone. Set the appropriate Built-in mic volume using the microphone gain knob on the main unit. Connect and use high- impedance instruments control such as guitar and input gain Hi-Z bass. - Page 42 Sample File Setup -Sampling- Press TRACK PAD to select track to record sample. Press sampling or red blinking TRACK PAD to start sampling. Sampling can be interrupted by pressing the Auxiliary right button CANCEL. Press sampling or red blinking TRACK PAD again,sampling will be completed.
-
Page 43: Name Of The Recorded File
Sample File Setup -Sampling- Name of the recorded file Recorded files are automatically named according to the following rules. 0 0 1 B I M 0 1 Project Number Recording Serial number Source Abbreviated name of the recording source Abbr. Recording Source Built In Mic Guitar (Hi-Z) -
Page 44: Sample File Setup -Converting
Sample File Setup -Converting- Convert audio The Lofi-12 XT has our original Lofi convert engine that makes it easy to create the “Lofi-12 sounds” . This convert audio feature allows you to convert common stereo audio files into the best audio files for the Lofi-12 XT. - Page 45 Sample File Setup -Importing- Converting audio files Refer to Card Reader Mode( → P.139) to connect to your PC/ Mac and copy the audio files that you want to convert to the following location on the card. "USB Drive:\Lofi-12XT \Convert” In the PROJECT MENU, select CONVERT AUDIO.
- Page 46 Sample File Setup -Converting- Select the settings you want to convert and press the button to check them. CONVERT SETTINGS Converts at a sampling frequency of 12kHz Converts at a sampling frequency of 24kHz Uses only the L channel of the stereo file. Uses only the R channel of the stereo file.
-
Page 47: Sample File Setup - Importing
Sample File Setup - Importing - Importing files that can be used with Lofi-12 XT You can also import 12 kHz or 24 kHz/16-bit mono WAV files (up to 40 seconds) created on your PC/Mac or other device into the Pool folder. -
Page 48: Sample File Setup - Loading Into Sample Slots
Sample File Setup - Loading into Sample Slots - The Lofi-12 XT can be used with the tracks by loading audio files in the card into the sample slots. Up to 256 samples (max. 64 MB) per project can be loaded into the sample slots. -
Page 49: Tag Search Operation
Sample File Setup - Loading into Sample Slots - Select a sample and load it into the sample slots On the SOUND page, push the A knob. TAG SEARCH opens. Search for the samples and select a sample, then press the Auxiliary right button LOAD. - Page 50 Sample File Setup - Loading into Sample Slots - Bass Drum TRK1 SD Snare TRK2 Hi Hats TRK3 DR Drum TRK4 PC Percussion TRK5 BS Bass TRK6 GT Guitar TRK7 KB Keyboard TRK8 SY Synthesizer ST Strings Wind VO Voice FX ...
- Page 51 Sample File Setup - Loading into Sample Slots - TAG SEARCH Select sample Exit TAG SEARCH D-pad Move cursor Update the audio file database to the latest state. B (Push) The update process usually takes about 3 minutes. Switch to C (Push) SAVE TAG C (Push)
-
Page 52: Tagging Samples
Sample File Setup - Loading into Sample Slots - Tagging samples Lofi-12 XT can set to 15 TAGs for a sample. By setting TAG, you can quickly access the samples you want to use. Push the C knob to enter TAG EDIT mode. -
Page 53: Select A Sample From The Sampl Pool And Load It Into The Sample Slots
Sample File Setup - Loading into Sample Slots - Select a sample from the SAMPL POOL and load it into the sample slots On the SOUND page, push the A knob to open TAG SEARCH. Press the Auxiliary left button BROWSE to display SAMPLE POOL. -
Page 54: Sample Pool Operations
Sample File Setup - Loading into Sample Slots - SAMPLE POOL operations If you know the sample you want, or if you want to load all the files in a folder into the sample slots, file selection in SAMPLE POOL may be convenient. - Page 55 Sample File Setup - Loading into Sample Slots - SAMPLE POOL operations SAMPLE POOL MENU This will load the selected sample into LOAD SELECTED the track/sample slots. FILE NAME This will search for file names within the displayed folder. SEARCH This will select all samples in the SELECT ALL displayed folder.
-
Page 56: Loading Files Into Sample Slots
Sample File Setup - Loading into Sample Slots - Loading files into sample slots Select samples and press the button. Press Auxiliary right button to open MENU. Select LOAD SELECTED and press the button. Deleting files Select samples and press the button. -
Page 57: Slot
Sample File Setup - Loading into Sample Slots - The SAMPLE SLOT in the PROJECT MENU allows you to load a sample into a selected sample slot. You can also unload a sample that has already been loaded into the sample slot. Loading a sample into a selected sample slot In the PROJECT MENU, select SAMPLE SLOT to open the SAMPLE SLOT Screen. - Page 58 Sample File Setup - Loading into Sample Slots - SLOT MENU This loads the selected sample slot to the already LOAD TO selected track. TRACK This can be used when one slot is selected. BROWSE This opens the SAMPLE POOL mode. SAMPLE SELECT This selects all sample slots.
-
Page 59: Update The Audio File Database
Sample File Setup - Loading into Sample Slots - Update the audio file database If you have added audio files or shared project data, please update the audio file database. On the SOUND page, push the A knob to open TAG SEARCH. Push the B knob. -
Page 60: Functions Of Parameter Pads Config Page
Functions of Parameter Pads / CONFIG page On the CONFIG page, settings can be edited for track sounds and step sequencers as well as sequence effects. Press the pad to open the CONFIG page. Setting sequencer CONFIG 1 - 128: A knob Number of steps in sequence Note length of step:... -
Page 61: Copying And Extending Sequences
CONFIG page -24 - +24: C knob TRANSP Track transposition setting (semitone) OFF: Does not set choke group. SELF: Turns off the voice that is sounding when the same note is re-triggered. D knob CHOKE 1 - 4: When any track within the same choke group is triggered, another track that is currently sounding within the choke group will be... -
Page 62: Setting Sequencer Effects
CONFIG page Setting sequencer effects The Lofi-12 XT has sequence effect functions, including Random that can randomize phrases, Stutter that repeats playback of pressed steps and Dice that sets the probability of notes sounding. SEQ MODE NORMAL: Sequences will be played back normally. -
Page 63: Sound Page
SOUND page Sample and voice mode settings can be made on the SOUND page. Press the pad to open the SOUND page. Edit the parameters with the knobs and the Auxiliary buttons. Editing a sample SEQ MODE 1 - 256: A knob SAMPLE SLOT Sample (slot) selection... - Page 64 SOUND page 0.0% - 99.99%: C knob START This sets the playback starting position in the sample. 0.0% - 100%: D knob This sets the playback range of (LENGTH) the sample. 1SHOT: The sample will play from the START to the END (LENGTH) while the TRACK PAD is being pressed.
-
Page 65: Editing The Track Voice Mode
SOUND page Editing the track voice mode Press the Auxiliary left button VOICE on the SOUND page. VOICE MONO,POLY,SLICE: A knob VOICE This selects the voice mode. GLIDE 0 - 127: (when VOICE This adjusts GLIDE. is MONO) OFF: An arpeggiator will not be used for playback B knob UP, DOWN, UPDOWN,... - Page 66 SOUND page VOICE 0 - 127: This sets the velocity sensitivity of the track. The velocity range increases as VELOCITY this value becomes higher. D knob SENSITIVITY When set to 0, notes will always sound with a velocity of 127. See “Adjusting pad sensitivity”...
-
Page 67: Glide Setting (When Mono)
SOUND page GLIDE setting (When MONO) Glide can be set when the VOICE mode is set to MONO. Auxiliary right button can also be pressed to turn on LEGATO, which causes a single voice to be output without retriggering. Arpeggiator settings (When POLY) The arpeggiator function can be used when the VOICE mode is set to POLY. -
Page 68: Slice Mode
SOUND page Slice mode When the VOICE mode is set to SLICE, samples can be sliced into up to 15 parts. By using the auto slice function, waveforms can be analyzed and automatically divided into a suitable slice. The levels and pitches of sample slices can be adjusted for each 15 PAD they are assigned to. -
Page 69: Slicing Samples (Manual Slicing)
SOUND page Slicing samples (Manual slicing) On the VOICE page, turn the A knob to select SLICE. Press the Auxiliary righy button SLICE. Use the following to create slices. CHOP/SLICE A knob Move the locator A (Push) Add slice point B knob Move slice point C knob... - Page 70 SOUND page • During sample playback, the A knob can be pushed at any time to add a slice point. • Slices can be selected by pressing the 15 PADs.
-
Page 71: Slicing Samples (Automatic Slicing)
SOUND page Slicing samples (Automatic slicing) On the VOICE page, turn the A knob to select SLICE. Press the Auxiliary right button SLICE. Press the Auxiliary left button TO AUTO on the CHOP/ SLICE Screen. Use the following to create slices. CHOP/SLICE A knob Adjust sensitivity... -
Page 72: Adjusting Slice Parameters
SOUND page Adjusting slice parameters Press the Auxiliary right button on the CHOP/ SLICE Screen. Press to enable PAD mode. Press one of the 15 PADs to which slices are assigned to select it for editing. Use the following to edit slices. CHOP/SLICE NONE, 1 - 4:... -
Page 73: Saving Slice
SOUND page Saving slice You can save slice information edited by pressing func buttons on the SLICE/CHOP page. The saved slice information is written directly to the audio file, so you can use it with the same settings even if you change the project or pattern. -
Page 74: Filter Page
FILTER page The FILTER page is used to set filter on the track. Press the pad to open the FILTER page. Press the Auxiliary buttons as necessary to open the desired parameter page for editing. Editing filter FILTER 0 - 127: A knob FILTER FREQ Cutoff frequency... -
Page 75: Adjusting Filter Envelopes
FILTER page Adjusting filter envelopes FLT ENV 0 - 127: A knob EG ATTACK Envelope attack setting 0 - 127: B knob EG RELEASE Envelope release setting Switches envelope type ASR: Attack-Sustain-Release type B (Push) ASR/AR envelope Attack-Release type envelope 0 - 127:... -
Page 76: Modulation Page
MODULATION page The each track has 2 LFOs that can be assigned to different targets. Press the pad to open the MOD page. Press the Auxiliary buttons as necessary to open the desired parameter page for editing. Editing LFO1 and LFO2 LFO1/2 0 - 127:... - Page 77 MODULATION page LFO1/2 SIN, SQR, TRI, SAW, RSAW, RAND, SMRND, LOG, RLOG, WAVESHAPE PLS10, PLS25, PLS75, PLS90, C knob TYPE STEP2, STEP3, STEP4, STEP5, STEP6, STEP7: LFO waveshape selection D (Push): Select the modulation target. ( → P.79) D knob ASSIGN D knob: Adjust the MOD target parameter...
- Page 78 MODULATION page MOD DETAIL (whole note) (half note) 1/4. (dotted quarter note) (quarter note) 1/8. (dotted 8th note) 1/2T (half note triplet) A knob SYNC (8th note) 1/16. (dotted 16th note) 1/4T (quarter note triplet) 1/16 (16th note) 1/8T (8th triplet) 1/32 (32nd note) 1/16T (16th triplet) 1/64 (64th note)
-
Page 79: Modulation Targets
MODULATION page Modulation targets ASSIGN PTICH SAMPLE START SAMPLE LENGTH FLT FREQ FLT RESO LFO1 SHAPE LFO1 DEPTH LFO1 PHASE LFO1 SYNC LFO1 RATE LFO2 SHAPE LFO2 DEPTH LFO2 PHASE LFO2 SYNC LFO2 RATE AMP ATTACK AMP RELEASE AMP LEVEL AMP PAN SEND DELAY SEND REVERB... -
Page 80: Amp Page
AMP page The AMP page is used to set amp envelope on the track. Press the pad to open the AMP page. Press the Auxiliary buttons as necessary to open the desired parameter page for editing. Editing envelope, panning and volume 0 - 127:... - Page 81 AMP page L63 - CTR - R63: C knob Track panning adjustment 0 - 127: TRACK volume adjustment D knob Sets the maximum volume of the Amp envelope. ON: Enable Amp Envelope OFF: Amp Envelope will be disabled. Auxiliary In the case of 1SHOT, the entire sample right range set by LENGTH will be played.
-
Page 82: Adjusting Amount Of Send To Send Fx
AMP page Adjusting amount of send to SEND FX SEND 0 - 127: A knob DELAY SEND Send amount from the track to the delay effect 0 - 127: B knob REVERB SEND Send amount from the track to the reverb effect •... -
Page 83: Effect Page
EFFECT page On the Lofi-12 XT, one insert effect can be set for each track. Setting EFX Press the pad to open the EFX page. Press the Auxiliary left button TYPE to select EFX TYPE. Select the effect to use, and press the button. - Page 84 EFFECT page EFX TYPE EFX TYPE A knob B knob C knob D knob CHORUS RATE DEPTH FLANGER RATE DEPTH FEEDBACK PHASER RATE STAGE INVERT INDELAY TIME FEEDBACK BPM SYNC BALANCE VIBRATO RATE DEPTH BPM SYNC AUTO WAH TYPE SENS DEPTH TREMOLO RATE...
-
Page 85: Reverb/Delay Page
REVERB/DELAY page The Lofi-12 XT has Delay and Reverb send effects. Send amounts can be adjusted on the AMP page and the mixer. Press the pad to open the Reverb/Delay page. Press the Auxiliary buttons (left for DELAY and right for REVERB) to open the parameter page desired for editing. - Page 86 REVERB/DELAY page DELAY 0 - 127: Delay time setting A knob TIME If BPM SYNC is set, this setting is disabled. 0 - 127: B knob BPM SYN Feedback amount setting (whole note) (half note) 1/4. (dotted quarter note) (quarter note) (dotted 8th note) 1/8.
- Page 87 REVERB/DELAY page REVERB 0 - 127: A knob PRE DELAY Pre-delay time 0 - 127: B knob DECAY Decay time 0 - 127: This adjusts the gain of the C knob LO CUT low-cut EQ. The higher the value, the more low frequencies will be cut.
-
Page 88: Creating Patterns Step Sequencer Overview
Creating Patterns Step Sequencer Overview Overview The Lofi-12 XT step sequencer can play multiple steps in order (a sequence) with performance and parameter data. Steps contain note data and STEP parameter data. Sequences contain multiple steps. 10 11 12 13 14 15 16 Sequences play in order from the first step. - Page 89 Note and Parameter Lock (lit yellow-green) Tied note (Indicated when REC is on) • Sequencer settings can be changed on the CFG page. CFG page details ( → P.60) • The Lofi-12 XT can generate a maximum of 20 notes simultaneously (20-voice polyphony).
-
Page 90: Creating Sequences - Step Recording
Creating Sequences - Step recording Using step recording, sequences can be created carefully while playback is stopped. Basic operations When stopped, press (lights red). Press the STEP for the position where you want to input. The input STEP will light red. Press the same STEP again to clear it. -
Page 91: Selecting Steps 17 And Higher
Creating Sequences - Step recording Selecting steps 17 and higher After procedure 1, press the page switch to select steps 17 and higher. While pressing the page switch, pressing a TRACK PAD that is lit blue will also select it. • The page switch is enabled/disabled according to the LEN (length) setting on the CFG page. -
Page 92: Inputting Tied-Notes (Long Sounds)
Creating Sequences - Step recording Inputting tied-notes (long sounds) Press while stopped to start step recording (lit red). Keep pressing the TRACK PAD. Press the STEP at the position where you want to start inputting notes. Press the STEP where you want the note to end. The tied notes from the start step to the end step are entered. -
Page 93: Creating Sequences - Real-Time Recording
Creating Sequences - Real-time recording Sequences can be created in real time while playing the 15PADs. Basic operations After pressing , press The pattern will start playing. Press the TRACK PAD when you want to input them. ● ❶ ● ❶ ●... -
Page 94: Creating Sequences - Direct Recording
Creating Sequences - Direct recording With direct recording, notes can be input on steps directly when both stopped and playing back. This is particularly useful for building up sequences while performing by directly inputting notes during playback. Basic operations While pressing a TRACK PAD, press the STEP at the desired position to input a note. -
Page 95: Clearing A Note
Creating Sequences - Clear note - Clearing a note While holding down , press the STEP you want to clear. Clearing tied notes Press . (lit red) Press the STEP (lit yellow-green) at the position you want to clear. This clears all consecutive tied notes from the step you pressed to the end. -
Page 96: Parameter Locking
Parameter Locking The Lofi-12 XT has a parameter locking function that can record knob operations to steps. This allows sounds to be changed over time and is useful for creating patterns with great expressiveness. Parameter locking data can be input in the following three ways. -
Page 97: Parameter Locking - Direct Input
Parameter Locking - Direct input Using direct input Press a PARAMETER PAD to open the page where you want to record parameter locking. While pressing a STEP, turn the A - D knobs. ● ❷ ● ❷ ● ❶... -
Page 98: Clearing Parameter Lock Information
Parameter Locking - Direct input Clearing parameter lock information Press + STEP (lit orange) for which parameter lock has been input. • STEPs to which both NOTE and parameter lock information are input are lit yellow. If you only want to delete the parameter lock, you can press func STEP and delete it from the STEP DATA menu. -
Page 99: Parameter Locking - Real-Time Input
Parameter Locking - Real-time input Inputting in real time (parameter recording) Press (lights red). Press to play the pattern. Press the pad for the parameters you want to record. And use the A - D knobs to record them. Press to end real-time input. -
Page 100: Editing Sequences
Editing Sequences Steps that have notes, parameter locks and other data already input can be selected and edited. Editing step data Press the button at the same time as a key for a STEP func that already has data input to open the STEP DATA MENU. Use the A knob to select the parameter to edit and turn B to adjust the parameter. -
Page 101: Micro Timing
Editing Sequences MICRO TIMING The Lofi-12 XT sequencer can record/edit MICRO TIMING information (note-on timing and note-off timing). The real-time recording performs non-quantize recording (resolution: ♩ =72), which records your performance timing, and the timing can be quantized by each track or edited by each step.It is also easy to nudge steps back and forth, even the beats you create in the step recordings or direct recording. - Page 102 Editing Sequences Editing Step Data STEP DATA NOTE NOTE Note (C-1 to G9) VELOCITY Velocity ROLL Roll information OFF TIM Note-off timing SWP RNG Sweep range SWP CRV Sweep curve SWP SPD Sweep speed PRESSURE Pressure information for Roll PAREMETER SOUND SMPL PITCH...
-
Page 103: Clearing Steps
Editing Sequences Clearing steps Press the button with the STEP. The note and parameter lock data from that step will be cleared. Clearing track data Press the button with the TRACK PAD. Select the item to clear, and press the button. -
Page 104: Copy Functions
Copy Functions Copying track settings to another Holding the button (lit green), press the PARAMETER PAD COPY to copy. will blink orange. COPY Holding the button (lit red), press the TRACK PAD that is COPY blinking orange to paste its track settings. •... -
Page 105: Saving And Managing Patterns
Saving and Managing Patterns Saving patterns Press func to open PATTERN SAVE menu. Press STEP to select the save destination pattern. ( STEP1= Pattern 1 … STEP16 = Pattern 16) See "Selecting patterns" on ( → P.18). Press the button to save pattern. •... -
Page 106: Clearing(Initialize) Patterns
Saving and Managing Patterns Clearing(Initialize) patterns Press + Select the item to clear, and press the button. CLEAR PATTERN DATA Clears all parameters in the pattern. Clear track settings. Clear the note information. Clear parameter lock information. -
Page 107: Renaming Patterns
Saving and Managing Patterns Renaming patterns Press Press STEP to select the pattern for renaming. ( STEP1= Pattern1 … STEP16 = Pattern16) Press Auxiliary left button MENU to open PATTERN MENU. Select RENAME and press the button. Finished rename, Press Auxiliary left button OK to save pattern name. -
Page 108: Editing Tracks Within A Pattern
Saving and Managing Patterns Editing tracks within a pattern The TRACK EDIT menu allows you to swap, copy, move, and clear tracks within a pattern. Press Press STEP and select Pattern. ( STEP1= Pattern1 … STEP16 = Pattern16) Press Auxiliary left button MENU to open PATTERN MENU. Select EDIT CURRENT PTN and press the button to open TRACK EDIT menu. -
Page 109: Swapping Tracks
Saving and Managing Patterns Swapping tracks Select SWAP and press the button. Turn A knob to select track to swap. Turn C knob to select track destination to swap. Press Auxiliary right button SWAP, select YES and press the button. -
Page 110: Copying Tracks
Saving and Managing Patterns Copying tracks Select COPY and press the button. Turn A knob to select track to copy. Turn C knob to select track to paste. Press Auxiliary right button COPY, select YES and press the button. -
Page 111: Moving Tracks
Saving and Managing Patterns Moving tracks Select MOVE and press the button. Turn A knob to select track to Move. Turn C knob to select track destination to move. Press Auxiliary right button MOVE, select YES and press the button. -
Page 112: Clearing Tracks
Saving and Managing Patterns Clearing tracks Select CLEAR and press the button. Press TRACK PAD to select a track to clear. Press Auxiliary right button CLEAR, select YES and press the button. -
Page 113: Song
SONG The Lofi-12 XT has a song function that allows patterns that have been created to be specified and played back consecutively. The number of repetitions, the number of bars in each pattern and the tempo can be specified as desired to create a musical composition. -
Page 114: Editing Songs
SONG Editing songs Press song to open the SONG SELECT menu. func COPY Move the cursor over the song you want to edit, and press the Auxiliary right button MENU. Select EDIT and press the button to open SONG EDIT. -
Page 115: Song Edit Operations
SONG SONG EDIT operations Repeat times Playback steps Pattern No. Tempo Playing order No. Cursor Setting about END mode Back to SONG Open MENU SELECT Editing pattern settings Move cursor position Press D-pad to move the cursor up/down/ left/right. - Page 116 SONG SONG EDIT operations Use A - D to edit patterns. Press the Auxiliary right button to insert, delete and enable/ disable patterns. SONG EDIT MENU Inserting a new Pattern after the selected INSERT Pattern. DELETE Deleting the selected Pattern ENABLE Disabling the selected Pattern •...
- Page 117 SONG SONG EDIT Select pattern (When END mode selected) ONCE: After the last song pattern is played, song A knob playback will stop without looping. LOOP: After the last song pattern is played, song playback will loop from the first. B knob Pattern playback repetitions C knob...
-
Page 118: Renaming Songs
SONG Renaming songs Press song to open the SONG SELECT menu. func COPY Move the cursor over the song you want to rename, and press Auxiliary right button MENU. Select RENAME and press the button. Edit the name and press the Auxiliary right button to complete renaming. -
Page 119: Clearing Songs
SONG Clearing songs Press song to open the SONG SELECT menu. func COPY Move the cursor over the song you want to clear, and press the Auxiliary right button MENU. Select CLEAR and press the button. Select YES and press the button. -
Page 120: Copying A Song
SONG Copying a song Press song to open the SONG SELECT menu. func COPY Move the cursor over the song you want to clear, and press the Auxiliary right button MENU. Select COPY and press the button. Select the song you want to paste and press the button. -
Page 121: Managing Projects
Managing Projects The project menu allows you to save and delete projects, manage sample slots, and convert audio files. Select and execute the menu as required. Press + project to open PROJECT MENU. func Creating new projects In the PROJECT MENU, select SELECT/NEW. Select EMPTY and press the button. -
Page 122: Saving Projects
Managing Projects Saving projects In the PROJECT MENU, select SAVE and press the button. Select YES and press the button. -
Page 123: Saving As A Different Project
Managing Projects Saving as a different project In the PROJECT MENU, select SAVE AS and press the button. Select the save destination and press the button. Use the direction and the button to change the name. Then press the Auxiliary right button OK. If you want to cancel saving, press the Auxiliary left button Back. -
Page 124: Renaming Projects
Managing Projects Renaming projects In the PROJECT MENU, select RENAME and press the button. Use the direction and the button to change the name. Then press the Auxiliary right button OK. -
Page 125: Deleting Projects
Managing Projects Deleting projects In the PROJECT MENU, select DELETE and press the button. Select YES and press the button. • Use this operation with caution because deleting a project cannot be undone. -
Page 126: Mix Tape Function
MIX TAPE function Lofi-12 XT is equipped with a MIX TAPE function that allows you to record the audio during playback in the background. MIX TAPE MICRO, MICRO ST, Type Ⅰ OLD, Type Ⅰ , Type Ⅱ , DAT: A knob... -
Page 127: Changing Cassette Type
MIX TAPE function Changing CASSETTE type Turn A knob to change the TYPE. TYPE Simulates the sound quality of a DAT cassette recorded at 48k/16bit. Simulates the sound quality of a high position TYPE Ⅱ cassette tape. Simulates the sound quality of a normal TYPE Ⅰ... -
Page 128: Clock Synchronization With External Devices
Clock Synchronization with External Devices Multiple devices, including external synthesizers and drum machines, can be connected to the MIDI and SYNC connectors, allowing them to be synchronized and used together. Connecting with other devices Connect other device to the MIDI and SYNC connectors. SYNC SYNC LINE... - Page 129 Clock Synchronization with External Devices Press system to open the SYSTEM MENU. func Select CLOCK and press the button. Set each item in the CLOCK settings.
- Page 130 Clock Synchronization with External Devices CLOCK INTERNAL: Use the built in clock. The Lofi-12 XT will operate as the master when used by itself or synchronizing other devices. MIDI: SOURCE The Lofi-12 XT will synchronize with MIDI clock received through the MIDI IN.
-
Page 131: Midi
MIDI Setting track MIDI channels MIDI channel numbers can be set for every Lofi-12 XT tracks. Press system to open the SYSTEM MENU. func Select MIDI and press the button to open the MIDI SETTING. Select TRACK and press the button. -
Page 132: Setting Midi Channels For The Unit
MIDI Setting MIDI channels for the unit Press system to open the SYSTEM MENU. func Select MIDI and press the button to open the MIDI SETTING. Select CHANNEL and press the button. Set A - D knobs to change settings. - Page 133 MIDI MIDI CHANNEL This channel is for receiving project PROJECT A knob level MIDI and other parameters CHANNEL related to the project This is the channel number used AUTO B knob when the OUTPUT CHANNEL is set CHANNEL to AUTO Channel used for output AUTO:...
-
Page 134: Making Other Midi Settings
MIDI Making other MIDI settings Press system to open the SYSTEM MENU. func Select MIDI and press the button to open the MIDI SETTING. Select CONFIG and press the button. - Page 135 MIDI MIDI CHANNEL 1/3 INPUT FROM Set connectors used to receive MIDI OUTPUT TO Set connectors used to send MIDI TX NOTE Turn note transmission on/off TX CC Turn control change transmission on/off MIDI CHANNEL 2/3 CLOCK OUT Turn clock output on/off OUT / THRU Switch between MIDI OUT and THRU Set command data transmitting (TX) and re-...
- Page 136 MIDI MIDI CHANNEL 3/3 Set active sensing transmitting (TX) and re- ACTIVE SENS ceiving (RX)
-
Page 137: Pad Sensitivity Setting
Pad sensitivity setting Setting pad velocity curve. Press system to open the SYSTEM MENU. func Select PAD VELOCITY and press the button. Turn A knob to adjust it. PAD VELOCITY 1 - 127 Velocity is always at this fixed value. This is best for people who play with a light SOFT touch. -
Page 138: Mute The Internal Speaker
Mute the internal speaker Always mute the internal speaker. Press system to open the SYSTEM MENU. func Select SPEAKER MUTE and press the button. Turn A knob to change SPEAKER MUTE Mute on Mute off... -
Page 139: Card Functions
Card functions Card reader mode You can access sampling audio files, Mix Tape files, user backup files, etc. from your PC/Mac. It is also used when updating firmware. Connect to PC/Mac with USB cable. Press system to open the SYSTEM MENU. func Select CARD and press the button. -
Page 140: Formatting Cards
Card functions Formatting cards Press system to open the SYSTEM MENU. func button. Select CARD and press the Select FORMAT and press the button. Select YES and press the button. • Supports up to 32 GB SDHC card. • Formatting cards takes a few minutes. •... -
Page 141: Testing Card Performance
Select CARD and press the button. Select PERFORMANCE TEST and press the button. Press the button to start the test. RESULT : OK The card can be used with the Lofi-12 XT. RESULT : NG The card cannot be used with the Lofi-12 XT. -
Page 142: Changing Power Settings
Changing POWER Settings Battery setting By changing the type of batteries used in Lofi-12 XT, the battery icon on the screen will be displayed correctly. Press system to open the SYSTEM MENU. func button. Select BATTERY and press the Turn A knob to adjust it. -
Page 143: Automatic Power Off Function
Changing POWER Settings Automatic power off function The time until automatic shutdown can be set. Press system to open the SYSTEM MENU. func Select AUTO POWER OFF and press the button. Turn A knob to select a time between 30 minutes and 6 hours (or Off to disable the AUTO POWER OFF function). -
Page 144: Resetting The Unit To The Factory Default State
Resetting the unit to the factory default state The Lofi-12 XT can be restored to its factory default settings. Press system to open the SYSTEM MENU. func Select RESET and press the button. Select YES and press the button. • This does not erase the data in the external card storage. -
Page 145: System Information
System information Checking system version information Press system to open the SYSTEM MENU. func Select INFORMATION and press the button. -
Page 146: Firmware Updates
Firmware updates The Lofi-12 XT firmware can be updated by connecting the Lofi-12 XT to a PC or Mac by USB and transferring an update file. Copy the downloaded firmware (.bin) to the root folder on the card. While pressing , press and hold the power button. -
Page 147: Appendix
Appendix Sound architecture... -
Page 148: Hardware Specifications
Hardware Specifications Pads 15 velocity-sensitive pads with RGB LEDs Controllers Control knob x 5, Directional pad with 2 button controls Display 1.5 inch OLED display Built-in Mic Mono x 1 (Omni-directional, 94dBSPL) Built-in Speaker Mono x 1 (1.5W 4Ohm) INPUT L / Guitar (Switchabîe 10kOhm and 1MOhm impedanœ) [LINE Gain] PAD: -20dB [Hi-Z Gain] LOW: 0dB, NORMAL: +10dB, HI: *20dB Audio Inputs...
Need help?
Do you have a question about the LoFi-12 XT and is the answer not in the manual?
Questions and answers