Table of Contents
Advertisement
Advertisement
Table of Contents

Related Manuals for Sonicware LIVEN Lofi-12


Summary of Contents for Sonicware LIVEN Lofi-12
- Page 1 User's Manual Rev.2 LVN-040-UM-02-EN...
- Page 2 SONICWARE will bear no responsibility for any errors depicted in this docu- ment. SONICWARE will bear no responsibility for any losses resulting from the use of this information, functions or per- formance, regardless of contracts, lack of caution or other conduct.
- Page 3 Remove the batteries when they will not be used for a long time. If a leak occurs, thoroughly wipe the battery compartment and battery terminals to remove the leaked fluid. • Do not open the case and disassemble or modify the product. •...
- Page 4 Introduction Thank you very much for purchasing a SONICWARE LIVEN Lofi-12. The LIVEN Lofi-12 is a compact groovebox that features a retro sampling, including a 12-bit sampler mode that gives any sound a pleasing low-fidelity feel, and a 4-track step sequencer with indepen- dent effects for each track as well as a master reverb.
- Page 5 Key features of the LIVEN Lofi-12 gineering Pocket Operator devices using the LINE jack. In addition, clock synchronization signals can be bridged between dif- ferent connectors. For example, MIDI clock can be generated from an input SYNC clock signal.
-
Page 6: Table Of Contents
Contents Changing the arpeggiator type (in ARP Names of parts ……………………………… 10 mode) ………………………………………… 22 Connection example ……………………… 10 Starting up and shutting down ……… 11 Sample selection …………………………… 23 Preparing a power supply ……………… Overview ……………………………………… 23 Starting up …………………………………… Selecting samples …………………………... - Page 7 Contents Setting the sampling frequency ……… 35 Exporting a single sample ……………… 46 Importing a single sample ……………… 46 LINE IN settings …………………………… 36 Changing the gain ………………………… 36 Exporting sample banks ………………… 47 Setting mono/stereo ……………………… 36 Importing sample banks ………………… 47 Activating and deactivating Step sequencer overview ………………...
- Page 8 Contents locking on …………………………………… 61 Lofi-12 as clock master ………………… 75 Recording knob operations ……………… 61 External device as clock master ……… 76 Parameter locking Bridging clock signals to a different con- – Real-time input …………………………… 62 nector from an external device acting as Inputting in real time (parameter recording) the clock master ……………………………...
- Page 9 Contents tion ……………………………………………… 87 Setting the headphone gain …………… 88 Setting the master tuning ……………… 88 Setting knob movement behavior …… 89 Restoring to factory default settings (fac- tory reset) …………………………………… 90 Checking the system versions ………… 90 Updating the firmware …………………… 91 Error codes ……………………………………...
-
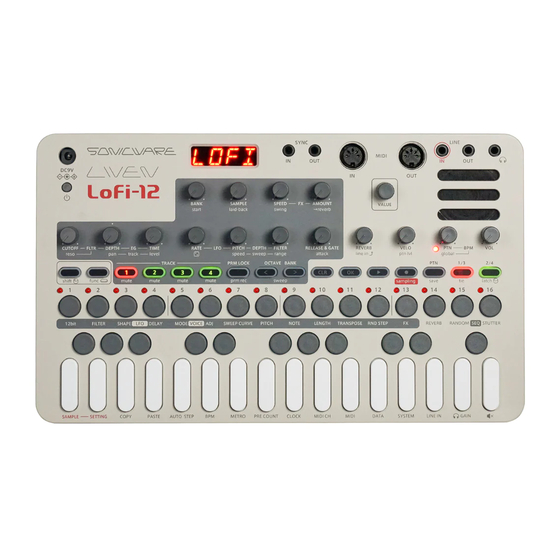
Page 10: Names Of Parts
Names of parts DC9V Main knobs Display SYNC SYNC MIDI MIDI LINE LINE Headphone jack 1 – 4 jack Speaker POWER switch VALUE knob Knobs Tempo Page Buttons but- tons Step Step buttons LEDs Keyboard Connection example SYNC SYNC LINE LINE MIDI ... -
Page 11: Starting Up And Shutting Down
(1.7mm inner diameter, 4.75mm outer diameter) Polarity: center+ *Equivalent to Korg Volca KA350 adapter Starting up Press and hold the POWER switch until LOFI (LIVEN Lofi-12) ap- pears on the display. L O F I Turning the unit off Press and hold the POWER switch until the display turns off. -
Page 12: Basic Operations
Basic operations This section explains basic operations. Adjusting the overall volume The volume from the speaker, headphones and the LINE OUT can be adjusted. Volume 0 – 127 This can be adjusted from −∞ to +6 dB with 0 dB as the mid- dle value (63–64). -
Page 13: Using The Func Button
Basic operations Using the func button Some Lofi-12 buttons have two functions. In the example above, the secondary functions of the but- tons are “save” and “FX”. Pressing these buttons while pressing the button will activate their secondary functions. In this manual, operations while pressing the button will be shown as follows. -
Page 14: Tracks And Patterns
Track 1 Track 2 Track 3 Track 4 Patterns and banks 16 patterns can be stored together in a single bank. The LIVEN Lofi-12 has 4 banks enabling 64 patterns to be saved in total. Pattern Pattern Pattern Pattern BANK 1 ……... -
Page 15: Basic Pattern Operation
Basic pattern operation Selecting patterns Playing patterns Press Press Press it again to stop. Press – → This selects a pattern. (STEP 1 for pattern 1… STEP 16 for pattern 16) ● ❸ ● ❶ ● ❷ Selecting pattern 17 and higher Press after procedure 1 to change the bank, enabling selec-... -
Page 16: Changing The Tempo
Basic pattern operation Changing the tempo PTN – BPM 40 – 250 When the tempo is shown on the display, the knob can be turned to change it in 0.1- beat increments. Reloading patterns Press Press This is useful for restoring sounds to their original states during live performances, for example. -
Page 17: Pattern Chain Playback
Pattern chain playback Selecting multiple patterns and playing them in order (chain playback) Press twice (lights orange). Press – Select patterns in the order that you want them to play. Press – again to deselect. Press The patterns will play in the selected order. ... -
Page 18: Track Selection And Basic Adjustments
Track selection and basic adjustments Switch between the 4 tracks of the Lofi-12 to work with them. Selecting tracks Press for the track you want to select. The selected TRACK button will light red and its track number will be shown on the display. (The unselected TRACK buttons will light green.) ... -
Page 19: Performing With
Performing with the keyboard and voice modes Performing Play the keyboard. Holding keyboard notes Press + keys to hold them. • Press the same key again to stop holding it. • Press to stop holding all keys. Changing the velocity The velocity value used when playing keys can be set. -
Page 20: Changing The Octave Range
Performing with the keyboard and voice modes Changing the octave range Press This lowers/raises the range by an octave. +3 octaves +2 octaves +1 octave − 1 octave − 2 octaves − 3 octaves Changing the voice mode Press ... -
Page 21: Changing The Glide (In Mono/Legato Mode)
Performing with the keyboard and voice modes Changing the glide (in MONO/LEGATO mode) Press to set the speed. Glide 0 – 127 The time can be changed in a range of 0 – 10000 ms. -
Page 22: Changing The Arpeggiator Type (In Arp Mode)
Performing with the keyboard and voice modes Changing the arpeggiator type (in ARP mode) Press to select the arpeggiator type. Arpeggiator DOWN DOWN UP DOWN U. D DOWN UP D. U UP & DOWN U. A . D DOWN & UP D. -
Page 23: Sample Selection
Sample selection Overview The Lofi-12 can store a total of 128 recorded samples in 8 banks with 16 slots each. Sound Sound Sound …… BANK 1 Slot 1 Slot 2 Slot 16 Sound Sound Sound …… BANK 8 Slot 1 Slot 2 Slot 16 Selecting samples... -
Page 24: Changing The Pitches Of Samples
Changing the pitches of samples In addition to changing pitches in semitones using the keyboard keys, the Lofi-12 has other ways of changing pitches. Changing track pitch Press Press this button to change the pitch 100 cents (1 semitone) at a time from −... -
Page 25: Adjusting How Samples Sound
Adjusting how samples sound Adjusting sample start positions Turn The sample start position can be set from 0 – 127. Adjusting sample attack and release Use the envelope generator to adjust the attack that affects the beginning of the sound and the release that affects how the sound fades out. -
Page 26: Filters
Filters Changing the filter type Press to select the type. Filter type This filter cuts high frequencies us- LPF./\ ing an envelope with attack and de- LP/\ cay. This filter cuts high frequencies us- LPF.│\_ LP1\_ ing an envelope with decay. This filter cuts high frequencies us- LPF./│_ LP/ 1_... -
Page 27: Changing The Filter Cutoff Frequency
Filters Changing the filter cutoff frequency Cutoff 0 – 127 The cutoff frequency can be changed in a range of 70 – 21600 Hz. Adjusting the filter resonance Resonance 0 – 127 The resonance can be changed in a range of 0.1 – 10. For BPF, the bandwidth can be changed in a 0.1 –... -
Page 28: Adjusting The Filter Envelope
Filters Adjusting the filter envelope Filter EG Depth − 63 – 63 The envelope depth can be set from − 100 – 100%. Filter EG Time 0 – 127 The time can be changed in a range of 13 ms – 20 s. For LPF./\, HPF/\ and BPF./\, TIME changes the attack and the de- cay. -
Page 29: Lfo
Overview Each track of the Lofi-12 has one LFO that can be used to modulate the pitch and the cutoff frequency. Adjusting the LFO speed Rate – LFO 0 – 127 The frequency of the LFO can be changed in a range of 0 – 30 Hz. Adjusting the amount of LFO effect on pitch Pitch Depth –... -
Page 30: Selecting The Lfo Wave
Selecting the LFO wave Press to select the LFO wave. LFO Wave sine wave SINE square wave SQAR triangle wave sawtooth wave reverse sawtooth wave R. S AW random wave RAND logarithmic wave reverse logarithmic wave R. L OG Setting the LFO starting delay Press to set the LFO starting delay. -
Page 31: Sweep
Sweep Overview The Lofi-12 has a sweep sound function that changes the pitch at a set speed. Sweeping notes while playing Press Pitch Sweep up Original sound Sweep Sweep down Sweep down Time Sweep up • Press again to disable the sweep function. -
Page 32: Effects
Effects Effects can be set for each track of the Lofi-12. Adjusting effects Press to select an effect. to adjust the parameters. ---- ---- Chorus Rate Amount CHRS Flanger Speed Amount FLNG Delay Time Amount Crush Sample rate LPF cutoff CRSH Distortion Gain... -
Page 33: Reverb
Reverb The Lofi-12 has a single high quality reverb effect. The send levels for this reverb can be set individually for each track. Adjusting the reverb Press to select the effect. to adjust the parameter. ---- Hall HALL Room ROOM Arena ARNA Plate... -
Page 34: Quick Sampling - Recording
Quick sampling – Recording Connecting equipment Enable recording to the LINE IN Press will blink red. Connect the output of the Use the step keys to check equipment you want to re- the recording level. cord to the Lofi-12 LINE IN. ... -
Page 35: Sampling Settings
Sampling settings The following settings are used for quick sampling. Setting auto recording Press to select A.R.LV. A . R . L V Turn This can be set to OFF or the input signal level that starts re- cording automatically ( −... -
Page 36: Line In Settings
LINE IN settings Changing the gain Press to select GAIN. G A I N Turn to change the gain. Gain MUTE – 127 Setting mono/stereo Press to select MONO. M O N O Turn to switch between ON and OFF. Monophonic Mono Stereo... -
Page 37: Activating And Deactivating Sample & Edit Mode
Activating and deactivating SAMPLE & EDIT mode Activating SAMPLE & EDIT mode (slot selec- tion) Press Regular mode Selecting slots SAMPLE & EDIT mode Turn to select a slot and press (slot selection) → This activates SAMPLE & EDIT mode (editing). -
Page 38: Deactivating Sample & Edit Mode
Activating and deactivating SAMPLE & EDIT mode Deactivating SAMPLE & EDIT mode (returning to Regular mode) Press This returns to slot selection. Press again. This returns to regular mode. -
Page 39: Sample & Edit Mode (Editing)
SAMPLE & EDIT mode (editing) — Preparing to record Connecting equipment Select the recording to the LINE IN slot Connect the output of the In SAMPLE & EDIT mode, equipment you want to re- press cord to the Lofi-12 LINE IN. ... -
Page 40: Sample & Edit Mode (Editing)
SAMPLE & EDIT mode (editing) — Recording Enable recording Start recording Press Press again. It will blink red. It will light and automatically Use the step keys to check start recording when a sig- the recording level. nal is input. -
Page 41: Sample & Edit Mode (Editing)
SAMPLE & EDIT mode (editing) — Basic operation Adjust parameters Adjust parameters precisely Turn a knob. Turn while the param- eter is shown. Start Pitch Level Start position in End position in Pitch adjustment Level sample sample 0 – 9998 1 –... -
Page 42: Setting Sustain Loops
SAMPLE & EDIT mode (editing) — Basic operation Setting Sustain loops The Lofi-12 has a sustain loop function that can play the desired in- terval in a sample as a loop. Set a sustain loop if you want to have a sound play continuously like an organ as long as you press a key on the keyboard. -
Page 43: Reversing Sample Playback
SAMPLE & EDIT mode (editing) — Basic operation Reversing sample playback Reverse This turns reverse playback on/off. Played in regular direc- tion Played in reverse Setting sample fade out The entire length of a sample is shown by the lit –... -
Page 44: Sample & Edit Mode (Editing) - Renaming And Copying
SAMPLE & EDIT mode (editing) — Renaming and copying Renaming samples In editing mode, press to move S A X . 1 the cursor left and right, and turn to select characters. Press D O N E ... -
Page 45: Sample & Edit Mode (Editing) - Clearing
SAMPLE & EDIT mode (editing) — Clearing Clearing samples In editing mode, press I N I T This clears the sample. • After completing a procedure, press twice to save the changes. • Press during a procedure to cancel it. -
Page 46: Sample & Edit Mode (Editing) - Exporting/Importing Samples
SAMPLE & EDIT mode (editing) — Exporting/importing samples Recorded samples can be exported to or imported from a PC, Mac or similar device by MIDI. See page 81 for details about connection. Exporting a single sample Use slot selection to select the sample you want to export. Press to enable editing. -
Page 47: Exporting Sample Banks
SAMPLE & EDIT mode (editing) — Exporting/importing samples Exporting sample banks In the slot selection, press to select the bank you want to export. Press B K . E X Set your PC to receive MIDI data. D O N E Press ... -
Page 48: Step Sequencer Overview
Step sequencer overview Overview The Lofi-12 step sequencer can play multiple steps in order (a se- quence) with performance and parameter data. Steps contain note data and param- STEP eter data. Sequences contain multiple steps. 9 10 11 12 13 14 15 16 Sequences play in order from the first step. -
Page 49: Creating Sequences - Preparation
Turn to select the sound to use. • The LIVEN Lofi-12 can generate a maximum of 10 notes simul- taneously (10-voice polyphony). • If the maximum polyphony is exceeded, notes will be turned off starting with notes on the lowest priority track. (The track pri- ority is from 4 to 1 in order. -
Page 50: Creating Sequences - Settings
Creating sequences – Settings Setting the note length of one step Press to select the note length. Note Whole note Half note 1/.4 Dotted quarter note Quarter note 1/.8 Dotted 8th note 1/2T Half note triplet 8th note 1/.16 Dotted 16th note 1/4T Quarter note triplet 1/16... -
Page 51: Creating Sequences - Step Recording
Creating sequences – Step recording Using step recording, sequences can be created carefully while play- back is stopped. Basic operations When stopped, press (lights red). Press – at the step where you want to input a note. The LED for the current step will blink. The LEDs for steps that already have notes will light. -
Page 52: Selecting Steps 17 And Higher
Creating sequences – Step recording Selecting steps 17 and higher After procedure number one, press to select steps 17 and higher. To select steps 1–16, press the 1/3 button. To select steps 17–32, press the 2/4 button. To select steps 33–48, press the 1/3 button twice. ... -
Page 53: Clearing Steps
Creating sequences – Step recording Clearing steps Press – During step recording, only the note information for that step will be cleared. Copying steps During step recording, press to select the step to copy. – Press C O P Y Press –... -
Page 54: Enabling Tied-Note (Long Sound) Input
Creating sequences – Step recording Tied-notes (long sounds) can be input with the Lofi-12. Enabling tied-note (long sound) input Press The button will light red, and tied-note input will be enabled. Inputting tied-notes (long sounds) When stopped, press (lights red) to start step recording. Press –... -
Page 55: Creating Sequences - Real-Time Recording
Creating sequences – Real-time recording Sequences can be created in real time while playing the keyboard. Basic operations Clearing notes After pressing Press at the time when press you want to clear notes. Notes will be cleared while The pattern will start playing, this is being pressed. -
Page 56: Setting The Metronome
Creating sequences – Real-time recording Setting the metronome Press to select MTRO. M T R O to adjust the metronome volume. Metronome 0 – 15 Setting a pre-count Press to select PR.CT. P R . C T to change the pre-count. Metronome OFF, 1 –... -
Page 57: Creating Sequences - Direct Recording
Creating sequences – Direct recording With direct recording, notes can be input on steps directly when both stopped and playing back. This is particularly suitable for building up sequences while perform- ing by directly inputting notes during playback. Basic operations – for the position where you want to input a Press and hold note... - Page 58 Creating sequences – Direct recording • By pressing before procedure 1, pages with steps 17 and higher can be selected. To select steps 1–16, press the 1/3 button. To select steps 17–32, press the 2/4 button. To select steps 33–48, press the 1/3 button twice. ...
-
Page 59: Creating Sequences - Groove Settings
Creating sequences – Groove settings The Lofi-12 includes a swing function for creating offset rhythms and a laid-back function for delaying the timing of sample sounds. Setting the swing Turn to adjust it. Every even step (2nd, 4th, 6th, etc.) will be delayed. Step 1 ♪... -
Page 60: Parameter Locking
Parameter locking The Lofi-12 has a parameter locking function that can record knob operations to steps. This allows sounds to be changed over time and is useful for creat- ing patterns with great expressiveness. Parameter locking data can be input in the following three ways. Direct input Turn knobs while pressing –... -
Page 61: Parameter Locking - Direct Input
Parameter locking – Direct input Recording knob opera- Turning parameter tions locking on – Press (lights green). , turn While pressing knobs. ● ❷ ● ❶ ● ❷ • By pressing before procedure 2, pages with steps 17 and higher can be selected. •... -
Page 62: Parameter Locking - Real-Time Input
Parameter locking – Real-time input Inputting in real time (parameter recording) Press (lights red). Press to play the pattern. Turn knobs and record the changes. Press , making it light green, to end real-time input. ● ❹ ● ❷ ● ❸... -
Page 63: Parameter Locking - Sound Locking Input
Parameter locking – Sound locking input Recording note input Turning sound and parameter lock locking on data at the same time Press twice (lights orange). – , play While pressing the keyboard. ● ❶ ● ❷ ● ❷... -
Page 64: Sequence Effects
Sequence effects The Lofi-12 has sequence effect functions, including Dice that sets the probability of notes sounding, Random that can randomize phras- es, and Stutter that repeats playback of pressed steps. Random Press When this is on, a randomized sequence will be played back again to turn the random function off. -
Page 65: Stutter
Sequence effects Stutter Press Turning this on enables stutter mode. – Press Only the pressed steps will be played. Press again to turn stutter mode off. -
Page 66: Deleting Sequences
Deleting sequences Clearing steps Press 〜 The note and parameter lock data from that step will be cleared. • While pressing , steps that have parameter lock data blink red. • When recording notes (REC button lit red), only note data will be cleared. -
Page 67: Copying Tracks
Copying tracks Copying tracks Press to select the track of the pattern to be copied. Press C O P Y Press to select the track for the pattern to be past- Press D O N E... -
Page 68: Pattern Saving
Pattern saving Sequences created on every track can be saved as patterns. Saving patterns Press Press D O N E DONE will appear, and it will be saved. Changing the save destination or copying the pattern Press to select the save destination bank. –... -
Page 69: Pattern Renaming
Pattern renaming Renaming patterns Press multiple times to P . N . E D select P.N.ED (pattern name editing). to select the pattern for renaming, and press to move the cursor left N A M E and right, and turn to select Cursor position blinks ... -
Page 70: Tempo Overview
Tempo overview The Lofi-12 has two BPM modes. Pattern BPM mode Whenever a different pattern is selected, the BPM is reset using the tempo saved in that pattern. Global BPM mode The current global BPM value will continue to be used even when a different pattern is selected. -
Page 71: Setting The Global Bpm
Tempo overview Setting the global BPM Press Global BPM 40 – 250 When the tempo is shown on the display, can be turned to change it in 0.1-beat increments. -
Page 72: Clock Synchronization With External Devices - Clock Settings
Clock synchronization with external devices — Clock settings Overview The Lofi-12 has the following synchronization capabilities. SYNC Use the SYNC IN/OUT jacks to connect and synchronize with de- vices that support SYNC (including the Korg Volca series). MIDI Use the MIDI IN/OUT jacks to connect and synchronize with de- vices that support MIDI. -
Page 73: Setting The Clock Source
Clock synchronization with external devices — Clock settings Setting the clock source When set to INT (internal), the Lofi-12 acts as a clock master. When not set to INT, the external device will be treated as the clock master. Press to select SRC. -
Page 74: Setting Sync In Polarity
Clock synchronization with external devices — Clock settings Setting SYNC IN polarity Press and select S.I.PO. S . I . P O Turn to set the polarity. Polarity – Sync In Synchronize with falling of FALL sync signal Synchronize with rising of RISE sync signal Setting SYNC OUT polarity... -
Page 75: Clock Synchronization With External Devices - Connection Examples
Clock synchronization with external devices — Connection examples Lofi-12 as clock master SYNC IN MIDI IN INPUT Volca series MIDI device PO series TX.CK set to ON ( → P.79) A.OUT set to ON ( → P.73) SRC set to... -
Page 76: External Device As Clock Master
Clock synchronization with external devices — Connection examples External device as clock master Make only one device the clock master SYNC OUT MIDI OUT OUTPUT Volca series MIDI device PO series SRC set to SRC set to SYNC MIDI SRC set to LN.IN... -
Page 77: Bridging Clock Signals To A Different Con
Clock synchronization with external devices — Connection examples Bridging clock signals to a different connector from an external device acting as the clock master Make only one device the clock master SYNC OUT MIDI OUT OUTPUT Volca series MIDI device PO series SRC set to SRC set to... -
Page 78: Midi
MIDI Setting channels for transmitting and receiv- ing MIDI Press , and select the track for T 1 . c h which you want to set the MIDI channel. T 4 . c h Turn to set the channel. MIDI Channel OFF, CH.01 –... -
Page 79: Setting The Midi Channel Used To Output Keyboard Playing
MIDI Setting the MIDI channel used to output key- board playing Press and select O.CH. O . C H Turn to set it. MIDI Channel TRCK (track), AUTO Turning control change transmission on/off Press and select TX.CC. T X . C C Turn to set it to on/off. -
Page 80: Setting Midi Out
MIDI Setting MIDI OUT Press and select M.OUT. M . O U T Turn to set MIDI OUT. MIDI OUT OUT, THRU Setting MIDI command transmitting and re- ceiving Press and select M.CMD. M . C M D Turn to set MIDI command transmitting and receiving. MIDI Commands Neither transmit nor receive... -
Page 81: Turning On/Off Active Sensing Reception
MIDI Turning on/off active sensing reception Press and select RX.AS. R X . A S Turn to set it to on/off. Active Sensing – Receive ON, OFF Setting the channel for transmitting and re- ceiving program changes Press and select PC.CH. P C . -
Page 82: Turning On/Off Program Change Reception
MIDI Turning on/off program change reception Press and select RX.PC. R X . P C Turn to set it to on/off. Program Change – Receive ON, OFF... -
Page 83: Exporting/Importing User Data
Exporting/importing user data Connecting – Exporting/importing to/from a PC/Mac PC/Mac Recommended MIDI applications interface PC MIDI-OX MIDI OUT MIDI IN Mac SysEx Librarian Connecting – Exporting/importing to/from another Lofi-12 Lofi-12 MIDI OUT MIDI IN... -
Page 84: Exporting A Single Pattern
Exporting/importing user data Exporting a single pattern Select the pattern you want to export. ( → P.15) Press and select P.EXP. P . E X P Set your PC to receive MIDI data. D O N E Press • Press to cancel. -
Page 85: Backing Up All User Data At Once
Exporting/importing user data Backing up all user data at once Press + the POWER switch to turn on the Lofi-12. Turn to select EXPT. E X P T Press D O N E • The step LEDs show the progress. (They light from in order. -
Page 86: Restoring (Importing) User Data
Exporting/importing user data Restoring (importing) user data Press + the POWER switch to turn on the Lofi-12. Turn to select IMPT. I M P T Press . This makes the unit ready to receive data. Start exporting from the sending device. When SAVE appears on the display S A V E ... -
Page 87: System Settings
System settings Setting the battery type Press to select BATT. B A T T Turn to select the battery type. Battery Alkaline dry cell ALKL Nickel-metal hydride rechargeable NIMH Lithium dry cell LTHM • Please set this correctly because it effects operation time. •... -
Page 88: Setting The Headphone Gain
System settings Setting the headphone gain Press Headphone Gain Louder output LOUD Factory default NORM Quieter output SOFT Setting the master tuning Press to select TUNE. T U N E Turn to set the master tuning. Master Tuning − 75 – 0 – +75 (cents) -
Page 89: Setting Knob Movement Behavior
System settings Setting knob movement behavior Press to set whether or not latching is used for knob op- eration. Latching When a knob is moved, the pa- Jump rameter changes immediately. The knob does not affect the parameter value until its posi- Latch tion reaches that value. -
Page 90: Restoring To Factory Default Settings (Factory Reset)
• This will not restore sample waveform data to the factory de- fault. To restore the sample waveform data, download it from the SONICWARE website and import it. Checking the system versions Press and hold + the POWER switch to V E R ... -
Page 91: Updating The Firmware
System settings Updating the firmware Press and hold + the POWER switch to U P D T turn on the Lofi-12. Transmit the firmware (Sys Ex data) from R C V a PC/Mac. • The step LEDs show the progress of data transmission. (They light from in order. -
Page 92: Error Codes
System settings Error codes System error ER. 1 0 Low battery ER. 1 1 Data receiving error ER. 2 0 Invalid data ER. 2 1 No need to update (Boot) ER. 2 2 Update Failed ER. 3 0... -
Page 93: Appendix
Appendix Figure1. Sound architecture...
Need help?
Do you have a question about the LIVEN Lofi-12 and is the answer not in the manual?
Questions and answers