Table of Contents
Advertisement
Quick Links
Advertisement
Table of Contents

Related Manuals for Kogan KAMOPSTM10J


Summary of Contents for Kogan KAMOPSTM10J
- Page 1 10-IN-1 STEAM MOP KAMOPSTM10J...
-
Page 2: Table Of Contents
Safety & Warnings Components Overview Accessories Assembly Filling the Water Tank Operation Cleaning & Care Specifications Troubleshooting Notes... -
Page 3: Safety & Warnings
SAFETY & WARNINGS Warning: Read all safety warnings and all instructions. Failure to follow the warnings and instructions listed below may result in electric shock, fire and/or serious injury. Warning: When using electrical appliances, basics safety precautions, including the following, should always be followed to reduce the risk of fire, electric shock, personal injury and material damage. - Page 4 • If the circuit breaker activates while using the steam function, cease use immediately and contact help.Kogan.com for support (beware of the risk of electrical shock). • The appliance emits extremely hot steam to sanitize the area of use. This means that the steam head and cleaning pads get extremely hot during use.
- Page 5 Residual risks: Additional residual risks may arise when using the appliance which may not be included in the enclosed safety warnings. These risks can arise from misuse, prolonged use, etc. Even with the application of the relevant safety regulations and the implementation of safety devices, certain residual risks cannot be avoided.
-
Page 6: Components
COMPONENTS Steam Unit Grout Tool Handle tube Scraping Tool Handle Measuring cup Window tool Microfibre pad Small Brush Garment steamer Cloth Medium Brush Mop head Accessory Adaptor Carpet Gilder Angle nozzle... -
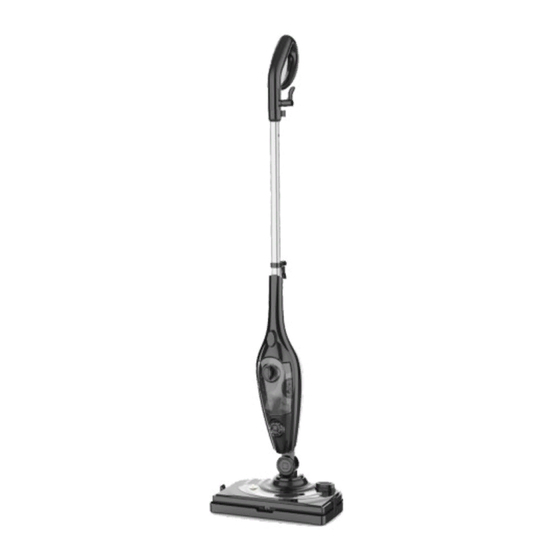
Page 7: Overview
OVERVIEW Handle Mop head spindle Cord holder Power cord Tube Water inlet Lock catch Indicator Water tank cap Steam button Water tank button Handle tube button Water tank Detergent spray pedal Steam control knob Detergent inlet... -
Page 8: Accessories
ACCESSORIES Accessory Suggested use Shower glass doors, mirrors, glass, removing soap scum and grime. Window/Garment Steaming Tool Garment tool for taking wrinkles out of garments, steaming draperies, tablecloths and more. Hard-wearing for use on hard sealed surfaces. Always test before use. Use the metal (wire bristle) Brushes brushes for hard to clean... -
Page 9: Assembly
ASSEMBLY This steam mop has been tested to ensure performance and safety. When assembling your steam mop for the first time you may notice some residual water inside of the unit. Before starting any assembly procedures, ensure the appliance is switched off, unplugged and it has cooled down with minimal to no water inside. - Page 10 Attaching the steam head • Slide the bottom end of steam unit into the mop head spindle until it clicks into place. • The mop head can be removed from the steam unit by pressing the salient point on the mop head spindle. Attaching a cleaning pad •...
-
Page 11: Filling The Water Tank
FILLING THE WATER TANK Method one Open the water tank cap, use the measuring cup to fill with 330mL of water, then close the water tank cap. Method two Remove the water tank from main body, open the water tank cap, and fill the water tank from water faucet. -
Page 12: Operation
OPERATION Starting the Steam Mop • Make sure the device has been filled with water before turning on. Do not run dry. • Plug the power cord into a power outlet and switch on. • The indicator light will turn red on each side of the water tank and the steam mop will begin preheating. - Page 13 Hand-held Mode • Press the lock catch to release the steam unit from the main body. • Attach the accessory adaptor to the steam unit, until it locks into place. • Attach the required accessory according to your need. Ensure the arrow indicators are aligned, then turn counter-clockwise, until it locks into place.
-
Page 14: Cleaning & Care
CLEANING & CARE WARNING: Do not immerse the appliance in water. Ensure that the product is powered off and unplugged before cleaning the appliance. Empty the water tank after use every time and clean the water tank. How to decalcify the water tank interior To clean calcium deposits that builds up inside the water tank, add one or two tablespoons of white vinegar to water tank and then shake the contents. - Page 15 Notice: Perform a test cleaning on a suitable isolated area after each lime scale removal to ensure that there is no debris left in the system. This product contains no serviceable parts. Do not try to repair it by yourself. Any servicing that requires disassembly other than cleaning must be performed by a qualified appliance repair technician.
-
Page 16: Specifications
SPECIFCATIONS Rated voltage 220-240V Rated frequency 50Hz Output power 1500W (+5%, -10%) water tank capacity 350ML Waterproof level IPX4... -
Page 17: Troubleshooting
TROUBLESHOOTING Use troubleshooting guide as a first step to resolve any problems you may be experiencing. All servicing should be done by an authorised service representative. WARNING: o reduce risk of personal injury-unplug steamer before servicing and allow to cool Problem Possible reason Possible solution... -
Page 18: Notes
NOTES... - Page 20 Need more information? We hope that this user guide has given you the assistance needed for a simple set-up. For the most up-to-date guide for your product, as well as any additional assistance you may require, head online to help.kogan.com...
Need help?
Do you have a question about the KAMOPSTM10J and is the answer not in the manual?
Questions and answers