Table of Contents
Advertisement
Quick Links
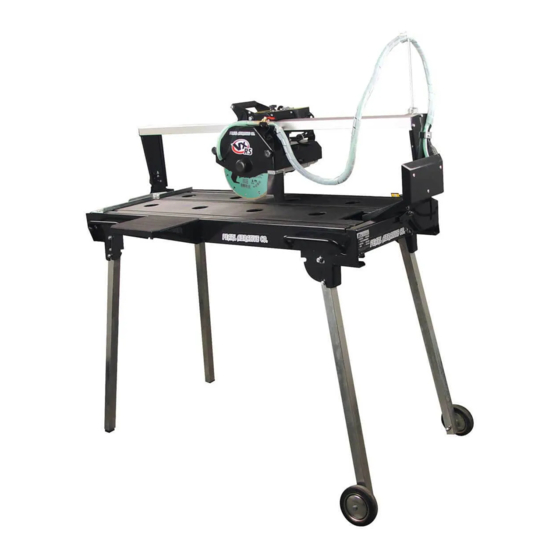
MODEL VX10RSPROR RAIL SAW
OWNER'S/OPERATOR'S MANUAL
RENTAL
Caution!
Read Safety and General Instructions carefully before using saw for the first time.
REV. 3
serial
number -
You should record the Serial Number of your saw on this
Owner's/Operator's Manual and on the Warranty Card.
The Warranty Card must be sent back with all the required
pertinent information for the warranty to take effect.
R
Patents Pending
Assembled in U.S.A.
Advertisement
Table of Contents

Subscribe to Our Youtube Channel
Related Manuals for Pearl VX RSPRO R


Summary of Contents for Pearl VX RSPRO R
- Page 1 MODEL VX10RSPROR RAIL SAW OWNER’S/OPERATOR’S MANUAL RENTAL serial number - You should record the Serial Number of your saw on this Owner’s/Operator’s Manual and on the Warranty Card. The Warranty Card must be sent back with all the required pertinent information for the warranty to take effect. Caution! Read Safety and General Instructions carefully before using saw for the first time.
-
Page 2: Table Of Contents
i. TABLE OF CONTENTS PAGE GENERAL SAFETY RULES AND PRECAUTIONS ......3 iii. SILICA DUST WARNING . -
Page 3: General Safety Rules And Precautions
ii. GENERAL SAFETY RULES AND PRECAUTIONS WARNING! Read all instructions. As with all machinery there are certain hazards involved with operation and use of the machine. The following basic safety precautions should be followed at all times to reduce the risk of fire, electric shock and serious personal injury to you or others. Keep these important operating instructions with this product. - Page 4 21. Extension cords. Make sure your extension cord is in good condition. When using an extension cord, be sure to use one heavy enough to carry the current your product will draw. An undersized cord will cause a drop in line voltage resulting in loss of power and overheating. If in doubt, use the next heavier gage. The smaller the gage numbers the heavier the cord.
-
Page 5: Silica Dust Warning
NIOSH website at http://www.cdc.gov/niosh/topics/respirators Observe OSHA regulations for respirator use (29 C.F.R.§1910.134). Visit http://www.osha.gov for more information. iv. FEATURES The Pearl VX10RSPRO is a professional saw for cutting tiles, paving stones, large-sized natural stones, and similar materials. Position lock cutting head... -
Page 6: Specifications
v. SPECIFICATIONS VX10RSPRO RAIL SAW BLADE CUTTING CUTTING DIMENSIONS* MOTOR WEIGHT CAPACITY LENGTH DEPTH (legs folded) 1-1/2 HP 8"-10" Blade 46" rip cut, 8": 1-1/2" 172 lbs. L: 60" 5/8" arbor blade 32" diagonal 10": 2-5/8" W: 25" 115 v, 60 Hz, 3,450 rpm with plunge cut H: 24"... - Page 7 ASSEMBLY & SET-UP 5. Install the side extension table, side splash guard Remove the carton box cover by lifting the upper and back splash guard. cover. 6. Install the spring holder on top of the sliding rail to Locate the accessory box and open it. Obtain the two hold the power cable and the water hose.
- Page 8 SAW STAND ASSEMBLY Cutting head carriage knob FOLDING STAND 1. It is recommended that adjusting the folding leg be done by at least two people. 2. Remove the detachable wheel assembly and stow it on the frame. 3. Shift the cutting head away from the end of the frame where the leg is being adjusted.
-
Page 9: Blade Installation
vii. BLADE INSTALLATION WARNING! Disconnect Knurled the power plug before installing Nuts the blade onto the blade shaft. WARNING! Setting the blade too low may damage the cutting table and if set too high, the blade may grab the material being cut, causing damage and possibly injury. -
Page 10: Side Table & Splash Guard Installation
xi. OVERFLOW PLUG ix. SIDE TABLE & SPLASH INSTALLATION GUARD INSTALLATION Install the side table and splash guard as shown in A tube at the rear end of the saw filters the debris from the illustration to the side. Fasten the knobs/screws the water produced during the cutting operation. -
Page 11: Operating The Saw
xiii. OPERATING THE SAW 1. After you have made yourself familiar with the 1. Before starting the cut, the cutting head must be components of your saw, the machine has been fully raised. Be sure to grasp the plunge handle properly set up, the water tray is filled with water, extending from the blade guard. -
Page 12: Grounding Instructions
CUTTING DEPTH WARNING! Setting the blade too low The recommended cutting depth is 1/4" below the may damage the cutting table and if set too high, cutting table surface. The cutting clearance has been the blade may grab the material being cut, causing fixed from original design. - Page 13 8. Position of the Tile Saw. 10. Always use the Ground Fault Circuit Interrupter (GFCI) plug included with the saw. • To avoid the possibility of the appliance plug or receptacle getting wet, position the tile saw 11. The tile saw cord includes a 15-amp twist lock to one side of a wall-mounted receptacle to plug.
-
Page 14: Choosing The Right Blade
Choose the correct type of saw blade for the material to be cut and the required cutting depth. THE RIGHT BLADE DOES THE RIGHT JOB For the most effective cutting and blade life always use the recommended Pearl Abrasive Co. blade. APPLICATION PEARL... -
Page 15: Electric Motor Specifications
xvi. ELECTRICAL MOTOR SPECIFICATIONS Horse Power 1-1/2 hp Recommendations: Volts 115 V/ 60hz • It is recommended that a 20 amp circuit be used while operating this saw. Amps 15 amps This will prevent possible power interruption or loss. Motor RPM 3,450 rpm •... -
Page 16: Care And Maintenance
xviii. CARE AND MAINTENANCE WARNING! For your safety before performing any maintenance on the saw, turn off the power switch and unplug the power cord. GENERAL RULES AFTER WET CLEANING AND BEFORE USING THE SAW AGAIN: • Always clean the machine before maintenance/ repair. •... -
Page 17: Water Pump Maintenance
xix. WATER PUMP MAINTENANCE For your safety before performing any maintenance on the saw, turn off the power switch and WARNING! unplug the power cord. When the machine has not been used for a long period 5. The fan can be removed by using pliers to pull it of time, hard packed dirt may begin to build up inside off. - Page 18 xx. ALIGNMENT INSTRUCTIONS (cont.) METHOD 2: BRIDGE bolts enough that the lower sub-assembly can move, changing the blade shaft's orientation. The 1. Loosen the bolts that secure the bridge (Fig. 2). fourth bolt is the pivoting bolt and does not have DO NOT REMOVE THE BOLTS AS THE BRIDGE to be loosened.
-
Page 19: Troubleshooting
xxi. TROUBLESHOOTING PROBLEM POSSIBLE CAUSE SOLUTION - Power cord not properly - Check that the machine is properly MACHINE DOES NOT RUN WHEN fixed/plugged in. connected to the power supply. SWITCHED ON - Power cord defective. - Have the power cord checked, replace if necessary. -
Page 20: How To Order Parts
Pearl reserves the right to discontinue products at any time without notice. All illustrations displayed in this manual are the property of Pearl Abrasive Co. and shall not be duplicated or reproduced without the express written consent of Pearl Abrasive Co. -
Page 21: Replacement Parts List
xxiv. REPLACEMENT PARTS LIST MAIN ASSEMBLY PART NAME PART NUMBER CR1080S PACR1080S M12 x 1.75 Nut PA102728 M6 x 1.0 x 10L Wing screw PA4294 M6 x 1.0 Female knob PA0610041 10" Inner flange PA103832 10" Outer flange PA103834 Water Pump PA103831 Splash guard PA103905... - Page 22 FRAME ASSEMBLY PART NAME PART NUMBER PART NAME PART NUMBER Frame weldment - Black PA103891 20 Cable clamp PA102719 Post A - Black PA103893 21 M4 x 0.7 x 10L Cross screw PA0353 Post B - Black PA103895 22 Safety pin with chain PA42148 (5/16)M8 x 25 x 1.8 Washer (electroplated) PA150119...
- Page 23 CUTTING HEAD ASSEMBLY PART NAME PART NUMBER PART NAME PART NUMBER Cutting head weldment - Black PA103874 21 M4 x 0.7 x 25L Cross screw PA103884 1.5HP Electric motor - KWW105 PA103876 22 Female M10 X 1.5 Knob PA102746 Rail carriage assembly - Black PA103877 23 M6 x 1.0 x 30L Knob PA102739...
- Page 24 BLADE GUARD PART NAME PART NUMBER Outer blade guard weldment - Black PA103868 Plastic male 5/16" x male 5/16" barbed straight valve PA00001JI 12D 8d X 120L Reinforced water hose PA103870 12D 8d X 180L Reinforced water hose PA103871 12D 8d X 2430L Reinforced water hose PA103872 Splash guard PA140275...
- Page 25 CUTTING HEAD SUB-ASSEMBLY PART NAME PART NUMBER Carriage B weldment - Black PA103886 Concentric flat roller PA103800 Eccentric flat roller PA103801 Eccentric flat rolle PA102745 Slide handle with rubber sleave PA102732 Carriage A weldment - Black PA103803VX M8 x 18 x 1.8T Wide washer PA230166 M8 Spring lock washer PA0121...
- Page 26 PART NAME PART NUMBER Lower power switch assembly - Rental PA103927 Upper power switch assembly PA103837 M 4 X 1.59 X 12L Cross tapping screw PA130038 Switch box upper housing PA103838 Reset button boot S1000-04.1 Toggle Switch Boot S1000-03.2 Power switch shield / Toggle Switch Safety Bracket PA100003 15A/125V Toggle switch with rubber boot S1000-03...
- Page 27 NOTES: – 27 –...
- Page 28 4900 ZAMBRANO ST., COMMERCE, CA 90040 FAX 562-927-5561 / 562-928-3857 PHONE 800-969-5561 www.pearlabrasive.com GEORGIA • USA ONTARIO • CANADA 3950 STEVE REYNOLDS BLVD., 375-2 PIDO ROAD NORCROSS GA 30093 PETERBOROUGH, ONTARIO K9J-6X7 ©2020 PEARL ABRASIVE CO., COMMERCE CA 90040 • 03/20...
Need help?
Do you have a question about the VX RSPRO R and is the answer not in the manual?
Questions and answers