Table of Contents
Advertisement
Quick Links
MODEL VX10.2XLPROR TILE SAW
Owner's/OperatOr's Manual
RENTAL
Caution!
Read Safety and General Instructions carefully before using saw for the first time.
REV. 2
serial
number -
You should record the Serial Number of your Tile Saw on this
Owner's/Operator's Manual and on the Warranty Card. The Warranty
Card must be sent back with all the required pertinent information
for the warranty to take effect.
Covered by one or more of the following US Patents:
6,080,041; 6,119,676; 6,272,990; 6,460,533; and D458,282
R
Advertisement
Table of Contents

Subscribe to Our Youtube Channel
Related Manuals for Pearl VX10.2XLPROR


Summary of Contents for Pearl VX10.2XLPROR
- Page 1 MODEL VX10.2XLPROR TILE SAW Owner’s/OperatOr’s Manual RENTAL serial number - You should record the Serial Number of your Tile Saw on this Owner’s/Operator’s Manual and on the Warranty Card. The Warranty Card must be sent back with all the required pertinent information for the warranty to take effect.
-
Page 2: Table Of Contents
TABLE OF CONTENTS page general safety rules fOr all pOwer tOOls ....... 3 syMbOls . -
Page 3: General Safety Rules For All Power Tools
i. GENERAL SAFETY RULES FOR ALL POWER TOOLS W RNING! Read all instructions. As with all machinery there are certain hazards involved with operation and use of the machine. The following basic safety precautions should be followed at all times to reduce the risk of fire, electric shock and serious personal injury to you or others. -
Page 4: Symbols
21. Extension cords. Make sure your extension cord is in good condition. When using an extension cord, be sure to use one heavy enough to carry the current your product will draw. An undersized cord will cause a drop in line voltage resulting in loss of power and overheating. Extension cord tables (refer to page 21) show the correct size to use depending on cord length and nameplate ampere rating. -
Page 5: Features
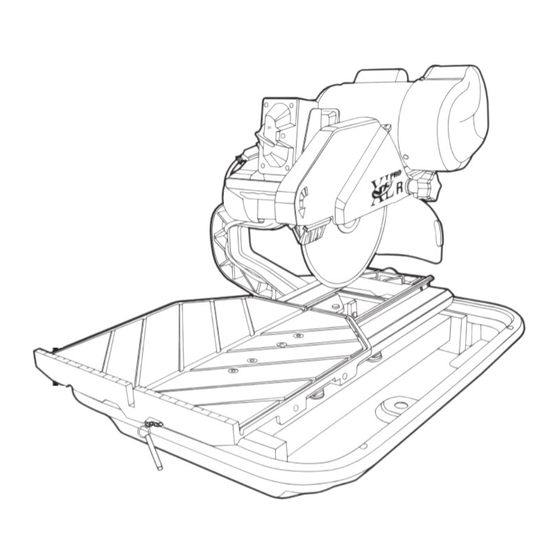
FEATURES The Pearl VX10.2XLPROR is a portable professional tile saw. Lightweight and compact it has innovative built in features that enable it to cut larger format tiles. The unique main table allow the saw to increase its cutting capacity when needed. -
Page 6: Getting To Know Your Saw
v. GETTING TO KNOW YOUR SAW Power Switch Motor Assembly Vertical Arm Assembly Blade Guard Adjustment Knob 45º/90º Rip Guide Blade Guard Diamond Blade Carriage Assembly Water Tray Lock Pin Main Table Assembly Roller Kit FRONT Drip Tray Blade Wrench –... -
Page 7: Blade Installation
vi. BLADE INSTALLATION 1. Carefully raise the cutting head to its highest WARNING: Setting the blade too low may position and secure it into place by tightening damage the cutting table and if set too high, the cutting head adjustment knob in the rear the blade may grab the material being cut, support. - Page 8 Do not operate any saw without Blade dressing stones are available from your local Pearl safety guards in place or with a blade diameter Warehouse. larger than the maximum saw blade capacity. 14. Before using the saw fill the water tub enough 8.
-
Page 9: Grounding Instructions
viii. GROUNDING INSTRUCTIONS GFCI plug Cover of grounded outlet box Metal Screw Grounding Means (Lug) Grounding pin Grounding pin Figure 2 1. Always use the included GFCI plug. 2-pole receptacle, as shown in Figure 2(B), if a properly grounded outlet is not available. The 2. -
Page 10: Using The Cutting Table
3. Simply line-up the material being cut with the appropriate pre-marked lines on the cutting Figure 4 table surface. Cutting large tile 4. Now you are ready to make your cut. VX10.2XLPROR can cut a 24" tile and diagonally cut a 18" tile. – 10 –... -
Page 11: Care And Maintenance
W RNING! For your safety before performing any maintenance on the saw turn off the power switch and unplug the power cord. The Pearl VX10.2XLPROR requires very little directly below adjuster. See Figure 5. maintenance however, keeping your saw clean and C. - Page 12 4 hex-screws Figure 9 Attaching Drip Tray to Tub screw Figure 6 Table roller adjustment STEP 5. Aligning the Blade to the Table • While cutting, the material being cut must move in a straight line parallel to the saw blade.
-
Page 13: Bearing Housing Replacement
8. Connecting the Water Pump A. Attach the provided adapter to the water Figure 11 pump. B. Hand tighten the adapter. Do not use a Water tubing wrench as it can strip the thread. C. Connect the clear tubing to the male Adapter section of the adapter until it fits securely See Figure 11. -
Page 14: Belt Replacement
5. Carefully nudge the motor slightly forward, so there is a little slack in the belt. Figure 13 6. Take off the old belt and replace with new belt. xiv. REPLACEMENT PARTS LIST vX10.2XlprOr vertical arM asseMbly PART NAME PART NUMBER Arm, Vertical V380101-MA Mount, Motor 10”... - Page 15 MOtOr asseMbly 21 20 19 PART NAME PART NUMBER PART NAME PART NUMBER Power Cable PSV10010R 20 Switch Box Cover with Gasket PSV0002LR Motor Fan Cover PSV10011 21 Toggle Switch PSV00001R 2A Motor Fan PSV10034 22 Circuit Breaker PSV10024...
- Page 16 Main asseMbly PART NAME PART NUMBER Base Assembly V31000 Carriage Assembly (Complete) V31100SS Table Assembly V380000-M Washer, Flat: .375 SAE V3809 Hex Bolt, Grd. 5 Min., .375 - 16UNCx3 V3806 Hex Bolt, Grd. 5 Min., .375 - 16UNCx3.5 V3807...
- Page 17 PART NAME PART NUMBER Table Plan V380001-MA Mount, Roller V31014-MA Spacer, Roller V31004-MA 4A Complete Metal Roller V31003-SPM Washer, Coined V31005-MA Nut Plate, Table V31015-MA PVC Roller V31003 Bolt 1/4''-20UNCx32L V03051 Flat Head Socket, .25-20x1.5 V3815 Set Screw, .25-20x1.25 V3816 10 Screw 1/4''-20UNCx27.5L...
-
Page 18: Base Assembly
PART NAME PART NUMBER 1A Complete Metal Roller V31003-SPM Bolt 1/4''-20UNCx32L V03051 Washer, Coined V31005-MA Spacer, Roller V31004-MA Metal Roller V31003M (use only with stainless steel rails) Base, Sub-Assembly V31000 Rubber Feet for Frame V310010 (set of four) -
Page 19: Accessories And Parts
xv. ACCESSORIES AND PARTS Optional Name (Qty.) Extension Table (1) Part Number V38008 Name (Qty.) Stainless Steel Water Tray (1) Name (Qty.) Drain plug not included GFCI (1) Part Number Part Number V35012SS V35018-REV.A Name (Qty.) Name (Qty.) Drip Tray (1) Extension Cord (1) Part Number Part Number... -
Page 20: The Right Blades Does The Right Job
Pearl reserves the right to discontinue products at any time without notice. All illustrations displayed in this manual are the property of Pearl Abrasive Co. and shall not be duplicated or reproduced without the express written consent of Pearl Abrasive Co. -
Page 21: Electrical Motor Specification
ELECTRICAL MOTOR SPECIFICATION Recommendations: VX10.2XLPROR • It is recommended that a 15 amp circuit be Horse Power 2 hp used while operating this saw. This will Volts 115 V/ 60hz prevent possible power interruption or loss. Amps 15 amps •... -
Page 22: Troubleshooting
NO WATER FLOW TO BLADE. Check the water feed tube weight abrasive building block to expose fresh diamonds. for kinks or obstructions. Check the inlet screen to ensure Blade dressing stones are available from your local Pearl it is not clogged. Remove the pump inlet and turn the Warehouse. - Page 23 – 23 –...
- Page 24 CORPORATE OFFICE: SO. CALIFORNIA • USA 6832 E. SLAUSON AVENUE, COMMERCE, CA 90040-0031 562-927-5561 • FAX 562-928-3857 Toll Free: 800-969-5561 www.pearlabrasive.com GEORGIA • USA ONTARIO • CANADA 4963 SOUTH ROYAL ATLANTA DRIVE 375-2 PIDO ROAD TUCKER, GA 30084-5024 PETERBOROUGH, ONTARIO K9J-6X7 Part No.
Need help?
Do you have a question about the VX10.2XLPROR and is the answer not in the manual?
Questions and answers