
Subscribe to Our Youtube Channel
Related Manuals for Moore Industries SPA2


Summary of Contents for Moore Industries SPA2
- Page 1 June 2004 Programmable Current/Voltage 224-790-00A Limit Alarm Trips HLPRG All product names are registered trademarks of their respective companies.
- Page 2 (HLPRG) Quickstart Guide Use the front pushbuttons to quickly and easily set- up the SPA for your application. After programming your alarm using the diagram below, install the unit into your application using the connection diagrams and terminal designation table located in this manual.
-
Page 3: Table Of Contents
Table of Contents Introduction ....................5 About This Manual ......................5 Model and Serial Numbers ..................... 5 Inputs ..........................5 Outputs ..........................5 Options ..........................5 Internal Settings ......................5 Specifications ....................6 Dimensions ........................7 Configuration: Front Panel Pushbuttons ........10 Main Menu/View Menu .................... - Page 4 Configuration: PC Configuration Software ........30 Installing the Configuration Software ................30 Connecting the SPA to the PC ..................30 PC Configuration Software Summary ............32 Status and Tool Bar Legend ..................33 Configuration Screens ................33 Input ..........................33 Display ..........................
-
Page 5: Introduction
Programmable Current/Voltage Limit Alarm Trips Outputs Introduction This is the user’s manual for Moore Industries’ SPA Alarms (HLPRG): Programmable Current/Voltage Limit Alarm. The SPA can be ordered with two (-2PRG) or four The instrument is configured using a combination of (-4PRG) contact closure alarms. -
Page 6: Specifications
Programmable Current/Voltage Limit Alarm Trips Specifications Performance Alarm Trip Repeatability: Performance Power Consumption: Ambient Ambient Temperature Current inputs, ±2 (continued) 3.5W max. (24DC supply); Conditions Effect: Current, 2 microamps (0.01% of 4W max. (UAC supply); microamps/°C; Voltage, (continued) 20mA span); Voltage 6W max. -
Page 7: Dimensions
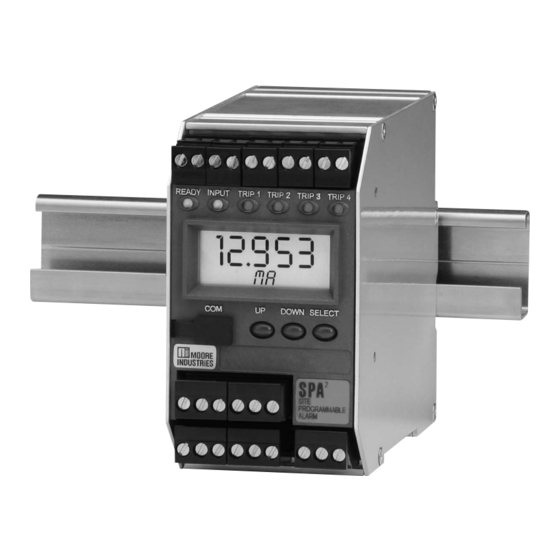
Programmable Current/Voltage Limit Alarm Trips Figure 1. SPA (HLPRG) Dimensions 138mm WHEN INSTALLED (5.43 in) 133mm WHEN INSTALLED (5.24 in) 55mm 126mm (2.17 in) (4.97 in) READY INPUT TRIP 1 TRIP 2 TRIP 3 TRIP 4 52mm (2.05 in) 100mm (3.94 in) DOWN SELECT... - Page 8 Programmable Current/Voltage Limit Alarm Trips Table 2. SPA (HLPRG) Terminal Designations Top Terminals (Left to Right) Input Type -Io Source Current Input +Io Source -Io Sink Used +Io Sink -Io Source Voltage Input +Io Source Used +Io Sink -Io Sink Middle Terminals (Left to Right) Output Type 2PRG...
- Page 9 Programmable Current/Voltage Limit Alarm Trips Figure 3. SPA (HLPRG) Hook-Up Diagram For Front Panel Configuration VOLTAGE SOURCE CURRENT SOURCE 2-WIRE TRANSMITTER READY INPUT TRIP 1 TRIP 2 TRIP 3 TRIP 4 DOWN SELECT SITE PROGRAMMABLE ALARM AC OR DC POWER SUPPLY The Interface Solution Experts...
-
Page 10: Spa 2 Configuration: Front Panel Pushbuttons
Programmable Current/Voltage Limit Alarm Trips Configuration: Password This menu is bypassed if the Password Security Front Panel Pushbuttons Jumper is not installed. If the jumper is installed, the menu comes up when SELECT is pressed from the The SPA (HLPRG) operating parameters may be set display of the process variable input. - Page 11 Programmable Current/Voltage Limit Alarm Trips Figure 4. Main Menu and Password Menu U = UP Key D = DOWN Key SEL = SELECT Key U = No action D = No action PW = Password CONFG READY INPUT TRIP 1 TRIP 2 TRIP 3 TRIP 4 CONFG INPUT INPUT...
- Page 12 Programmable Current/Voltage Limit Alarm Trips Figure 5. View Menu *If set as a: READY INPUT TRIP 1 TRIP 2 TRIP 3 TRIP 4 • TRIP alarm, trip point value is displayed along with an "H" (high alarm) or an "L" (low alarm), depending upon configuration DOWN SELECT...
-
Page 13: Configuring The Input
Programmable Current/Voltage Limit Alarm Trips Configuring the Input Figure 6. CONFG INPUT Menu Figure 6 gives an overview of the Input Configuration menu. Use the UP and Down buttons If the Password Jumper is not installed, the password to cycle through the lists sub-menu is bypassed, and the “CONFG INPUT”... -
Page 14: Configuring The Options
Programmable Current/Voltage Limit Alarm Trips Caution: Configuring the Options Moore Industries does not recommend use of Figure 7 gives an overview of the Options broken wire detecton if using a voltage input on the Configuration menu. . Various factors may hinder the unit’s... - Page 15 Programmable Current/Voltage Limit Alarm Trips Figure 7. CONFG OPTNS Menu **When FROM PC is selected, CONFG the actual text is input from the OPTNS PC Configuration Program. The display shows the PC default ("*****") until the proper EGU is downloaded from the PC program. TOGGLE DSPLY *NORM/...
-
Page 16: Scaling The Input
Programmable Current/Voltage Limit Alarm Trips Scaling the Input Figure 8. SCALE INPUT Menu Figure 8 gives an overview of the Input Scaling menu. NOTES: 1. When scaling the input, the value Scaling allows you to take your PV (Process Variable) displayed represents the actual input. -
Page 17: Applying Input (Bench Scaling)
Programmable Current/Voltage Limit Alarm Trips Applying Input (Bench Scaling) Input Trimming Figure 9 gives an overview of the Apply Input menu. Figure 10 gives an overview of the Input Trimming menu. With Bench Scaling, also called “Standard Ranging”, inputs are “captured” at their zero and full scale levels Input trimming increases the measurement accuracy using external, calibrated equipment. - Page 18 Programmable Current/Voltage Limit Alarm Trips Figure 10. TRIM INPUT Menu TRIM INPUT FCTRY TRIM TRIM USER 1 PNT MODE USER 2 PNT If Factory Trim If USER 1 or 2 PNT XXXXX TRIM XXXXX APPLY ZERO (ZERO) If USER 1PNT If USER 1PNT If USER 2PNT XXXXX...
-
Page 19: Configuring The Analog Output (-Ao Option)
Programmable Current/Voltage Limit Alarm Trips Configuring the Analog Output Damping– Output Damping allows you to introduce a delay (0-30sec) into the response (-AO Option) of your unit in order to stop momentary input Figure 11 gives an overview of the Analog Output variations from setting off alarms. -
Page 20: Scaling The Analog Output (-Ao Option)
Programmable Current/Voltage Limit Alarm Trips Scaling the Analog Output Figure 12. SCALE AOUT Menu (-AO Option) NOTES: 1. When setting zero and full values, Figure 12 gives an overview of the Analog Output the values displayed are the analog output. Scaling menu. -
Page 21: Trimming The Analog Output (-Ao Option)
Programmable Current/Voltage Limit Alarm Trips Figure 13. TRIM AOUT Menu Trimming the Analog Output (-AO Option) TRIM Figure 13 gives an overview of the Analog Output AOUT Trimming menu. Output trimming increases the measurement accuracy of the SPA by calibrating its analog output to the device that is receiving the output. - Page 22 Programmable Current/Voltage Limit Alarm Trips Figure 14. SPA (HLPRG) Trimming Hook-Up Diagram For Front Panel Configuration VOLTAGE SOURCE CURRENT SOURCE 2-WIRE TRANSMITTER READY INPUT TRIP 1 TRIP 2 TRIP 3 TRIP 4 DOWN SELECT SITE PROGRAMMABLE ALARM AC OR DC POWER SUPPLY HOOK-UPS FOR OUTPUT TRIMMING...
-
Page 23: Configuring The Alarm(S)
Programmable Current/Voltage Limit Alarm Trips Press SELECT at “ENTER DELAY” and input Configuring the Alarm(s) your desired delay time by using the UP and The SPA offers you four alarms. Each of these DOWN buttons. alarms may be configured as trip, fault or rate of change alarms. - Page 24 Programmable Current/Voltage Limit Alarm Trips Figure 15. CONFG ALARM MENU (Trip Alarm) NOTES: 1. Smart Ranging skips standard ranging and goes to dead band. 2. Input flashing during standard ranging. ALARM TRIP ALARM CONFG FAULT TYPE ALARM If TRIP ENTER XXXXX TRIP (Smart Ranging)
- Page 25 Programmable Current/Voltage Limit Alarm Trips “INPUT FAULT” appears. Press SELECT at “INPUT FAULT” appears. Select whether or “INPUT FAULT”. Dependent upon whether you not to enable the input failure alarm by using the UP and DOWN buttons; press SELECT . wish the alarm activated due to an input fault, use the UP and DOWN buttons to scroll “EXIT ALARM X”* appears.
- Page 26 Programmable Current/Voltage Limit Alarm Trips Figure 16. CONFG ALARM Menu (Fault Alarm) CONFG ALARM ALARM ALARM TRIP TYPE FAULT If FAULT INPUT TOGGLE CONFG FAULT ALARM1 ON/OFF INPUT TOGGLE CONFG ON/OFF ALARM2 TOGGLE FAULT CONFG ON/OFF ALARM3 ENTER DELAY CONFG ALARM4 TOGGLE LATCH...
- Page 27 Programmable Current/Voltage Limit Alarm Trips Rate of Change Alarm Configuration Note: When configuring a Rate of Change alarm, “LATCH Figure 17 gives an overview of the Rate of Change ON” must be selected in the “SET LATCH’” menu. Alarm configuration menu. At the “SET LATCH”...
- Page 28 Programmable Current/Voltage Limit Alarm Trips Figure 17. CONFG ALARM Menu (Rate of Change Alarm) CONFG ALARM ALARM ALARM CONFG TRIP TYPE ALARM1 FAULT If ROC ENTER CONFG XXXXX DELTA ALARM2 ENTER TIME CONFG ALARM3 TOGGLE LATCH LATCH OFF/ CONFG LATCH ON ALARM4 TOGGLE FSAFE...
-
Page 29: Password Configuration
Programmable Current/Voltage Limit Alarm Trips Figure 18. CONFG PASWD Menu Password Configuration Figure 18 gives an overview of the Password Configu- ration menu. NOTES: 1. The Password menu is accessible The password menu is accessible only when the only when the security jumper security jumper is not installed (Figure 2) or when the is not installed or when the password is entered correctly. -
Page 30: Installing The Configuration Software
No Alarm Needed instrument, or use a PC and Moore Industries' Intelli- It is not necessary to connect the SPA to a PC to gent PC Configuration software. - Page 31 Programmable Current/Voltage Limit Alarm Trips Figure 19. SPA (HLPRG) Hook-Up Diagram For PC Configuration VOLTAGE SOURCE CURRENT SOURCE 2-WIRE TRANSMITTER READY INPUT TRIP 1 TRIP 2 TRIP 3 TRIP 4 DOWN SELECT SITE PROGRAMMABLE ALARM AC OR DC POWER SUPPLY The Interface Solution Experts...
-
Page 32: Pc Configuration Software Summary
Programmable Current/Voltage Limit Alarm Trips PC Configuration Software Summary Figure 20. SPA (HLPRG) Main PC Screen Once the default configuration has been saved to disk, You may also use the Quick Set feature to set these it is safe to program other parameters. The PC features and download them. -
Page 33: Status And Tool Bar Legend
Programmable Current/Voltage Limit Alarm Trips 11. Analog Output Tab– Configuration of the analog Configuration Screens output (if your instrument is equipped with the -AO option) is performed here. Refer to the Analog Output Note: section for a complete description. Unless otherwise noted, ensure that the PC Program is idle before making any selections or configuration 12. -
Page 34: Display
Programmable Current/Voltage Limit Alarm Trips Note: Running Average Filter Settings– This function is Once you have configured all parameters, download for filtering the input signal. The SPA provides this to the unit by selecting “Download” in the Transfer filter with a user-selected range between 1 and 16. dropdown menu located in the Status Bar. -
Page 35: Alarms
Programmable Current/Voltage Limit Alarm Trips Precision– Select the number of decimal places/ Rate of Change– Used if you wish to be notified when resolution of your display. deviations occur outside of ranges you have set. Display– Indicates the same reading as viewed on the SPA ’s LCD when the unit is in monitor mode. - Page 36 Programmable Current/Voltage Limit Alarm Trips Manual Reset Fault Alarm A latching alarm requires a manual reset. There are The Fault Alarm enables the fields outlined below. two connections labeled “MR” on the SPA top termi- nal block. These terminals work in conjunction with Select the type of Fault Alarm you require in the latching alarm function.
-
Page 37: Analog Output
Programmable Current/Voltage Limit Alarm Trips Rate of Change Alarm Analog Output The fields below must be configured in order to set up your Rate of Change Alarm properly. The alarm will be Figure 24. Analog Output (-AO) Tab set according to the rate of change of the process variable over a set time period. - Page 38 Programmable Current/Voltage Limit Alarm Trips Figure 25. SPA (HLPRG) Trimming Hook-Up Diagram For PC Configuration VOLTAGE SOURCE CURRENT SOURCE 2-WIRE TRANSMITTER READY INPUT TRIP 1 TRIP 2 TRIP 3 TRIP 4 DOWN SELECT SITE PROGRAMMABLE ALARM AC OR DC POWER SUPPLY HOOK-UPS FOR OUTPUT TRIMMING EXTERNAL...
- Page 39 Programmable Current/Voltage Limit Alarm Trips Note: Output Test– This test may be performed in order to Once you have configured all parameters, download check output performance and accuracy and to trim to the unit by selecting “Download” in the Transfer other instruments in your setup.
-
Page 40: Scaling
Programmable Current/Voltage Limit Alarm Trips Scaling Note: Once you have configured all parameters, download to the unit by selecting “Download” in the Transfer Figure 26. Scaling Tab dropdown menu located in the Status Bar. Or, click button in the Tool Bar. You may also use the Quick Set feature to configure your Scaling parameters and download the settings. - Page 41 Programmable Current/Voltage Limit Alarm Trips Note: To create a custom curve: Once you have configured all parameters, download to the unit by selecting “Download” in the Transfer Click the “Enabled” box . dropdown menu located in the Status Bar. Or, Select the number of points for your curve (128 click the button in the Tool Bar.
-
Page 42: Error Codes
Programmable Current/Voltage Limit Alarm Trips Error Codes the microprocessor, or with conflicting operating parameter settings, the LCD will display an error code Every SPA is subjected to an exhaustive battery of upon unit start-up. operational checks and tests prior to its shipment. Occasionally, however, units can sustain damage Table 4 lists the error codes. -
Page 43: Installation
• Any Moore Industries product in a metal case or housing should be grounded. Factory phone numbers are listed on the back cover • The protective earth conductor must be of this manual. - Page 44 Date Fred Adt Robert Stockham Quality Assurance Director Moore Industries-Europe General Mgr. European Contact: Your Local Moore Industries Sales and Service Office United States • info@miinet.com Belgium • info@mooreind.be China • sales@mooreind.sh.cn Tel: (818) 894-7111 • FAX: (818) 891-2816 Tel: 03/448.10.18 • FAX: 03/440.17.97 Tel: 86-21-62491499 •...
- Page 45 4. Ship the equipment to the Moore Industries location nearest you. The returned equipment will be inspected and tested at the factory. A Moore Industries representative will contact the person designated on your documentation if more information is needed. The repaired equipment, or its replacement, will be returned to you in accordance with the shipping instructions furnished in your documentation.
- Page 46 The Netherlands • sales@mooreind.nl United Kingdom • sales@mooreind.com Tel: (02) 8536-7200 • FAX: (02) 9525-7296 Tel: (0)344-617971 • FAX: (0)344-615920 Tel: 01293 514488 • FAX: 01293 536852 © 2006 Moore Industries-International, Inc. Specifications and information subject to change without notice. 224-790-02A...
Need help?
Do you have a question about the SPA2 and is the answer not in the manual?
Questions and answers