Advertisement
Quick Links
YMDC2000 Series
Non Handed Door Closer
Regular Arm
Installation
See Page 2
Left Hand Door - LH
Right Hand Reverse - RHR
Parallel Arm
Installation
See Pages
Left Hand Door - LH
Right Hand Reverse - RHR
Installation
See Page 5
Left Hand Door - LH
Right Hand Reverse - RHR
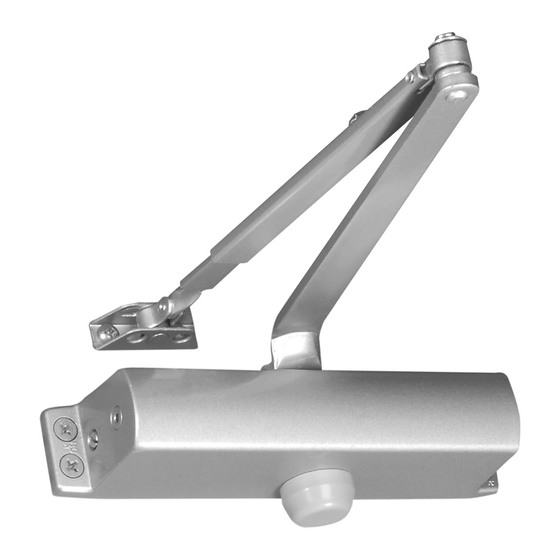
Backcheck Valve
Latch Valve
Closer
Body
Sweep Valve
Installation Instructions
80-9325-0025-010 (06-08)
!
Doors should be hung on ball bearing or
anti-friction hinges.
A separate door stop is recommended.
Door and frame must be properly
reinforced.
Always adjust spring power before
adjusting control.
Adjust closing time speed between 3 and 7
seconds from 90° to 0°. Greater closing
times may be required for elderly or
handicapped.
These door closers should
3 & 4
installed on the exposed side (weather
side) of exterior doors.
Installation must be in accordance with
American National Standard A115.
Top Jamb
Metal
#7
Power Adjustment Shaft
Parallel Arm
Bracket
A n I n c o r r e c t l y i n s t a l l e d o r
improperly adjusted door closer can
cause property damage or personal
injury. These installation instructions
should be followed to avoid the
possibility of misapplication or
misadjustment.
NOT
Wood
3/16"
* Pilot Hole
1/4-20
Required
Regular Arm/Top
Jamb Shoe
Connecting Rod
Main Arm
Closer Arm
Non Hold Open Models
Adjustable (Sizes 1 thru 6)
YMDC2501
Regular Arm
Installation
See Page 2
Parallel Arm
Installation
be
See Pages
3 & 4
Top Jamb
Installation
See Page 5
Self Drilling Screws
Wood and Metal
For Wood drill 3/16 hole
for Wood drill 7/32
Machine Screws
#7 Drill, 1/4-20 Tap
Insert Cutouts
Full Cover
Right Hand Door - RH
Left Hand Reverse - LHR
Right Hand Door - RH
Left Hand Reverse - LHR
Right Hand Door - RH
Left Hand Reverse - LHR
(Optional)
Sleeve Nut and Bolt
Drill 9/32 thru from Closer Side
3/8 Drill other Side
Thru Bolt and Grommet Nut
Drill 9/32 thru from Closer Side
3/8 Drill other Side
Cover
Insert
Screw Pack
Advertisement

Related Manuals for Yale YM Series


Summary of Contents for Yale YM Series
- Page 1 Installation Instructions 80-9325-0025-010 (06-08) A n I n c o r r e c t l y i n s t a l l e d o r improperly adjusted door closer can cause property damage or personal injury. These installation instructions should be followed to avoid the Non Hold Open Models YMDC2000 Series...
- Page 2 YMDC2000 Series Non Hold Open Door Closers — Regular Arm Mark and Drill Holes Parts 5-1/2 1-3/4 (140) (44) 1-3/8 (35) (19) (25.4) (304.8) Right Hand Shown Installation Sequence Inches Dimension "A" Opening (mm) 7-1/2 To 100° (191) Door/Wall/Hardware/Jamb 101° to 130° (152) conditions permitting 4-1/2...
- Page 3 YMDC2000 Series Non Hold Open Door Closers — Parallel Arm 80-9325-0025-010 (06-08) Parts 2-3/4 Mark and Drill Holes (70) (10) (51) 7/16 (13) (11) Installation Sequence Top of Door Frame 3-1/2 (89) (19) (304.8) Right Hand Shown Inches Door (mm) Opening Door/Wall/Hardware/Jamb 9-1/2...
- Page 4 Non Hold Open Door Closers — Parallel Arm YMDC2000 Series 80-9325-0025-010 (06-08) Open Valves Adjust Arm Sweep Right Hand Door Flat Left Hand Latch Door Flat Caution: Don't remove valves Sweep Arm Screw Spring Power Adjust (If necessary) Cover Latch Backcheck Install cover using screws provided.
- Page 5 YMDC2000 Series Non Hold Open Door Closers — Top Jamb Arm Parts Mark and Drill Holes (304.8) (19) Top of Frame 1-7/8 (38) (13) 1-3/4 5-1/2 (44) (140) Inches Door/Wall/Hardware/Jamb (mm) Right Hand Shown conditions permitting Installation Sequence Dimension "A" Opening 7-1/2 To 100°...
- Page 6 Yale® is a registered trademark of Yale Security Inc., an ASSA ABLOY Group company. Other products' brand names may be trademarks or registered trademarks of their respective owners and are mentioned for reference purposes only. These materials are protected under U.S. copyright laws. All contents current at time of publication. Yale Security Inc., an ASSA ABLOY Group company reserves the right to change availability of any item in this catalog, its design, construction, and/or its materials.