Table of Contents
Advertisement
Quick Links
RuiDa Technology Co., Ltd
Addr:
3th
floor,Technology
Avenue,Nanshan
Province,P.R.China
Tel:
0755--26066687
Fax:
0755--26982287
E-mail:
sales@rd-acs.com
Web:
www.rd-acs.com
SHENZHEN RUIDA TECHNOLOGY
Read this manual before operation
The content include of electric connections and operating steps
Read the manual to operate the systems
RDC7132G
Building,NO.,1067
District,Shenzhen
city,Guangdong
RDC7132G User manual V1.0
User manual V1.0
Nanhai
https://www.ruidacontroller.com
Advertisement
Table of Contents

Subscribe to Our Youtube Channel
Related Manuals for RuiDa RDC7132G


Summary of Contents for RuiDa RDC7132G
- Page 1 RDC7132G User manual V1.0 Read this manual before operation The content include of electric connections and operating steps Read the manual to operate the systems RDC7132G User manual V1.0 RuiDa Technology Co., Ltd Addr: floor,Technology Building,NO.,1067 Nanhai Avenue,Nanshan...
- Page 2 All rights reserved.You may not reproduce, transmit, store in a retrieval system or adapt thispublication, in any form or by any means, without the prior written permissionof RuiDa, except as allowed under applicable copyright laws. We have identifiedwords that we consider as trademarks. Neither the presence or absence oftrademark identifications affects the legal status of any trademarks.
- Page 3 RDC7132G User manual V1.0 CERTIFICATION DECLARATION The product has been certified by the CE (Commutate European) safety certification. It has passed the corresponding conformity assessment procedure and the manufacturer's declaration of conformity, in accordance with the relevant EU directive. ROHS This product has been certified by EU legislation (Restriction of Hazardous Substances) Safety certification;...
- Page 4 RDC7132G User manual V1.0 SAFETY INFORMATION When using this system, please make sure the operation is correct and the usage is safe. Some signs or text will be used to remind you to pay attention to the dangerous matters and some important information.
- Page 5 If any missing parts or damaged parts are found, please contact ruida technology immediately.Do not install or debug the equipment if any obvious damage is found.
-
Page 6: Table Of Contents
RDC7132G User manual V1.0 Contents Chapter 1 Installation Dimension........................ 1 1.1 Panel size............................2 1.2 Mainboard Size...........................3 Chapter 2 Electrical connection diagram of control system............... 4 2.1 Electrical connection diagram of control system................5 Chapter 3 Mainboard interface signal description..................6 3.1 Main power interface CN0......................... 7 3.2 U-disk interface.......................... - Page 7 RDC7132G User manual V1.0 4.3.10 IP setting..........................28 4.3.11 diagnose..........................29 4.3.12 Screen origin........................... 30 4.3.13 The axis reset.......................... 30 4.4 Alarm information..........................31 SHENZHEN RUIDA TECHNOLOGY...
-
Page 8: Chapter 1 Installation Dimension
RDC7132G User manual V1.0 Section 1 Installation Dimension CONTENTS: Panel size Mainboard Size SHENZHEN RUIDA TECHNOLOGY... -
Page 9: 1.1 Panel Size
RDC7132G User manual V1.0 1.1 Panel size All dimensions are in mm, accurate is 0.1mm (four positioning holes are symmetrical in position) Pic 1. 1 Panel size Mainboard Size All dimensions are in mm, accurate is 0.1mm (four positioning holes are symmetrical in... -
Page 10: Mainboard Size
RDC7132G User manual V1.0 position) PIC 1. 2 Mainboard Size SHENZHEN RUIDA TECHNOLOGY... -
Page 11: Chapter 2 Electrical Connection Diagram Of Control System
RDC7132G User manual V1.0 Section 2 Electrical connection diagram of control system CONTENTS: Electrical connection diagram of control system SHENZHEN RUIDA TECHNOLOGY... -
Page 12: Electrical Connection Diagram Of Control System
RDC7132G User manual V1.0 2.Electrical connection diagram of control system Electrical connection diagram of control system SHENZHEN RUIDA TECHNOLOGY... -
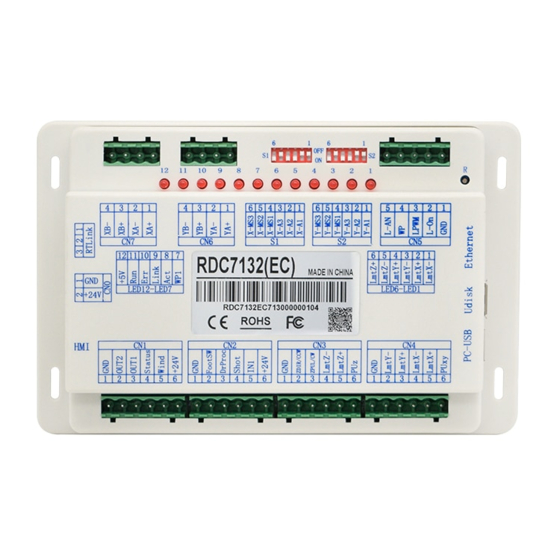
Page 13: Chapter 3 Mainboard Interface Signal Description
RDC7132G User manual V1.0 Section3 Mainboard interface signal description CONTENTS: Main power interface CN0 U-disk interface PC-USB interface RTLink@ Interface Ethernet Interface HMI Interface General/Dedicated output IO port CN1 General/Dedicated input IO port CN2 Limit input interface Laser power control... -
Page 14: Main Power Interface Cn0
RDC7132G User manual V1.0 Main power interface seri definition number Power source (input) +24V Power positive (input) The control system adopts a single 24V power supply, and it is recommended to use more than 24V/6A power supply to keep a certain margin. -
Page 15: General/ Dedicated Output Io Port Cn1
RDC7132G User manual V1.0 General/ Dedicated output IO port CN1 General/ dedicated output definition symbo definition Power source (output) Out2 General output, Reserved Out1 General output, Reserved Status Dedicated output, working status signal port (or second pen signal). When it is a working state signal, if the port is connected to the relay externally, the relay coil will be switched on when it is working, and there will be no impact when the work is suspended. -
Page 16: Limit Input Interface
RDC7132G User manual V1.0 pedal switch stepping down and the first stepping down is less than 100 milliseconds, the second pedal action is considered invalid by the mainboard. DrProc Dedicated input, protection signal input, if the machine needs to be protected in a specific state (such as open cover protection), the protection signal is input from this pin. -
Page 17: Laser Power Control Interface Cn5
RDC7132G User manual V1.0 the limit position, the high voltage signal will be triggered or the limit signal will be disconnected, and the limit indicator will be off. Then the limit polarity will be negative. On the contrary, if the moving axis is close to the limit, the corresponding indicator light goes off, and the corresponding indicator light goes on when leaving the limit, the limit polarity is positive. -
Page 18: Y/X Axis Motor Interface Cn6/Cn7
RDC7132G User manual V1.0 3.11 Y/X axis motor interface CN6/CN7 Same with the X/Y motion axis interface, take the X axis interface for example. symbol definition 1 XA+ Motor X - axis Positive phase A 2 XA- Motor X - axis negative phase A... - Page 19 RDC7132G User manual V1.0 Subdivision Presets subdivision 1600 3200 6400 Suitable driving current and subdivision are selected for different motors. It is recommended to use 3200 subdivision current of 1.22a. SHENZHEN RUIDA TECHNOLOGY...
-
Page 20: Chapter 4 Man-Machine Interface Operation Instructions
RDC7132G User manual V1.0 Section 4 Man-machine interface operation instructions CONTENTS: Operation panel and key function introduction Main interface and function introduction FN Key menu Alarm information SHENZHEN RUIDA TECHNOLOGY... -
Page 21: Operation Panel And Key Function Introduction
RDC7132G User manual V1.0 Operation panel and key function introduction 4.1.1 operation panel 4.1.2 Key function introduction "Reset" key: reset the mainboard "Stop" button: used in the process of stop the work "Start/pause" : start work or stop/restart work... -
Page 22: Main Interface And Function Introduction
RDC7132G User manual V1.0 "Origin" key: set the positioning point "Frame" key: operate the border of the current processing file "Pulse" key: laser tube pulse "Exit" key: used to stop work, close menu, cancel Settings, etc ... - Page 23 RDC7132G User manual V1.0 Processing parameter display area Graphic Coordinat display area e display area Layer parameter area Processi ng bar 图 Processing The quantity working 4.2-1 stat file border size of processing condition Graphics display area: this area is used for preview display of files and painting of ...
-
Page 24: Menu Key
RDC7132G User manual V1.0 Network connection status: used to display the status of the motherboard connecting to the network. When the network communication is used and the connection is established, the area will display "connected"; otherwise, "not connected" will be displayed.。... -
Page 25: Max/Min Power Settings
RDC7132G User manual V1.0 4.2-3 Press "X+/-", the cursor will appear, move the cursor to the modified number, press "Y+/-" to modify the number, and the number will increase or decrease in cycles. After modification, press "ok" to save parameters, and press "exit" to cancel modifying parameters. The dialog box will disappear and return to the menu interface. -
Page 26: File Settings
RDC7132G User manual V1.0 4.2-5 The parameters can be modified by the "Y+/-" and "X+/-" keys. Setting parameter method can refer to speed setting. 4.2.5 File settings In the menu interface, select the "file" item and the following dialog box will pop up:... - Page 27 RDC7132G User manual V1.0 the file will be previewed on the main screen. The current file dialog box will be closed. To cancel the preview, press esc. Press the "X+/-" key to toggle back and forth between the list of files on the left and the item on the right with a light blue cursor, indicating that the list or item is activated for the convenience of the user.
-
Page 28: U Disk File
RDC7132G User manual V1.0 Preview the working time of the current file: preview the total working time of the current file. Clear all files: clear all processed files. Delete all files: Delete all memory files. Format memory: fast format memory. -
Page 29: Layer Parameter Settings
RDC7132G User manual V1.0 This system supports FAT32 and FAT16 file formats of usb flash drive, which can only be recognized by the system if the file is placed in the root directory of usb flash drive. File names with more than 8 characters will be automatically cut off by the system, and file names other than English and Numbers will not be displayed when copied to the main board. -
Page 30: 4.3 Fn Key Menu
RDC7132G User manual V1.0 "FN" to move the light blue square to the parameter entry to be modified. After setting the parameters, press "ok" to save the parameters, and the parameters will be take effect. If you do not press "ok" after modifying the parameters of this layer, the parameters will not be saved. -
Page 31: Continue Setting
RDC7132G User manual V1.0 4.3-2 Press "Y+/-" to select an entry. When the light blue cursor stops on the entry, press "ok" to enter the corresponding entry setting interface. 4.3.3 Continue setting Press ok when the light blue cursor is over the item, and the following dialog box pops up:... -
Page 32: Some Settings
RDC7132G User manual V1.0 4.3.4 Some Settings Press ok when the light blue cursor is over the item, and the following dialog box pops up: 4.3-4 Operate the same inching Settings. If the point shooting mode is "continuous", when the point shooting key is pressed, the laser will continue to emit light. - Page 33 RDC7132G User manual V1.0 4.3-5 Press "FN" to move the light blue cursor to the corresponding modification item. When the light blue square is on the registration point enable item, press "ok" to select or not to select the enable item. When the light blue cursor is in the set to anchor point and next anchor point entries, press the X+/- key to select.
-
Page 34: Set As The Factory Parameter
RDC7132G User manual V1.0 Anchor 1-4 enablement: when multiple anchor logic is enabled, four anchor points can be individually disabled and enabled. Once you select the setpoint logic, assuming that the next anchor point number is 1, and four anchor point all can make, is when to start the memory file (including keyboard start and PC start), or PC using direct output to start the work and choose the options "to the original site for the anchor point,"... -
Page 35: Restore Factory Parameters
RDC7132G User manual V1.0 4.3.7 Restore factory parameters When this entry is selected, the system overrides all current user and manufacturer parameters with the factory parameters previously setting. The operation method is the same as "set as the factory parameter". -
Page 36: Diagnose
RDC7132G User manual V1.0 4.3-8 Press "FN" to move the light blue light to the corresponding modification item. Press "X+/-" and "Y+/-" to modify the parameters. After modification, press "ok" to save the parameters. 4.3.11 diagnose Press ok when the light blue cursor is over the item, and the following dialog box pops up:... -
Page 37: Screen Origin
RDC7132G User manual V1.0 4.3.12 Screen origin Press ok when the light blue cursor is over the item, and the following dialog box pops up: 4.3-10 Here, the origin position of the display screen can be set. Select different origin positions to mirror the display graph in different X/Y directions. -
Page 38: Alarm Information
RDC7132G User manual V1.0 4.3-11 Press "Y+/-" to move the light blue square to the corresponding entry. Press "ok" to reset the relevant axis of the system, and the "reset" information will pop up on the interface. After the reset, the information will disappear automatically and return to the main interface. - Page 39 RDC7132G User manual V1.0 Thank you for your selection of our production! All the copyright of this manual is owned by Ruida technology. Any person or company can not copy upload and send the manual without Ruida’s permission. Content will be revised or modified. We will not send message to every users.
Need help?
Do you have a question about the RDC7132G and is the answer not in the manual?
Questions and answers