Advertisement
Available languages
Available languages
Quick Links
Advertisement

Related Manuals for Blueair Cabin P1


Summary of Contents for Blueair Cabin P1
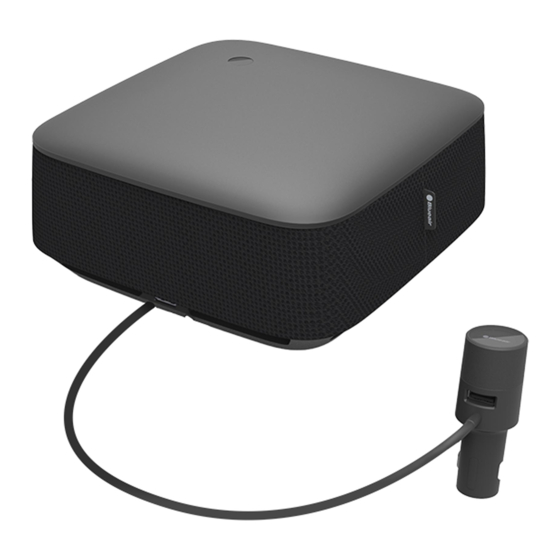
- Page 1 Blueair Cabin P1 Car Air Purifier User Manual 차량용 공기청정기 사용 설명서 車用空氣清淨機使用手冊...
-
Page 3: Table Of Contents
Blueair (including but not limited to those set out under this User Manual). You agree that you are solely responsible for your own conduct while using this product, and for any consequences thereof. -
Page 4: General
General Blueair Cabin P1 car air purifier The P1 air purifier is designed for use in cars, A control knob (also 12V power) enables the driver purifiying the air while the car is in use. to either change the fan speeds (3 speed options) or activate the Clean Cycle program. -
Page 5: Safety Instructions
Whilst operating the device, the driver must be aware of, and take into consideration the prevailing traffic conditions. Blueair declines all responsibility for personal harm or injury whilst using the product if the installation has not been carried out correctly or if the product is used incorrectly. - Page 6 Use only the mounting strap included in the box and ensure that the unit is se- curely fastened as specified. Blueair disclaims all liability for any harm or accident caused by improper installation, usage, disassembly and maintenance by any user or third party.
- Page 7 Do not alter the plug in any way. Do not use the unit if the power cable or plug is damaged or malfunctions in any manner. Keep the power cable away from heated surfaces. No foreign objects should enter the unit as this may cause an electric shock or damage.
-
Page 8: Blueair Cabin P1 Car Air Purifier
Blueair Cabin P1 car air purifier 1. Open and unpack the box IMPORTANT! 2. Read the User Manual Please note that the Particle+Carbon filter is not Please refer to www.blueair.com for more mounted inside the unit when purchased. The filter is information. -
Page 9: Filters
Tire wear Dander IMPORTANT! Use only genuine Blueair filters to ensure proper function of your unit and to qualify for full warranty coverage. Filter checklist To make it easy to find the right filter in the future, please fill in the customer record below and keep this user manual for reference. -
Page 10: Getting Started
Getting started 1. Remove the top cover 2. Install the filter 1. Place the purifier unit 1. Remove the plastic on a flat surface or car bag from around the seat and release the top filter and pull the two cover by pressing the left sides of the filter apart and right release locks IN... - Page 11 4. Attach the mounting strap Note: If placed behind a headrest, the strap should be attached around the supporting rods (or at the Thread the mounting bottom of the headrest), not in the middle of the strap through the unit headrest.
-
Page 12: Functionality
Functionality 1. General The car air purifier unit is controlled by pressing down the control knob to adjust the fan setting. Notes: 1. In order for the unit to clean the air optimally, please ensure that the car´s recirculation mode is active and any window or sunroof is closed. - Page 13 3. Turn on To turn the unit on When the unit is turned press once. on, the start up sequence begins and the fan is activated at Note: the same speed as the The unit must be last used setting. connected to the power supply port and powered up (i.e.
- Page 14 5. Clean Cycle program The Clean Cycle program starts automatically with a high fan speed in order to purify the cabin from particles and gases as fast as possible. After 5 minutes, the fan speed decreases to medium. After 5 more minutes, the fan speed decreases to low speed and remains there as long as the unit is connected to the power supply.
- Page 15 6. Idle mode 7. Notifications Press and hold the 3 red LEDs blink in a control knob for 3 triangle formation seconds. Any LEDs that should a notification or are on will fade out error occur (see table within 2 seconds. below).
- Page 16 8. Changing the filter A filter change alert is Note: displayed on the The recommendation of approximately 6 control knob when a months/180 days between filter changes is filter change is due. based on a usage of 360 hrs during that period (2,5hr * 6 days * 4 weeks * 6 months).
-
Page 17: Care And Maintenance
Bring it to the nearest official waste recycling service. Help and support If you have questions about Blueair products, please visit www.blueair.com. Warranty information The Blueair Limited Warranty applies only if the unit is installed, used, and maintained according to the instructions in this manual. - Page 19 Blueair는 본 제품의 사용으로 인해 직접 또는 간접적으로 발생하는 손해, 부상 또는 법적 책임에 대해 어떠한 책임도 지지 않습니다. 사용자는 Blueair가 적용되는 모든 관련 법률, 규정, 표준 및 모든 조건 및 지침 (본 사용 설명서에 명시된 내용을 포함하되 이에 국한되지 않음)에 따라 적절하고 안전한 방법으로 본...
- Page 20 일반 Blueair Cabin P1 차량용 공기청정기 4.5m 길이의 케이블로 본체와 제어 노브를 Blueair Cabin P1 차량용 공기청정기는 소형 또는 연결하므로 중형 자동차용으로 디자인되었으며, 자동차를 뒷좌석 머리받침 뒤편에 장치를 사용하는 동안 공기를 정화합니다. 설치할 수 있습니다. Blueair의 HEPASilent™ 첨단 여과 제어 노브의 USB 충전 포트는 운전자나 앞좌석...
- Page 21 본 차량용 공기청정기가 사용 설명서의 지시사항에 따라 설치되었는지 확인하십시오. 사용자의 안전을 위해, 상자에 담겨 제공된 품목만 사용하십시오. 장치를 조작하는 동안 운전자는 일반적인 교통 상황을 주의 및 고려해야 합니다. Blueair는 설명서에 따라 올바르게 설치가 되지 않은 상태에서 제품을 사용하는 동안 발생하는 일신상의 위해 또는 부상에...
- Page 22 부상을 예방하기 위해 조수석 앞의 대시보드 내부에 장착된 안전 에어백의 정면이나 근처에는 장치를 설치하지 마십시오. 주의: 자동차의 12V 전원 아웃렛에 직접 플러그를 연결하려면 본 차량용 공기청정기와 함께 제공된 전원 케이블만 사용하십시오. 차량용 공기 청정기는 자동차의 시동이 켜지거나 꺼질 때 자동으로 켜지거나 꺼지는 차량의 12V 전원...
- Page 23 Blueair Cabin P1 차량용 공기청정기 중요! 1. 상자를 열고 포장을 풉니다. 2. 사용 설명서를 읽으십시오. 구매시에는 미세먼지+카본 필터가 본 장치 내부에 장착되어 있지 않습니다. 필터는 상자 속에 자세한 정보는 www.blueair.com 또는 별도의 품목으로 들어 있으며, 제품을 사용하기 blueairkorea.co.kr 사이트를 참조하십시오.
- Page 24 구매시에는 미세먼지+카본 필터가 본 장치 내부에 장착되어 있지 않습니다. 필터는 상자 속에 별도의 품목으로 들어 있으며, 제품을 사용하기 전에 반드시 설치해 주십시오. 1개의 Blueair 미세먼지+카본 필터가 차량용 공기청정기와 함께 제공됩니다. 이 필터는 다음과 같은 차내 공기 중의 오염물질을 제거합니다. 꽃가루...
- Page 25 시작하기 1. 상단 덮개 제거 2a. 필터 설치 1. 평평한 바닥이나 1. 포장용 비닐 커버를 차량 좌석에 청정기를 제거한 후 놓고 그림과 같이 왼쪽과 필터의 양옆을 잡아 오른쪽의 잠금장치를 ‘안’ 당겨 벌려서 정사각형을 으로 누르고, 만듭니다. ‘위’ 로 들어 위쪽 덮개를 분리합니다.
- Page 26 4. 마운팅 스트랩 연결 참고: 헤드레스트 뒤에 배치된 경우 헤드레스트 표시된 대로 장치에 가운데가 아닌 지지 로드(또는 헤드레스트 아래쪽)에 마운팅 스트랩을 돌려서 스트랩을 연결해야 합니다. 끼웁니다. 벨크로 면이 장치에 닿도록 합니다. 5a. 마운팅 위치 선택 6. 제어 노브 및 12V 전원 공급 장치 연결 전원...
- Page 27 기능 1. 일반 본 차량용 공기청정기는 제어 노브를 눌러서 설정을 변경할 수 있습니다. 참고: 1. 공기를 최적의 상태로 정화하기 위해서는 반드시 자동차의 내기 순환 모드를 사용해야 하며, 창문과 선루프는 닫아 주십시오. 2. 장치의 전원이 꺼졌다가 다시 켜지는 경우 팬 속도는 가장 최근에 사용한 설정과 동일한 속도로 활성화됩니다.
- Page 28 3. 켜기 제어 노브를 한 번 장치가 켜지면 누르면 작동이 시작되며 전원이 켜집니다. 팬은 가장 최근의 설정으로 참고: 작동됩니다. 본 장치는 반드시 전원 포트에 연결한 후에 전원을 켜야 합니다 (즉, 자동차의 시동이 켜진 상태여야 함). 4. 팬 속도 조정 작동 노브를 한 번 누를 때마다 Low(낮은) 속도에서 Medium(보통) 속도로, 이어서...
- Page 29 5. Clean Cycle 프로그램 Clean Cycle 프로그램은 되도록 빠르게 차내의 미세먼지와 가스를 제거하기 위해서 우선적으로 높은 팬 속도가 자동으로 작동됩니다. 6분 후에 팬 속도는 보통으로 줄어들고 3분 동안 보통 속도로 회전하다가 낮은 속도로 감속된 뒤에 전원이 꺼질 때까지 유지됩니다. 제어 노브를 눌러서 다른 팬 속도 설정(낮음, 보통 또는 높음)으로 전환하거나 3초...
- Page 30 6. 절전모드 7. 알림 제어 노브를 알림 또는 오류 3초 동안 길게 발생 시 3개의 빨간색 누릅니다. 모든 LED가 세모꼴을 이루며 LED는 2초 동안 깜빡입니다(아래의 표 불빛이 점점 참조). 희미해집니다. 상황 권장 조치 사항 장치가 작동하지 않음 - 장치가 제어 플러그에서 제어...
- Page 31 8. 필터 교체 필터 교체 시기가 되면 참고: 제어 노브에 약 6개월/180일의 필터 교체 권장 주기는 필터 교체 알림이 해당 기간 중 360시간 사용을 표시됩니다. 기준으로 산정되었습니다 (2.5시간 * 6일 * 4주 * 6개월). 1. 상단 덮개를 열고 4. 필터 초기화 버튼을 정화...
- Page 32 당사의 제품 및 포장은 환경 친화적으로 디자인되었으며 재활용이 가능합니다. 일반 쓰레기와 함께 필터 또는 제품을 버리지 마십시오. 가까운 곳의 인가된 재활용 센터에 가져다주십시오. 보증 정보 본 장치가 이 설명서의 지시사항에 따라 설치, 사용 및 관리되는 경우에만 Blueair 제한 보증이 적용됩니다.
- Page 35 使用 Blueair Cabin P1 車用空氣清淨機前請詳閱使用手冊。 備註: 本機種可能依據各國家/地區有不同版本 使用本產品即表示您已仔細閱讀本免責聲明, 且您理解並同意遵守以下條款和條件。 Blueair 對因使用本產品而直接或間接造成的損害, 傷害或任何法律問題不承擔任何責任。 您同意 以合適和安全的方式使用本產品, 該方式符合所有適用的法律, 法規, 標準以及Blueair制定的所有 條款和指南 (包括但不限於本使用手冊中的規定) 。 您同意在使用本產品時對自己的行為負全部責 任, 以及由此產生的任何後果。 請仔細閱讀本使用手冊, 以便於操作前熟悉本產品的功能以及本產品的組裝、 安裝、 放置或使用說 明。 未能按照本使用手冊中的規定正確或安全地操作本產品可能會導致產品損壞, 個人財產損失。 未經成人直接監督, 本產品不適合兒童使用。 請勿將本產品與不兼容的零組件一起使用, 或以 Blueair提供的文件之外的任何方式更改本產品。 目錄 簡介 安全說明 Blueair Cabin P1 車用空氣清淨機...
- Page 36 簡介 Blueair Cabin P1 車用空氣清淨機 駕駛可在行車專注度不受影響的情況下使用控 Blueair Cabin P1車用空氣清淨機是專為汽車設 制旋轉鈕 (適用 12V 電壓) 變換風速 (3 段風速) 計的, 用於在車間內提供空氣淨化。 或啟動清淨循環模式。 Blueair 的 HEPASilent™ 高效過濾技術讓車用空 控制旋轉鈕和機身之間的電源連接線長達 4.5 公 氣清淨機過濾有害污染物 (例如: 甲醛等揮發性 尺, 足夠的長度能將機器安裝在前排與後排座椅 有機化合物 (VOC))、 微粒和異味。 頭枕後方。 本產品配備可便利取用的 USB 充電接口, 讓後 座乘客可以在享受車內清淨空氣的同時同步充...
- Page 37 Blueair Cabin 車用空氣清淨機屬於電器產品。 請在使用前閱讀安全資訊說明並採取必 要預防措施來降低火災、 電擊或受傷的風險。 本款車用空氣清淨機之保固條款僅在依照相關說明安裝、 使用、 清潔與保養下適用。 行車時請勿調整設定或分心查看本車用空氣清淨機的顯示圖示。 行車時請勿使用手機或其他電子裝置。 您必須遵守所有適用的安全駕駛法和行為, 包括 那些涉及移動設備使用的法律和行為。 警告: 表示危險情況, 若不避免會導致死亡或重傷。 為避免發生危險狀況, 僅限製造商、 Blueair 授權服務中心或Blueair 代理或代理商之專業人士可更換損 壞之電源線。 警告 : 為避免危險, 務必始終由製造商、 服務代理商、 Blueair 代理或代理商之專業人士進行電 源線更換。 ( 舉凡因電源線損壞, 故障或任何其他原因) 請避免將任何液體, 例如水、 清潔劑或可燃性溶劑潑灑在車用空氣清淨機上。 如果有任何液體溢出情況發生, 請勿使用該設備。 如果有溢出物, 請用柔軟乾淨的濕布擦...
- Page 38 為避免受傷, 絕對不可以將本車用空氣清淨機安裝在前排座椅前方儀錶板或安全氣囊的 前方或周圍。 注意 : 僅可使用隨貨附贈的電源線, 務必使用Cabin 車用空氣清淨機隨貨附贈的電源線, 並將機 器連接至符合規格的12V電源插座。 (請參閱空氣清淨機上的額定電壓標籤貼紙)。 否則可 能導致火災等危險。 車用空氣清淨機設計用於連接汽車中的12V電源插座, 當汽車的點菸器開關時自動打開或 關閉電源。 因此, 我們強烈建議在車內使用點菸器控制的12V電源插座, 以避免電池耗盡 的風險。 備註: 本產品亦可於船舶、 卡車或休旅車/露營車內使用的 12V 電源插座使用。 請謹記依照使用說明書把 車用空氣清淨機固定。 切勿以任何方式變更或改造電源插頭 。 如果電源線或插頭發生任何形式的損壞或故障, 請勿使用本車用空氣清淨機。 遇電源線 破損或插頭損壞或鬆弛時, 若繼續使用, 將可能發生觸電、 短路甚至火災等危險。 電源線請遠離發熱表面。 請勿讓異物進入本車用空氣清淨機, 否則將有可能導致觸電或使本裝置損壞的風險。 為避免車用空氣清淨機損壞, 請勿在本空氣清淨機上放置任何物品或擋住出風口、 進風 口和空氣通道。...
- Page 39 一般 注意 : 拔除插頭時請握住插頭, 如以拉住電源線方式拔除插頭, 可能會造成電源線斷裂, 導致發生觸電、 短路甚至火災的危險。 請勿使用多頭電源線插座或與其他電器共同使用電源線, 可能會因過熱發生火災的危險。 使用電器前請確定插頭與插座緊密貼合, 以避免因鬆動或插入不完全, 導致發熱產生危險。 插頭上若堆積灰塵, 容易因濕氣造成絕緣不良, 引起火災等危險, 故請定期清除插頭上的灰塵。 拉扯、 踐踏或重壓電源線, 將造成電源線破損, 並可能發生觸電、 短路甚至火災等危險。 請勿用沾濕的手觸碰插頭與插座, 否則可能發生觸電的危險。 遇以下情況請將插頭拔除: 長期不使用或外出前、 清潔保養或移動機器前、 發生異常 (例如有燒焦 味時) 。 請注意在對電器進行清潔或保養等相關作業前, 須將電器切斷電源。 請勿在本空氣清淨機上坐、 站或攀爬, 或是將本空氣清淨機當作桌子或收納裝置使用。 本產品內含有精密電子零件, 請勿用水沖洗, 否則可能導致絕緣不良、 漏電或短路等危險。 請勿在浴室、...
- Page 40 Blueair Cabin P1 車用空氣清淨機 1. 開啟包裝盒並進行拆封 重要訊息! 請注意, 新購入本車用空氣清淨機時, 微粒 + 活性碳 詳閱使用手冊和快速使用指南 濾網尚未裝入本車用空氣清淨機內。 濾網是另外單 如需詳細資訊, 請前往 www.blueair.com 獨放置在包裝盒內, 必須先裝上濾網後才能使用。 包裝內容 1. 車用空氣清淨機主機 4. 控制旋轉鈕, 含 4.5 公尺連接電源線 2. 固定綁帶 使用者手冊 3. 微粒 + 活性碳濾網 上蓋 제품 개요 折疊的微粒 + 活性碳濾網...
- Page 41 濾網 重要訊息! 請注意, 新購入本空氣清淨機時, 微粒 + 活性碳濾網尚未裝入本空氣清淨機內。 濾網是另外單獨放置在包裝盒 內, 必須先裝上濾網後才能使用。 本車用空氣清淨機隨貨附贈一個 Blueair 微粒 + 活性碳片濾網。 本款濾網可以過濾下列車內空氣中 的有害污染物: PM 2.5 花粉 粉塵 寵物皮屑 甲醛 汽油揮發物(苯) 輪胎磨損 污染物 重要訊息! 請使用 Blueair 原廠濾網確保本車用空氣清淨機的功能正常以達到原廠保證的清淨效能。 濾網清單 為了便於日後快速找到正確的濾網, 請填妥下方客戶記錄並且妥善保存本使用手冊供參照查 閱。 本產品的型號和序號請參閱本空氣清淨機底部的額定電源標籤貼紙。 型號 代理商名稱 序號 代理商地址 購買日期...
- Page 42 啟動 1.請拆下車用空氣清淨機上蓋 2a.安裝濾網 將車用空氣清淨機主機 拆下濾網四周的塑膠包 放在平坦的表面或汽車 裝後將濾網的兩側展開 座椅上, 然後依照圖示 IN 成四方形。 和 UP 的方向按壓位於左 側和右側拆卸鎖扣。 拿起上蓋。 將攤開的濾網裝在車用 空氣清淨機主機上。 將上蓋以內側朝上的 將上蓋裝回至車用空氣 方向放在空氣清淨機 清淨機主機上。 (務必妥 主機旁邊。 善蓋緊並聽到” 喀” 的聲 音) 3.將電源線連接至車用空氣清淨機主機 將車用空氣清淨機裝於 車內前, 請將電源線連 接至車用空氣清淨機背 面的電源供應座。 備註: 第一次安裝時不需要按壓濾網重置按鈕。...
- Page 43 4.裝上固定帶 如圖所示, 將固定帶穿 注意 : 如果置於頭枕後方, 固定帶應環繞支柱 (或頭枕 過裝置。 讓魔鬼氈側朝 底部), 而非頭枕中央 向裝置。 5a.選擇固定位置 6.連接控制鈕與 12 V 電源 將含電源的控制鈕連接 至駕駛座附近的 12 V 電 放置選擇 源插座。 . 前/後頭枕、 中央鞍座 將裝置固定於頭枕後方或 中央鞍座的頂端。 5b.黏緊固定帶, 將裝置固定 7.電源線管理 將電源線配置於地毯下 將魔鬼氈側 (1) 穿過 方或控制鈕與裝置間的 扣環並黏緊固定帶。 塑膠配件上。 為避免調整 車上座椅時造成電源線...
- Page 44 功能 1.簡介 本款車用空氣清淨機可使用控制旋轉鈕或智慧型手機進行控制 (請參閱章節 「7.車用空氣清淨機和您 的智慧型手機連線」 備註 : 1.為了讓車用空氣清淨機可以發揮最佳的空氣清淨效能 , 請確保車內空調的循環模式呈現開啟狀態 , 同時確實 緊閉門窗和天窗 。 2.車用空氣清淨機關機後再次開機時 , 將以前次設定的風速啟動 。 3.清潔時間取決於汽車駕駛室中的空氣含量 。 2.控制旋轉鈕 - 細節介紹 2a.導覽 控制旋轉鈕安裝在 12V 按壓控制旋轉鈕即可 最低風速 電源插座上, 例如: 汽車 切換風速大小 (請參閱 中等風速 儀錶板附近。 「調整風速」 章節)。 控 最高風速 制旋轉鈕顯示面板只...
- Page 45 3.開機 按壓一次即可開機。 車用空氣清淨機開啟 時, 即開始啟動程式, 風速將停留在前次的 設定後啟動。 備註: 車用空氣清淨機必須連 接至電源供應座才能開 機 (汽車的點菸器為開 啟狀態。 ) 4.調整風速 功能的切換順序依序為最低風速、 中等風速、 最 高風速、 清淨循環模式再回到最低風速, 每按壓 控制旋轉鈕一次即可切換至下一種模式。 各段風速的 LED 指示燈狀態: 最低風速 (1) = 1槓白色 LED 燈閃爍 3 次 中等風速 (2) = 2槓白色 LED 燈閃爍 3 次 最高風速...
- Page 46 清淨循環模式 清淨循環模式會自動以高速啟動, 以最快速度淨化汽車內的懸浮微粒與氣體。 只要清淨機連接電源的期間, 經過5分鐘的淨化後, 風扇速度降至中速, 再過5 分鐘後, 風扇速度降至低速並維持不變。 按壓控制旋轉鈕以切換其他風速 (低速, 中素或高速) - 或持續按住3秒鐘將本 機切換至待機模式。 備註: 清淨循環模式 清淨時間取決於汽車座艙內的空氣含量。 CLEAN CYCLE PROGRAM 高速 HIGH 清淨機效率 中速 汽車大小對應的淨化時間 低速 5–6 3–4 分鐘 minutes minutes Sedan Hatchback 時間(分鐘) TIME (min) 8–11 5–6 分鐘 minutes minutes Minivan...
- Page 47 7. 待機模式 8.通知 持續按壓空氣旋轉鈕長 3 槓紅色 LED 燈以三 達3秒鐘, 直至指示燈在 角形的方式閃爍時, 表 兩秒內熄滅。 示有訊息通知或發生 故障 (請參閱下表) 狀態 建議採取措施 車用空氣清淨機無法運作 - 車用空氣清淨機 檢查控制旋轉鈕是否安裝正確以及電源線/ 未與控制旋轉鈕連接成功。 插頭是否有損壞。 車用空氣清淨機無法運作 - USB 充電器超載, 移除外部裝置直至車用空氣清淨機恢復正常 如果 USB 充電接口超載過多外部裝置 - 例如 運作。 行動電話等 - 系統的電源超載, 將造成電源關 閉。 一般硬體故障 聯絡客服...
- Page 48 9.更換濾網 控制旋轉鈕上的濾網 備註: 更換指示燈亮起時(6槓 濾網的建議更換時間是每 6 個月/180 天, 此建議時 紅色LED燈全數亮起), 間是以運轉時數 360 小時 (6 個月 X 每個月 4 週 X 每 提醒您更換濾網。 週 6 天 X 每天 2.5 小時使用) 為準。 按下濾網重置按鈕。 拆下上蓋, 將新的濾網 裝在車用空氣清淨機 主機上。 FILTER RESET 將上蓋裝回至空氣清 淨機主機上。 將汽車的點菸器開關 切換至...
- Page 49 清潔與保養 本公司建議定期清潔可常保您的車用空氣清淨機發揮最佳清淨效能。 更換濾網 1.拆下上蓋後擦拭上蓋內側。 2.使用軟刷、 吸塵器和/或其他適合的配件吸除出風口的粉塵。 3.使用軟刷或吸塵器配件吸除小面積進風口的粉塵。 簡介 1. 使用柔軟、 乾淨的濕布擦拭裝置外部。 2. 請勿使用汽油、 化學溶劑或腐蝕性物質清潔, 因為此類物質會損害機器表面。 3. 請勿讓異物進入通風口或進、 出風口。 否則會造成觸電或車用空氣清淨機損壞。 4. 請勿自行對 Blueair 產品的電子或機械功能進行修理或調整。 有關保固資訊請 聯絡您當地的代理商或 Blueair。 環境保護 : 同心協力愛護地球! 我們的產品和包裝皆採用永續設計並且以可回收材質製造。 請勿將濾網、 產品本體和家用廢棄物一起丟棄。 協助和支援 如果您有 Blueair 產品的相關問題, 請至官網 www.blueair.com/tw 或撥打客服專線0800-000-048 保固資訊...
- Page 52 Tel: +971 (4) 8821244 Tel: +852 2345 8988 salesme@blueair.se blueairasia@blueair.se Blueair Inc. Blueair, Blueair (Shanghai) Trading Co. Ltd. Suite 1900, Hindustan Unilever Limited (HUL) Room 1001, City Gateway 100 N LaSalle Street Unilever House, B. D. Sawant Marg, No. 398 North Caoxi Road...
Need help?
Do you have a question about the Cabin P1 and is the answer not in the manual?
Questions and answers