Table of Contents
Advertisement
Quick Links
Control Box
Post Bracket
120 Volt indoor
Transformer
(surge protector
not supplied)
Run 1000' (max.) of low
voltage wire to control
box from transformer
(wire not included).
This product meets the requirements of UL325, the standard for gate operator safety.
For Online Technical Support 24 hour/day, 7 day/week visit
For more information on Mighty Mule's full line of Automatic Gate Operators and
Mighty Mule® is the retail brand of Nortek Security & Control, LLC
Copyright
©
2019 Nortek Security & Control, LLC
Installation Manual
Gate Swings Evenly and Freely
Hung Firmly and Plumb
First Gate Opener
Horizontal Support
Power Cable
12 Volt automotive or marine
type battery in weather proof
housing (REQUIRED, not included).
Example of finished installation
(installations vary slightly on different types of gates)
NSC Sales: 800-543-4283 • Fax 850-575-8912
NSC Technical Service 800-543-1236
Access Controls visit
MM272
Warning Sign
Gate Bracket
Horizontal Support
PVC conduit (not included)
to run second opener power
cable under driveway.
www.mightymule.com
Second Gate Opener
Gate Bracket
Fence Post Set in Concrete
www.mightymule.com
Post Bracket
10022113 A
Advertisement
Table of Contents

Related Manuals for Nortek Security & Control MIGHTY MULE MM272


Summary of Contents for Nortek Security & Control MIGHTY MULE MM272
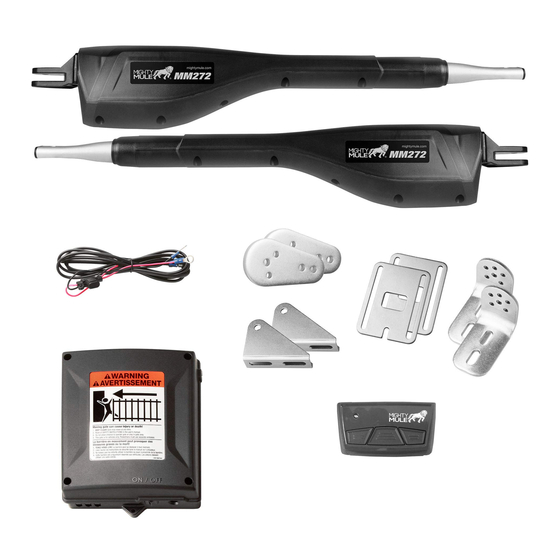
- Page 1 MM272 Installation Manual Gate Swings Evenly and Freely Control Box Hung Firmly and Plumb Warning Sign First Gate Opener Second Gate Opener Post Bracket Gate Bracket Gate Bracket 120 Volt indoor Post Bracket Transformer Horizontal Support Horizontal Support (surge protector not supplied) Power Cable 12 Volt automotive or marine...
- Page 2 WARNING This equipment meets Underwriters Laboratory Standard 325 (UL 325). However, gate equipment has hazards associated with its use and therefore by installing this product the installer and user accept full responsibility for following and noting the installation and safety instructions. Failure to follow installation and safety instructions can result in hazards developing due to improper assembly.
-
Page 3: Table Of Contents
Table of Contents Please Read This First! ..................... ii Manually Opening and Closing Gate................iii Important Safety Information ..................iii For the Installer and End User ..................iv Installing Warning Signs and Pedestrian Gates ............viii Required Safety Precautions for Gates ................. ix Technical Specifications ....................1 Before You Begin ........................2 Solar Panel and Gate Activity Chart ................2... -
Page 4: Please Read This First
Please Read This First! Thank you for purchasing a Mighty Mule Gate The Mighty Mule Gate Operator features Dual Sense Operator—the "do-it-yourself" automatic gate Technology™. This feature makes the gate stop and operator! When correctly installed and properly used, reverse direction when it comes in contact with an your Mighty Mule Gate Operator will give you many obstruction. -
Page 5: Manually Opening And Closing Gate
Important Safety Information Because automatic gate operators produce high levels this manual cannot be completely exhaustive in of force, consumers need to know the potential hazards nature. They do, however, provide an overview of associated with improperly designed, installed, and the safe design, installation, and use of this product. -
Page 6: For The Installer And End User
Important Safety Information For the Installer and End User WARNING To reduce the risk of injury or death: 1. READ AND FOLLOW ALL INSTRUCTIONS. 5. Use the manual/emergency release only when the gate is not moving. 2. Never let children operate or play with gate controls. Keep the remote control away from children. - Page 7 Important Safety Information For the Installer and End User Typical Entrapment Zones are shown in the diagrams on page Zone 1 – leading edge of the gate and the fence post. Zone 2 – between the gate and the gate post. Zone 3 –...
- Page 8 Important Safety Information For the Installer and End User III. After Installation 7. To operate this equipment safely, YOU must know how to disconnect the operator for manual 1. Attach the warning signs (included) to each side gate operation (see page iii).
- Page 9 Important Safety Information For the Installer and End User Mighty Mule gate operators utilize Dual Sense One or more edge sensors may be located at the Technology™ entrapment protection. Dual Sense leading edge, bottom edge, and post edge, both inside Technology™...
-
Page 10: Installing Warning Signs And Pedestrian Gates
Important Safety Information Installing Warning Signs and Pedestrian Gates Warning signs alert people of automatic gate operation and are required when installing Mighty Mule Automatic Gate Operators. A minimum of two WARNING SIGNS must be installed in the area of the gate. Each sign is to be visible by persons located on the side of the gate on which the placard is installed. -
Page 11: Required Safety Precautions For Gates
Important Safety Information Required Safety Precautions for Gates These warning labels should be found at the locations specified below. If any of them are missing, immediately contact NSC for replacements. WARNING AVERTISSEMENT Moving gate can cause injury or death! 1. KEEP CLEAR! Gate may move at any time. 2. -
Page 12: Technical Specifications
Technical Specifications MIGHTY MULE MM272 DUAL GATE OPENER _____________________________________ _____________________________________ DRIVE • Low friction screw drive (linear actuator) rated for -5 °F to +160 °F (-20 °C to +71 °C). • Powered by a 12 V motor with integral case hardened steel gear reducer. Motor speed reduced to 260 rpm. Generates 520 inch lb. -
Page 13: Before You Begin
Before You Begin 1. Determine Charging Options for Battery: Transformer OR Solar NEVER USE TRANSFORMER AND SOLAR PANEL(S) AT THE SAME TIME! It will damage the control board! IMPORTANT • The Mighty Mule 272 is designed and intended for use with a 12 Volt automotive, marine or lawn tractor battery. The battery must be placed inside a weatherproof case and located within 6' of the control box. - Page 14 2. Check Direction of Gate Swing The Mighty Mule 272 is designed for PULL-TO-OPEN installations. PUSH-TO-OPEN installations require two Push-To-Open brackets [FM148]. Push-to-Open Installation Instructions begin on page Your Property Your Property 3. Prepare the Gates • Gates must be plumb, level, and swing freely on their Pull-To-Open Push-To-Open hinges.
-
Page 15: Parts List - Opener And Mounting Hardware
Parts List – Opener and Mounting Hardware WARNING Moving Gate Can Cause Injury Or Death Transformer (1) Battery Wire KEEP CLEAR! Gate may move at any time. Do not allow children to operate gate or RB503 Harness with play in gate area. Control Box (1) This gate is for vehicles only. -
Page 16: Tools And Materials
Tools and Materials Tools Needed: • Power Drill • Open End Wrenches — " and " • Adjustable Wrench • " Drill Bit • Hacksaw or Heavy Duty Bolt Cutters • Small Flat Bladed Screwdriver • Large Phillips Screwdriver • Tape Measure •... -
Page 17: Installation Overview For Pull-To-Open Gates
Installation Overview for Pull-To-Open Gates PUSH-TO-OPEN installation instructions begin on page Example of an installation on a chain link fence: Gate Swings Evenly and Freely Control Box Hung Firmly and Plumb 120 Volt indoor Transformer First Opener Second Opener (surge protector not supplied) Gate Bracket Closed Position Stop Plates... -
Page 18: Installation Of The First Gate Opener
Installation of the FIRST Gate Opener IMPORTANT: Determine which side of the driveway you will mount the control box. From this point on, the gate and gate opener on the same side as the control box will be referred to as the FIRST gate and gate opener. The gate and gate opener on the opposite side of the driveway from the control box will be referred to as the SECOND gate and gate opener. -
Page 19: Install Post Bracket Assembly And Gate Bracket
Install Post Bracket Assembly and Gate Bracket Step 1 Insert the " x 1 " bolt through the center hole of the post brackets and post pivot bracket. Secure with a " washer, " lock washer and " nut. DO NOT "... - Page 20 Step 5 Be sure the position of the gate opener and brackets Gate in the allows for 1" of clearance between the gate and the opener in both the open and closed position, while CLOSED POSITION 1" minimum at the same time maintaining a stroke distance of 7" Pinch Area to 13"...
-
Page 21: Attach Opener Arm
Step 9 EXAMPLES Drill " holes through post as marked. Fasten post bracket assembly to the TOP VIEW Post Bracket fence post using two " x 8" bolts, washers, lock washers and nuts. You Mounting must use bolts that completely penetrate the post. Examples Round Metal Post Step 10... -
Page 22: Install The Closed Position Stop Plates
Install the Closed Position Stop Plates The closed position stop plate is attached to the FIRST gate to help stabilize the gate leaf in the closed position. An optional low profile ground stop, when used with the closed position stop plate, provides a secure point for the SECOND gate to close against. To further enhance the stability and security of your gate, install a Mighty Mule Automatic Gate Lock [FM143] page 26). -
Page 23: Mount The Control Box
Closed Position Stop Plate mounted on the SECOND GATE Step 4 SIDE VIEW Using appropriate hardware for your type of gate, attach the vertical • •• • •• •• • • •••• • •• •• • •• •• •• closed position stop plate to the SECOND gate frame at the point where •... -
Page 24: Connect Opener Power Cables
Connect Opener Power Cables Step 1 STATUS Bring FIRST power cable into the control box through a strain relief slot, 1st OPR. OPEN < JOG > CLOSE leaving enough wire to reach the FIRST OPR. terminal block. 2nd OPR. MAX OFF SEC. - Page 25 Control Box Step 3 Lay the measured length of low voltage wire First Gate Opener in a trench following a path from the selected electrical outlet to the control box. Wires coming 120 Volt indoor up from the ground should be run through PVC Transformer conduit to protect them from lawn mower blades, weed eaters, and grazing animals.
-
Page 26: Connect Battery Harness To Control Board
Step 6 At the AC outlet, strip " of insulation from the ends of the low voltage wire. Attach these stripped ends to the transformer terminals. A dab of household petroleum jelly on each terminal will help prevent corrosion. We suggest adding crimp on fork lugs to the end of each wire before attaching it to the transformer. -
Page 27: Connect The Battery
Connect the Battery Control Box Step 1 Place the 12 Volt automotive/lawn tractor or marine battery and its weatherproof case within 6 First Gate Opener feet of where the control box is mounted. Within 6 feet Battery Cable from Control Box 12 Volt automotive, lawn tractor BLACK to NEGATIVE or marine type battery in weather... -
Page 28: Setting Dual Sense Detection And Auto Close Timer
Step 3 FIRST Opener STATUS Press and HOLD the 1st opener JOG CLOSE button on JOG Buttons 1st OPR. the control board and be prepared to RELEASE the button OPEN < JOG > CLOSE SECOND Opener when the gate reaches the desired closed position/limit. Use JOG Buttons 2nd OPR. -
Page 29: Personalize Your Transmitter Setting
MMT103 Transmitter Learning the MM103 With system off, press and hold the transmitter button you want to use, then turn on the system and keep holding the button until the system "beeps" once. NOTE: For instructions on using the FM134/135 transmitter with this product, refer to www.mightymule.com. -
Page 30: Push-To-Open Installation Instructions
Push-To-Open Installation Instructions PUSH-TO-OPEN gates open out from the property (opener arms extend to open). Push-To-Open Brackets are required for this type 27).). In a Push-To-Open installation, the opener is installed while the gate is in of installation, one for each gate [FM148] page the closed position and the opener fully retracted. - Page 31 Step 3: Attach Opener Arm (page Step 4: Install Closed Position Stop Plates (page Step 5: Mount the Control Box (page Step 6: Connect Opener Power Cables (page Step 7: Connect the Transformer (page 13) OR Solar Charger (page Step 8: Connect Battery Harness (page Step 9: Connect Battery (page...
-
Page 32: Solar Panel Instructions
Solar Panel Instructions NEVER USE TRANSFORMER AND SOLAR PANEL(S) AT THE SAME TIME! It will damage the control board! IMPORTANT INFORMATION ABOUT LOW VOLTAGE WIRE: • The only wire acceptable for use with NSC products is 16 gauge multi-stranded, low voltage, PVC sheathed wire. This particular gauge enables the solar panel to provide an adequate charge through the control board to the battery at distances up to 250'. -
Page 33: Connecting Additional Devices
Connecting Additional Devices Mighty Mule strongly recommends the use of additional obstruction detection devices however we do not endorse any specific brand names. Only use products that are listed to be in compliance with any applicable UL safety standards and national and regional codes. PLEASE NOTE: Contact sensors, non-contact sensors, shadow loops, etc. - Page 34 2nd OPR. MAX OFF SEC. STALL FORCE AUTO CLOSE PWR. LIMIT Accessory Inputs REMOVE JUMPER FOR PUSH TO OPEN OPTION SAFETY: Typically for use with photo beam device, loop detector or other non-contact sensors SFTY. • Activation of this input while the gate is closing will cause the gate ≤JP1 VAR1 EXIT...
-
Page 35: Troubleshooting Guide
Troubleshooting Guide If your gate opener does not function properly, use this guide or use the online troubleshooter located at www.mightymule.com before calling the NSC Service Department. VISUAL AND AUDIBLE DIAGNOSTIC INDICATORS 1. Visual Indicators: a. Power LED (Green): • ON: AC power or Solar power is present. •... -
Page 36: Maintenance
Maintenance Monthly, test the obstruction and entrapment protection systems. Monthly, service the gate operator (make sure the power switch is OFF). Clean extended operator arm with a soft, dry clean cloth. After cleaning, apply a high quality silicon spray to a soft dry cloth and wipe the push/pull tube. DO NOT directly spray the tube! On all gates weighing 250 lb. -
Page 37: Accessories
Accessories Please visit www.mightymule.com for photos and detailed descriptions of Mighty Mule Accessories, or call Mighty Mule sales 1-800-543-4283. Solar Panel (FM123) If your gate is more than 1000' from an AC power source, you can choose to maintain the battery charge with the Solar Panel Charging Kit. - Page 38 Accessories are Available From Your Retail Store (con't) Low Voltage Wire (RB509) The 16 gauge, multi-stranded, dual conductor Low Voltage Wire is for connecting the AC powered transformer, or the Solar Panel to the control board. Also used for the connection of accessories, such as locks, keypads, push buttons and other wired control devices.
-
Page 39: Gate Operator Installation Checklist
Gate Operator Installation Checklist The gate has been checked to make sure it is level and moves freely in both directions. ❑ Potential pinch areas have been guarded so as to be inaccessible OR have sensing edges and/or photo ❑ beam obstruction detection devices installed. - Page 40 VOLTAGE RATINGS 14 Vac Transformer _____________ 13.0 to 16.0 Vac 10 W Solar panel _______________ 18.0 to 22.0 Vdc 600 mA Measure voltage at panel and control box. 12 V Battery ____________________ 12.5 to 13.5 Vdc Charging circuit ________________ 13.8 to 14.8 Vdc Measure voltage at battery terminals with battery connected 800-543-4283 •...
Need help?
Do you have a question about the MIGHTY MULE MM272 and is the answer not in the manual?
Questions and answers