Table of Contents
Advertisement
Quick Links
Advertisement
Table of Contents

Subscribe to Our Youtube Channel
Related Manuals for Sailrite Leatherwork


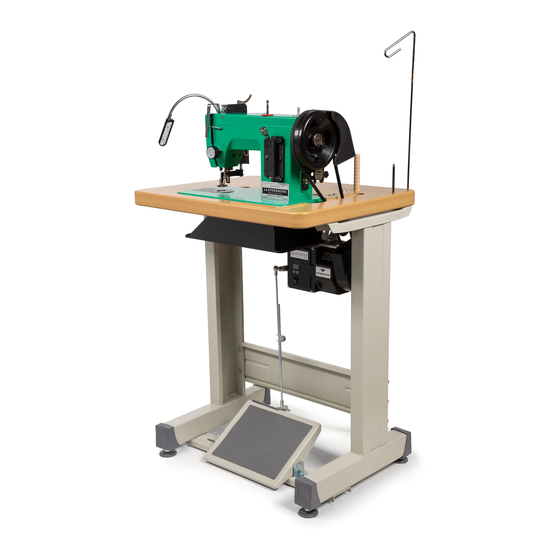
Summary of Contents for Sailrite Leatherwork
-
Page 2: Table Of Contents
Leatherwork Safety ����������������������������������� 1 Adjusting Presser Foot Tension ������������������� 21 Removing Material From Under Machine Damage Prevention ��������������������� 2 the Presser Foot ������������������������������������������21 Sewing Fabric ���������������������������������������������22 Sew like a pro with Sailrite ® Workhorse Safety Precautions ���������������� 3 ® Leatherwork Maintenance ����������������������� 23 Changing Motor Rotation ��������������������������... -
Page 3: Leatherwork Safety
Leatherwork Safety Leatherwork Machine Damage Prevention Please observe the following when using your Sailrite ® sewing machine: To prevent damage and keep your machine running smoothly, please observe the following when sewing: • Do not operate in conditions where you or using the machine as this is a tip-over the machine are or may become wet�... -
Page 4: Changing Motor Rotation
• Remove foot from the treadle when turning • Do not cover the motor’s ventilation; it can the power ON� cause the motor to overheat� • Turn the motor power switch OFF before replacing or threading the sewing machine needle� • Turn the motor power switch OFF when Sailrite�com Leatherwork Guidebook ®... -
Page 5: Preparing To Sew
V-92 #18 or #20 #14 or #16 (Mesh Fabric) Sailrite Lifetime (PTFE) ® #18 or #20 (Dense Fabric) For woven textiles, use our needle and thread recommendations available online in our “Thread & Needle Recommendation Guide.” You can find the guide on every fabric detail page or by searching #300032XHT at Sailrite.com. Sailrite�com Leatherwork Guidebook ®... -
Page 6: Needles
Needle Installation Leatherwork needles are round on top, unlike home sewing machine needles� As a result, proper installation must be exercised carefully� Improperly installed needles are the main reason users call for help� The needles have two distinct sides� One side has... -
Page 7: Winding Bobbins
Stand arm (G)� 2� Pass through thread post (H)� 3� Wrap around bobbin tensioner (I)� 4� Run under and up through a hole in top of bobbin (J)� Place bobbin on post and push Sailrite�com Leatherwork Guidebook | 10 ®... -
Page 8: Threading The Machine
6� Pass through take-up arm (right to left) (H) and then under end cover (I)� 7� Pass through the needle bar thread guide hole (J) and then down through the needle eye from left to right (K)� 11 | Sailrite�com Leatherwork Guidebook | 12 ®... -
Page 9: Removing & Installing Bobbin Case
Slit Tension Adjustment Screw case is pushed all the way on. The finger of Tension Plate the bobbin case will drop into the notch in the hook’s retaining ring (H)� Bobbin thread should loosely dangle� 13 | Sailrite�com Leatherwork Guidebook | 14 ®... -
Page 10: Picking Up Bobbin Thread
1� Hold the needle thread loosely to the right (14)� Grab the top of the balance wheel and rotate Leatherwork Sewing Machines arrive tuned and optimized for sewing toward the front of the machine (19) until the needle moves down and then back up�... -
Page 11: Regulating Stitch Length
Rotating the leather/fabric while the machine 18), and place scrap material or card stock is at rest with the presser foot down may bend paper under the foot� Lower the foot and operate the needle� 17 | | 18 Sailrite�com Leatherwork Guidebook ®... -
Page 12: Thread Tension Adjustment
NOTE: Decorative cap removed� Loosen in 1/4 increments, testing the drag on the the machine that separates the disks, preventing the thread after each 1/4 turn until proper tension is disks from opening correctly� achieved� 19 | | 20 Sailrite�com Leatherwork Guidebook ®... -
Page 13: Adjusting Presser Foot Tension
Several of the same characteristics that make the Leatherwork great for leather also make the machine perfect for upholstery fabrics, canvaswork and most home fabrics� However, as a heavy-duty machine, the Leatherwork is not ideal for sewing very light and delicate fabrics like silk, light sheers or chiffon� Use this simple checklist before sewing fabrics: Adjusting Presser Foot Tension 1�... -
Page 14: Leatherwork Maintenance
Top side lubrication points Lubrication The machine was thoroughly oiled prior to shipment. Oil all metal-to-metal working parts frequently! Sailrite recommends Super Lube synthetic oil for oiling and maintaining the Leatherwork ® Sewing Machine� With regular use, Super Lube will help your machine operate more smoothly, last longer and sew more quietly� After oiling, briefly sew with scrap material to prevent soiling your work. - Page 15 Underside lubrication points Left end and back side lubrication points 25 | Sailrite�com Leatherwork Guidebook | 26 ®...
-
Page 16: Troubleshooting The Leatherwork
Troubleshooting the Leatherwork Use this next section as a guide to better understand your Leatherwork and to help fine- tune and resolve common sewing machine problems� Replacing Take-Up Spring Proper Needle Orientation If you are getting inconsistent stitch tension or if your thread looks loose and sloppy near the tension assembly under operation, check your take-up spring (J). If the wire hook has broken off, you’ll need &... -
Page 17: Belt Issues
(N)� The hook just rests in place� Be sure the axle is facing out� Surface marring is damage to leather and other delicate material surfaces� The Leatherwork Sewing Machine has a special knurled surface foot and feed dog to reduce marring� To further 7�... -
Page 18: Skipped Stitches
2� Turning Corners Correctly To reset the timing on your Leatherwork, follow the steps outlined on p� 39 “Leatherwork Timing�” You can turn gentle corners while sewing at slow, consistent speeds� If motion is... -
Page 19: Thread Issues
If the machine is out of timing it may cause the gib hook point to cut or shred the thread� To reset the stop as soon as the problem is resolved� timing on your Leatherwork, follow the steps outlined on p� 39 “Leatherwork Timing�” 1� Thread/needle combination too small for material being sewn�... - Page 20 Thread loops could also be caused by a burr on the Retaining Ring Cap Spring (p� 34, B)� Remove any burrs by polishing them with emery paper or a fine file. If badly damaged, replace with a new Retaining Ring Cap Spring (#1603)� 35 | | 36 Sailrite�com Leatherwork Guidebook ®...
-
Page 21: Needle Issues
When the needle is completely down, the outer portion of the walking presser foot is up and cannot move the fabric, which also would bend the needle� 37 | | 38 Sailrite�com Leatherwork Guidebook ®... -
Page 22: Leatherwork Timing
Ensure needle is properly oriented after adjustment (p� 27) If your Leatherwork is still not performing properly after adjusting the needle bar height, proceed to check the rotational timing (p� 41)�... - Page 23 Oscillating hook sewing machines have loose tolerances between the Shuttle Gib Hook and the Shuttle Driver� This play between the parts is intentional and allows the Leatherwork to sew a wide variety of thread sizes� The typical play between parts is 0�04 inch�...
- Page 24 See p� 45 to make adjustment� > For the sake of clarity, (49) shows the machine without the retaining ring installed� While this makes it easier to see the timing, the hook must be held in place with light finger pressure to keep it from falling out of the shuttle assembly when rotating the balance wheel� 43 | | 44 Sailrite�com Leatherwork Guidebook ®...
- Page 25 (H)� the center shaft (H)� After adjusting/verifying the correct left-right position of the Shuttle Gib Hook, proceed to check the rotational positioning of the Shuttle Race Guide Shaft (p� 47)� 45 | Sailrite�com Leatherwork Guidebook | 46 ®...
- Page 26 (B) to slide the cap spring forward or back� If more movement is required, you’ll need to adjust the rotational positioning of the Shuttle Race Guide Shaft (p� 48)� 47 | Sailrite�com Leatherwork Guidebook | 48 ®...
- Page 27 Three Hole Thread Guide W029 14 30 Upper Tension Assembly (includes 24) 8511 Components may 103253 be purchased Thread Guard Screw separately Top Plate Set Screw E072 Thread Take-Up Spring (included in 21) 5332 49 | Sailrite�com Leatherwork Guidebook | 50 ®...
- Page 28 Needle Bar Connecting Rod W065 Presser Bar Actuator Cam Needle Bar Connecting Stud A042S Needle Guard 102627 Needle Bar Connecting Stud (220-240V Leatherwork Only) (Face Screw Alternate) A042 Set Screw W052-1 A092 Needle Screw Needle Bar Set Screw with 2�5mm...
- Page 29 Shuttle Race Guide Shaft B170 Lower Shaft B172 Shuttle Driver W172 Shuttle Gib Hook 9601 Bobbin 123100 Bobbin Case Assembly 1232 Screw B139-2 Retaining Ring Cap Spring 1603 Retaining Ring Clip Set 123011 53 | Sailrite�com Leatherwork Guidebook | 54 ®...
- Page 30 Knurled Feed Dog 121395 W046-1 Driving Crank Guide Nut Driving Crank Guide Screw A061 Feed Lifting Rock Shaft A072 Feed Lifting Rock Shaft Crank A073 B139-2 Screw Feed Regulator Wavy Washer A067 55 | Sailrite�com Leatherwork Guidebook | 56 ®...
- Page 31 Presser Bar Actuator Feed Screw W020-1 Crank Rod Bearing Set Base Screw W025-1 End Plate W041 End Plate Set Screw W041-1 Presser Foot Bracket Limiter W014 C097 Screw Presser Bar Feed Rod W036 57 | Sailrite�com Leatherwork Guidebook | 58 ®...
- Page 32 Idler Pulley Set Nut Pulley Bracket W059 Bracket Washer LT-2M-4 Bracket Lock Washer LT-2M-3 Bracket Bolt LT-2M-2 Screw W049-1 Set Screw 713100 Idler Pulley Leatherwork L-Bracket 121448 Washer 121444 Compression Spring 121443 121445 Fiber Washer Belt Cover & Bracket 120930 59 | Sailrite�com...
- Page 33 Not to Scale PA R T # PAR T N A M E Not to Scale Legs for Leatherwork 121455 Workhorse Servo Motor 120260 (110V) ® or 120261 (220-240V) Oil Tray 120864 Tabletop for Leatherwork 121454 Support Pin 120866 Not to Scale...
-
Page 34: Specifications
Leatherwork Specifications Workhorse Servo Motor Specifications ® 110-120V or 220-240V (check motor to confirm Max� Sewing Speed Stitch-by-Stitch up to 412 stitches/minute Voltage voltage) Shuttle Oscillating (Cam/Rocker Arm Driven) H�P� 0�75 Max� Straight Stitch Length Power 550W Needle Bar Stroke 34mm Power Consumption 4�5 amps Needle System... - Page 35 3�75 5/64 2�0 Turn the power off and on twice, and try again� If the “E3”: Board cannot read the parameter problem still occurs, contact Sailrite� 4�50 3/32 2�4 Replace the main fuse� To do this, turn off and 5�25 7/64 2�8...
- Page 36 Sailrite headquarters for repair, the customer is or for products not purchased directly from Sailrite� responsible for all shipping costs to and from Sailrite� Maximum liability is limited to the amount paid by the Please insure the machine in transit� The machine original purchaser�...
- Page 37 We are proud to provide you with everything you need to successfully maintain and repair your Leatherwork Sewing Machine� Your purchase comes with personalized support for the lifetime of your machine� We will do our best to satisfy every support request accurately, completely and in a timely manner�...
Need help?
Do you have a question about the Leatherwork and is the answer not in the manual?
Questions and answers