
Related Manuals for Sailrite FABRICATOR


Summary of Contents for Sailrite FABRICATOR
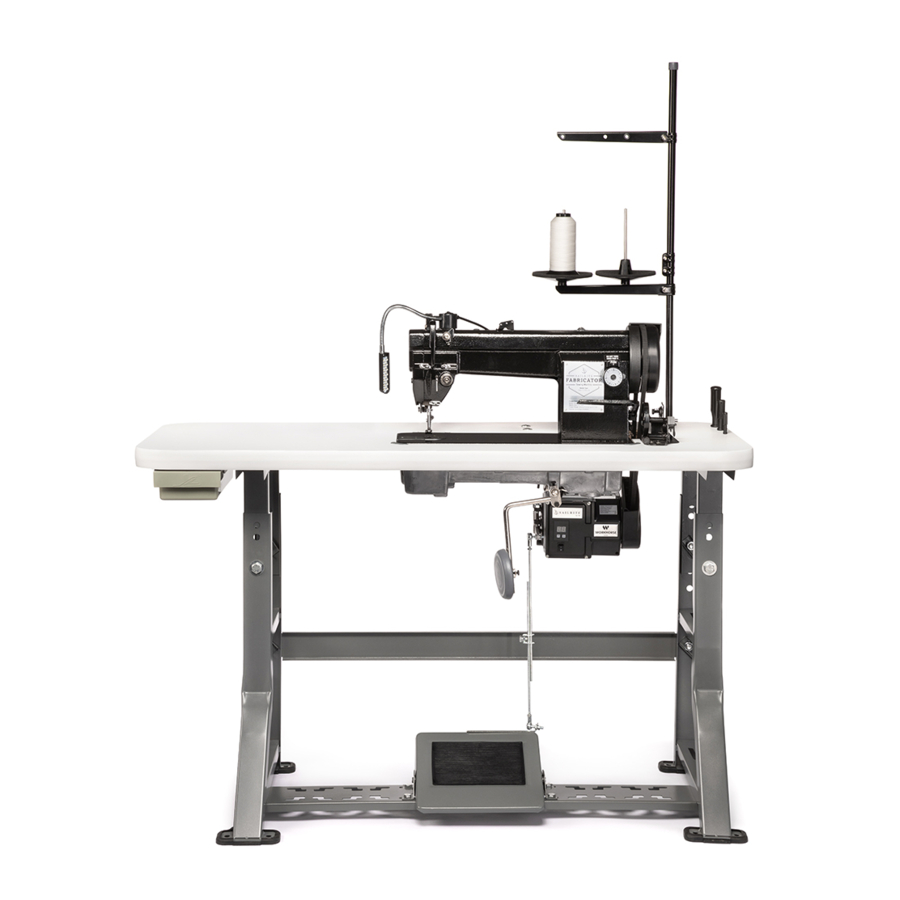
- Page 1 FABRICATOR ® ASSEMBLY INSTRUCTIONS Video instructions available at Sailrite.com/fabricator-setup or search part #300300XHT.
- Page 2 Sailrite.com/fabricator-setup or search #300300XHT at Sailrite.com. Fabricator Packaging "I'm here to help! Give these videos a watch for seamless setup." The Fabricator Sewing Machine head comes in a specially designed box with foam packaging to protect it from damage. — Eric Grant Save all original packaging to use if the machine ever needs to be sent in for service.
-
Page 3: Leg Assembly
Standard Fabricator Assembly ® Standard Fabricator Assembly ® Leg Assembly Attaching Tabletop & Drawer Find parts A, B, and D. Stand both K-legs On a soft surface, place the tabletop “bottom” upright and bolt the back support bar (E) to the side up. -
Page 4: Oil Pan Installation
Standard Fabricator Assembly ® Standard Fabricator Assembly ® Installing the Treadle Oil Pan Installation Find the treadle pedal (A) and use B, C, Flip the oil tray upside down and locate the two stop screws (J). The stop screw that touches to mount the L-bracket (B) as shown (6). -
Page 5: Machine Installation
Standard Fabricator Assembly ® Machine Installation Push the machine Support Pin (A) into the hole in the tabletop nearest the carriage bolts holding the motor (11). Insert the tapered end of the knee lift post connector (B) into the raised hole in the bottom of the oil tray (C) (12). - Page 6 Standard Fabricator Assembly ® Standard Fabricator Assembly ® Securing the Stitch PRO Belt Adjustment for the Balance Wheel Workhorse Servo Motor ® Remove the three screws (A) for the belt cover Before installing the drive belt (J), loosen the installation. Position the C-shaped belt guard...
- Page 7 Standard Fabricator Assembly ® Standard Fabricator Assembly ® Attaching the Bobbin Winder Installing the Knee Lift Assembly Attaching the Balance Wheel Belt Cover Position the bobbin winder so its slots (E) are Assemble the knee lift (G) and attach it to the shaft sticking out from the oil tray (H).
- Page 8 Note: If you want to lock the feet in the up position, push the knee lift to the right and pivot lever (C) Please proceed to the Fabricator Guidebook. into the up position. Release the knee lift and the feet will stay up. Actuate knee lift and lower lever (C) to drop the feet.
- Page 9 Deluxe Fabricator Assembly ® Deluxe Fabricator Assembly ® Deluxe Leg Assembly and B. Stand both leg bottoms Find parts upright and bolt the back support bar (C) to the holes in the back of the legs so the support bar holes (D) are to the left (1).
- Page 10 Deluxe Fabricator Assembly ® Deluxe Fabricator Assembly ® Attaching Tabletop & Drawer Installing the Linkage Bar Oil Pan Installation Place the tabletop on a soft surface so the Flip the oil tray upside down and locate the two Bolt the linkage bar (I) to the outermost hole of the bobbin case access (A) is facing up.
- Page 11 Deluxe Fabricator Assembly ® Machine Installation Push the machine Support Pin (A) into the hole in the tabletop nearest the carriage bolts holding the motor (11). Insert the tapered end of the knee lift post connector (B) into the raised hole in the bottom of the oil tray (C) (12).
- Page 12 Deluxe Fabricator Assembly ® Deluxe Fabricator Assembly ® Securing the Stitch PRO Belt Adjustment for the Balance Wheel Workhorse Servo Motor ® Remove the three screws (A). Position the Before installing the drive belt (J), loosen the C-shaped belt guard (B) and reinstall the...
- Page 13 Deluxe Fabricator Assembly ® Deluxe Fabricator Assembly ® Attaching the Bobbin Winder Attaching the Balance Installing the Knee Lift Assembly Wheel Belt Cover Position the bobbin winder so its slots (E) are Assemble the knee lift (G) and attach it to the over the pilot holes in the table.
-
Page 14: Leveling The Table
(F). Wipe the dirty oil and the dust from the oil drip pan, replace the plug and add fresh oil. Use any high-quality, clear sewing machine oil. Please proceed to the Fabricator Guidebook. Highest Lowest 23 | Sailrite.com... - Page 15 One of our support staff members will review your case and contact you. Sailrite.com Equipping you to sew 122520*1 Copyright ©2020 Fabricator Version 6-20 Original manual in English Assembly Instructions Ultrafeed PATENTED TECHNOLOGY Patents #6499415 • #7438009 Qty: 1 ®...
Need help?
Do you have a question about the FABRICATOR and is the answer not in the manual?
Questions and answers