LEHNER POLARO Operating Instructions With Parts List
Hide thumbs
Also See for POLARO:
- Operating manual with parts list (31 pages) ,
- Operating manual (34 pages)

Related Manuals for LEHNER POLARO


Summary of Contents for LEHNER POLARO
- Page 1 LEHNER POLARO ® Operating instructions with parts list Status: January 2011 Serial number: ..............Original operating instructions...
- Page 3 It is prohibited to distribute or duplicate this document and to utilise or disseminate its content without express permission. Non-compliance shall result in claims for damages. All rights for patents, utility patents and industrial patents are reserved by Lehner. English...
-
Page 4: Table Of Contents
Table of Contents Content What you should know ............6 1.1 Foreword ....................6 1.2 About these operating instructions ............6 1.3 Description of the POLARO ..............7 ® 1.4 Intended use................... 9 1.5 Reasonably foreseeable misuse ............9 1.6 Warranty ....................9 1.7 For your safety .................. - Page 5 Table of Contents Settings ................21 4.1 Turning ....................21 4.2 Determining the spreading width ............22 Maintenance and cleaning ..........23 5.1 Maintenance ..................23 5.2 Cleaning ....................26 5.3 Transport and storage ................26 Appendix ................27 6.1 EC Declaration of Conformity ............... 27 6.2 Identifi...
-
Page 6: What You Should Know
Maintenance and care in accordance with the operating instructions ensure the safety of the machine and retain the value of your POLARO ® 1.2 About these operating instructions... -
Page 7: Description Of The Polaro
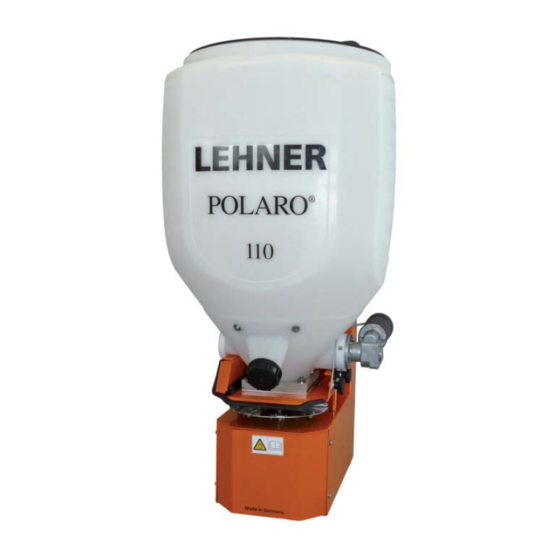
Caution! Warning against possible dangerous situations. Minor personal injury or damage to property is possible. 1.3 Description of the POLARO ® The POLARO is a spreader for spreading de-icing salt, grit, sand and ®... - Page 8 1 What you should know Technical data ® ® ® POLARO POLARO 110 POLARO Dimensions L/W/H 570/485/870 570/485/1050 700/626/1070 Unladen weight 29 kg 38 kg 42 kg Volume 70 l 110 l 170 l Salt capacity 90 kg 130 kg...
-
Page 9: Intended Use
Rusted bearings are not subject to the manufacturer's warranty. Motors may not be opened or dismantled. Upon receipt: Check your POLARO for any damage caused in transit. Any such ® damage must be reported to the manufacturer within 24 hours of receipt. -
Page 10: For Your Safety
Observe the relevant spreading material manufacturer's instructions. • Contact the relevant spreading material manufacturer for spreading tables and other information about the spreading material used. • LEHNER Agrar GmbH accepts no liability for the storage and application of spreading material. -
Page 11: Mounting And Operation
Warning! Risk of injury Do not operate the spreader if there are any safety-related defects. The POLARO can be attached on the front or rear of the tractor, off- ® road vehicle or ATV. The POLARO can be mounted using an auxiliary bracket. -
Page 12: Mounting The Hopper
This agitator is not suitable for grit and sand. Mount the hopper. Check whether the hopper fi ts well in the hopper platform. (See arrow) Check that the is securely attached. ® POLARO... -
Page 13: Electrical Connection
2 Mounting and operation 2.3 Electrical connection Caution! Risk of malfunctions Defective plugs and cables or those of the wrong size can lead to malfunctions. Use original or cables and plugs approved by the manufacturer only. Caution! Risk of short-circuit Ensure that the cable is not routed over any sharp edges. -
Page 14: Filling The Spreading Material Hopper
2 Mounting and operation Plug the spreader cable into the 16-pin plug of the control panel. The battery cable supplied must be used to ensure an optimum power supply. Caution! Risk of short-circuit Observe the adapter manufacturer's mounting instructions. When mounting a 12/24 V adapter (available as an accessory), a separate on/off switch must be connected in the 24 V supply line, because the adapter needs power in standby mode. -
Page 15: Operating The Polaro
® 3 Operating the POLARO 3.1 Controls on the control panel Rocker switch - opening the slide (rocker switch at bottom) and closing the slide (rocker switch at top) Display Rocker switch - switching on and off Speed controller for spreading disc... -
Page 16: Switching The Spreading Disc And Agitator On And Off
® 3 Operating the POLARO 3.2 Switching the spreading disc and agitator on and off Danger! Risk of injury due to accident When travelling on public roads and streets, follow the road traffi c regulations. Warning! Risk of injury When the spreader is switched on, the drive motor starts up immediately. - Page 17 ® 3 Operating the POLARO Autostart/automatic freewheeling If an agitator motor is diffi cult to start due to heavy loads, the motor starts up to 10 times in alternating motor direction. The slide must be open for this so the material fl ows off.
-
Page 18: Setting The Speed
® 3 Operating the POLARO 3.3 Setting the speed The speed of the setting disc can be set on a continuous scale using the rotary knob on the control panel. The value indicated on the display is the desired value which the machine will attempt to maintain. -
Page 19: Opening/Closing The Slide
® 3 Operating the POLARO 3.5 Opening/closing the slide Before opening the slide, ensure that the POLARO is switched off, ® otherwise spreading material is spread immediately. Activate the rocker switch on the left of the control panel to open or close the slide. -
Page 20: Setting The Spreading Width
® 3 Operating the POLARO 3.6 Setting the spreading width The spreading width depends on the condition of the spreading material and the speed of the spreading disc. The more coarse the spreading material, the larger the possible spreading width. -
Page 21: Settings
4 Settings 4.1 Turning Put the spreader in the carton or put the carton over the spreader to catch the spreading material. Due to the pull, the the spreading disc speed used in practice must be set. Weigh out the ejected spreading material at various slide positions until the suitable slide position is determined. -
Page 22: Determining The Spreading Width
4 Settings 4.2 Determining the spreading width Please refer to the relevant spreading material manufacturer's information for reference values for the spreading width. Spread on a fi rm surface. Weigh spreading material or sweep into a pile across the direction of travel and assess the side distribution. Formulas Gram/min = Output in gram/m... -
Page 23: Maintenance And Cleaning
5 Maintenance and cleaning 5.1 Maintenance Warning! Risk of injury Disconnect from the power supply for repair work. Warning! Risk of injury due to high component weight Disassemble with support if necessary. Warning! Risk of injury Always wear goggles, a breathing mask and gloves when cleaning with compressed air. - Page 24 5 Maintenance and cleaning Remove agitator plug. Unscrew knurled screws 1 at the top and bottom of both sides. Remove the hopper Unscrew four nuts 3 with a 17 mm wrench. Disassemble the hopper platform 4 and pull the dosage slide 5 out from the top.
- Page 25 5 Maintenance and cleaning Drive motor The spreading disc's drive motor should be cleaned and lubricated at the end of the season. This extends the service life of the motor. Carry out this maintenance work correctly otherwise the manufacturer's warranty may be invalidated.
-
Page 26: Cleaning
5 Maintenance and cleaning 5.2 Cleaning Warning! Risk of injury Disconnect from the power supply for cleaning work. Caution! Risk of injury Always wear goggles, a breathing mask and gloves when cleaning. Observe the spreading material manufacturer's specifi cations. The hopper can be almost fully emptied by means of the residual discharge. -
Page 27: Appendix
6 Appendix 6.1 EC Declaration of Conformity In accordance with EC Directive 2006/42/EC Manufacturer: LEHNER Agrar GmbH Häuslesäcker 5-9 D-89198 Westerstetten Tel.: (+49) 07348 95 96 0 Fax: (+49) 07348 95 96 40 www.lehner.eu info@lehner.eu Person employed by the company with the authorisation to... -
Page 28: Identifi Cation
6 Appendix 6.2 Identifi cation The serial number of the spreader is located on the back of the frame. Note the serial number in these operating instructions so that it is readily available for inquiries. -
Page 29: Distribution Box Terminal Assignment
6 Appendix 6.3 Distribution box terminal assignment... -
Page 30: Troubleshooting
6 Appendix 6.4 Troubleshooting... -
Page 31: List Of Spare Parts
6 Appendix 6.5 List of spare parts... -
Page 32: List Of Spare Parts
6 Appendix 6.5 List of spare parts Spare part no. Quantity Designation Size Steel frame Front cladding Edge guard Allen screw M 6 x 15 Compensating ring Counter bearing for motor Countersunk screw M 6 x 15 Slide motor Connection hook Plastic cable clamp Cable protection sleeve Diameter 20 mm...
Need help?
Do you have a question about the POLARO and is the answer not in the manual?
Questions and answers