Table of Contents
Advertisement
Quick Links
Advertisement
Table of Contents

Related Manuals for Onbon OVP-H8X


Summary of Contents for Onbon OVP-H8X
- Page 1 OVP-H8X USER MANUAL Version:V1.0 Date:2020.1.7...
-
Page 2: Statement
Statement Without the written permission of the company, any unit or individual may not copy, copy, copy or translate Part or all of this manual. Do not use this manual in any form or in any way (electronic, mechanical, photocopying, recording or other possible ways) to spread or use the product for any commercial or profit-making purpose. -
Page 3: Table Of Contents
Directory Statement..................................2 Directory..................................3 INSTRUCTION................................4 Safety Notice..............................4 About software..............................5 FUNCTION...................................5 Description................................5 Features................................6 Panel instruction................................7 Front panel................................7 Back panel................................8 Basic steps...................................9 Menu.....................................9 1.1 Menu key operation............................9 1.2 Initial menu status............................10 Initial menu status............................10 Main menu................................11 Output configuration.............................13 Image effect menu............................ -
Page 4: Instruction
INSTRUCTION Safety Notice There are high voltages in this product, so non-maintenance personnel must not open the case or repair the equipment by yourself to avoid danger. The input voltage range of this product's AC power supply is 100 ~ 240V, 50 / 60Hz, please use the correct power supply. -
Page 5: About Software
FUNCTION Description OVP-H8X video controller is developed by our company for LED large screen display, rented screen, conference room,High-end video processing equipment in the studio and other markets. This product adopts the 4K image processing technology designed for... -
Page 6: Features
Features Single device can control 10.46 million pixels, horizontal maximum 16000 pixels, vertical maximum 3840 pixels; Integrated 16-channel Gigabit Ethernet port output interface; Fast and seamless switching between all input signal sources and output modes; With 7-channel ultra high definition (UHD) digital and analog input interfaces; ... -
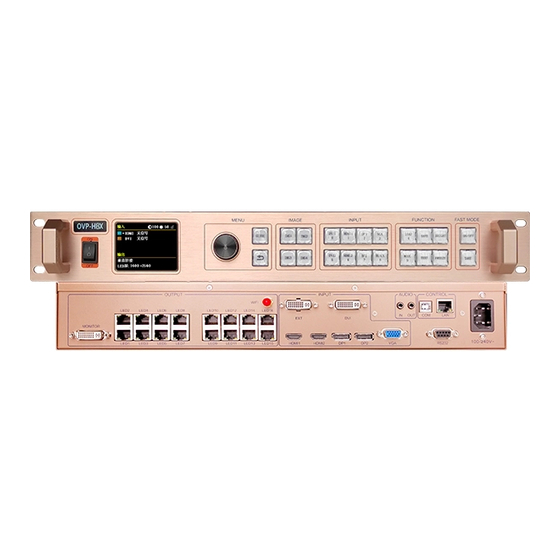
Page 7: Panel Instruction
Panel instruction Front panel ○ ○ ○ ○ ○ ○ ○ Interfaces Power supply 2.8”full color LCD screen(320×240) Operate screen area and display the system status information through the LCD. MENU 区 Short press [OK]:means turn into menu or confirm [GUIDE] :... -
Page 8: Back Panel
INPUT The input Selection key area has [DVI] ~ [DP2] 8 buttons, 8 input source port selection buttons, and correspond to the input interface logo of the back panel. When BLACK is pressed, the LED indicator of BALCK is on, and the screen output is black. -
Page 9: Basic Steps
DP 2 Audio input/out put port HDMI audio HDMI video input port built-in DP audio DP video input port built-in AUDIO_IN Analog audio input port AUDIO_OUT Analog audio output port Control interface Network control port USB input port WIFI WIFI wireless control RS232 RS232C control DB9 port Power supply... -
Page 10: Initial Menu Status
initial state. In the browsing state, turn [Knob] counterclockwise to move the cursor upward or left; turn [Knob] clockwise to move the cursor downward or right. When moving the cursor to the item to be adjusted, press the [OK] key to enter the corresponding setting submenu. At this time, turn the [knob] counterclockwise to decrease the current parameter value;... -
Page 11: Main Menu
Main menu The device uses a 2.8-inch LCD display software menu, the LCD display pixel is 320 * 240, and the font 24 * 24 can display 10 lines. The user operation menu is divided into six categories. Click [OK] in the non-menu state to pop up the main menu: Main menu Level 2 and Level 3 submenus... - Page 12 Input resolution (horizontal width, vertical height, refresh rate) Advance Input hot backup VGA settings (automatic adjustment, horizontal start, vertical start) Timed switching (task 1, task 2, ...) Other settings (image rotation, sound settings, screen projection equipment) Test chart (closed, Figure 1 to Figure 8) Key lock (open, closed) Factory setting (VGA ADC calibration, VGA DDC programming, comment, factory reset, firmware version)
-
Page 13: Output Configuration
Output configuration In the non-menu state, click the [OK] button to enter the main menu, and then select "Output Settings", the following menu will pop up: LED screen size In the non-menu state, click [OK] to enter the main menu, then select "Output Settings", and then select "LED Screen Size"... -
Page 14: Image Effect Menu
LAN output setup In the non-menu state, click [OK] to enter the main menu, then select "Output Settings", and then select "Network Port Output Settings" to enter the network port output settings menu: Note: (1)As mentioned above, when the PC screen control software completes the settings of the “connect card access”... -
Page 15: Image Capture Menu
Brightness: The adjustment range is 0-100, and the default value is 50. Contrast: the adjusting range is 0-100, and the default value is 50. Saturation: the adjustment range is 0-100, and the default value is 50. Sharpness: the adjustment range is 0-10, and the default value is 5. ... -
Page 16: Note
Capture switch: The input image intercept function is on or off, and the default is off. Capture width: the minimum value is 128, and the maximum value is "the width of the input signal". Capture height: The minimum value is 128, and the maximum value is "the height of the ... - Page 17 The input resolution setting provides users with DVI / HDMI input signal source EDID editing function, and sets the recommended resolution of the input signal source. The WIN7 computer graphics card can automatically read the recommended EDID resolution of the input DVI / HDMI port of the device. Output recommended resolution; after WIN10 input resolution setting is completed, you must manually select "Recommended Resolution"...
- Page 18 VGA setup Select VGA setting in "Advanced Options", then enter the VGA setting menu: Horizontal start: adjustment range 0-300. Vertical start: the adjustment range is 0-300. Note: (1)The actual adjustable range of horizontal start and vertical start is determined by the internal calculation of the system.
- Page 19 task settings are also completed by the PC software;( (3) When the timing switch is turned on and the task is valid, the timing switch can be turned off or on at any time through the LCD menu. Other setup There are three adjustment items in "Other Settings": Image rotation: contains three special effects of "HV mirror", "horizontal mirror"...
-
Page 20: User Mode Save And Recall
Factory reset: Reset to factory default. Firmware version: Used to query the current software and hardware version number, and the factory date. User mode save and recall User mode save Press the front panel shortcut "SAVE" to quickly switch out the user mode save menu: After selecting the save mode, press [OK] to save. -
Page 21: Intelligent Navigation
keys 1 ~ 9 to directly view, and then press "OK" key to directly call. Intelligent navigation Intelligent navigation provides users with a means to quickly debug the splicer when using the splicer for the first time. The LED screen is set up through three simple steps. The software is simple, convenient, and practical. -
Page 22: Faq
This system is a professional device, and the use of certain functions requires the user to have considerable professional knowledge. When users encounter problems, they can try to adjust the machine by themselves. If you still can't solve the problem according to the steps listed below, please do not contact your local distributor or directly contact our after-sales service department. - Page 23 Information is Check whether the input signal is correctly violated, and displayed on the LCD it has been switched to the corresponding signal source. screen, but no image is output. Check whether the display terminal supports the output resolution and refresh rate of the device. Check whether the brightness and contrast are set too ...
-
Page 24: Specifications
Specifications Image input port VGA×1 VESA standard:1600×1200@75Hz or belowcompatible HDMI×2 VESA standard :HDMI1.4,3840×2160@30Hz or below compatible DVI×1 VESA standard, compatible with HDMI2.0 EXT×1 DVI Expansion input interface (DVI or SDI or wireless projection screen), factory standard DVI DP×2 VESA standard,DP1.2,3840×2160@60Hzor below compatible Image output port DVI monitor 1920×1080@60Hz... - Page 25 Weight ≤3Kg www.onbonbx.com 第 8 页...
- Page 26 CONTACT US Shanghai ONBON Technology Co.,ltd (Headquarters) Address: 7 Floor, Tower 88, 1199#, North Qinzhou Road, Xuhui District, Shanghai City, China Tel Phone:0086 15921814956 Website: www.onbonbx.com ONBON (Jiangsu) Optoelectronic Industrial Co.,LTD Address: 1299#, Fuchun Jiang Road, Kunshan City, Jiangsu Province, China...
Need help?
Do you have a question about the OVP-H8X and is the answer not in the manual?
Questions and answers