Table of Contents
Advertisement
Quick Links
Advertisement
Table of Contents

Related Manuals for Mini Gadgets OmniXNEStake


Summary of Contents for Mini Gadgets OmniXNEStake
- Page 1 OmniXNEStake Hidden Camera SKU: OmniXNEStake Version 1.0...
- Page 2 THANK YOU FOR PURCHASING THE OMNIXNESTAKE HIDDEN CAMERA Please read this manual before operating the camera and keep it handy. Your purchase should include: 1 x OmniXNEStake 1 x Manual 1 x A/V Cable 1 x Remote ...
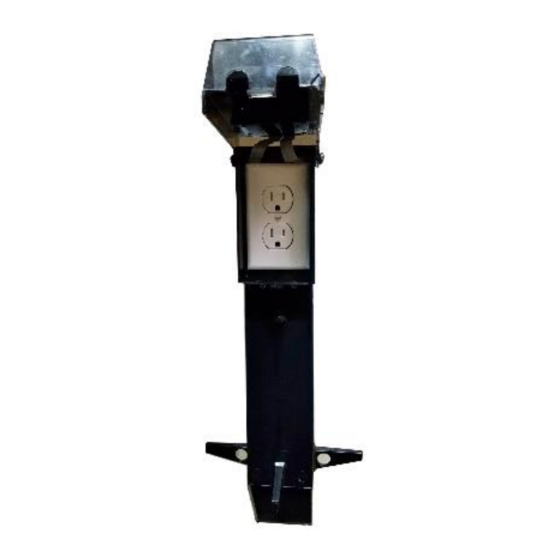
- Page 3 GET FAMILIAR WITH YOUR OMNIXNESTAKE HIDDEN CAMERA Version 1.0...
-
Page 4: Operating The Camera
OPERATING THE CAMERA HOW TO TURN ON THE CAMERA 1. Make sure the unit is plugged in and receiving power. 2. Point the remote at the device and press the power button on the remote. The Green light will blink once and then the Red light will blink 3 more times and turn off (if motion is detected immediately). - Page 5 2. The camera has now stopped recording and is now in Standby Mode. HOW TO RECORD WITH NIGHTVISION The OmniXNEStake’s night vision will automatically come on when it is dark. The unit’s 56 IR LEDs are not visible to the naked human eye.
- Page 6 HOW TO TAKE PICTURES 1. When the camera is in Standby Mode press the “Photo Button.” The green light will turn red while the photo is being taken. 2. Once the photo is taken, the light will turn back to green and once again be in standby mode.
- Page 7 you wish to confirm that you have entered into motion detection mode, wave your hand in front of the camera lens and the unit will flash the red light 2 times and then the light will turn off confirming that the device detected your motion and is now recording video. HOW TO STOP RECORDING MOTION DETECTION 1.
-
Page 8: Changing Your Device Settings
CHANGING YOUR DEVICE SETTINGS (INCLUDING THE DATE/TIME STAMP) Your OmniXNEStake comes with an A/V cable that is used to connect the device to a monitor/TV so that you can adjust various settings. 1. Connect your device to a monitor/TV using the provided A/V Cable 2. - Page 9 Loop Record – Choose whether you want the device to automatically overwrite the oldest file on the memory card if the memory becomes full. d. Video Time – When in continuous recording mode, this setting determines how long video files will be before the current recording is stopped and a new recording is started.
- Page 10 Setup -> Light Freq – Select different light frequencies. We recommend that you do not adjust this setting. Setup -> Date Format – Choose from various date/time formats (MM/DD/YYYY, DD/MM,YYYY, Etc.) m. Setup -> Date Input – Set the current date n.
- Page 11 AutoPlay Removable Disk > Open folder to view files Or… Go to Start > Computer > Removable Disk Version 1.0...
-
Page 12: Troubleshooting
3. Open the Removable Disk drive 4. Open the [folder name] folder 5. Double click the file you want to view VLC Player is recommended for watching videos TROUBLESHOOTING THE DEVICE WON’T TURN ON Make sure the power cable is securely plugged into a functioning electrical outlet THE DEVICE HAS CRASHED ... -
Page 13: Other Problems
OTHER PROBLEMS Call our technical support at 770–694–6923 Version 1.0... -
Page 14: Specifications
SPECIFICATIONS Video Resolution 1920x1080 Video Format Frames per Second Up to 30 fps Vision Angle 100 degrees LUX Rating 0.1 Lux (IR OFF), 0.01 LUX (IR ON) (56 IR LEDS) Motion Detection & 8 meters for straight-line distance PIR Sensor Photo Resolution 2048x1536 Photo Format... - Page 15 Version 1.0...
- Page 16 QUALITY CONTROL CHECKLIST ☐ Remote ☐ A/V Cable ☐ MicroSD Card Reader & 16GB Card ☐ OmniXNEStake QC Tech:____________________________________ Date: ______________________________ Version 1.0...
Need help?
Do you have a question about the OmniXNEStake and is the answer not in the manual?
Questions and answers