Table of Contents
Advertisement
Quick Links
EN
IMPORTANT SAFETY INFORMATION: Always read this manual first
before attempting to install or use this fireplace. For your safety, always
comply with all warnings and safety instructions contained in this manual
to prevent personal injury or property damage.
08/53543/0 (AU/NZ) Issue 1
Owner's Manual
Model
BLF7451-AU/
PRISM 74"
Advertisement
Table of Contents

Related Manuals for Dimplex PRISM


Summary of Contents for Dimplex PRISM
- Page 1 08/53543/0 (AU/NZ) Issue 1 Owner’s Manual Model BLF7451-AU/ PRISM 74" IMPORTANT SAFETY INFORMATION: Always read this manual first before attempting to install or use this fireplace. For your safety, always comply with all warnings and safety instructions contained in this manual...
-
Page 2: Table Of Contents
Table of Contents Welcome & Congratulations ....3 ImPortAnt InstruCtIons ....4 Quick reference Guide . -
Page 3: Welcome & Congratulations
Welcome & Congratulations thank you and congratulations for choosing to purchase an electric NO NEED TO RETURN fireplace from Dimplex, the world TO THE STORE leader in electric fireplaces. Questions With the Assembly? Please carefully read and save these instructions. -
Page 4: Important Instructions
IMPORTANT SAFETY INSTRUCTIONS Read all instructions before using this appliance. When using electrical appliances, basic precautions should always be followed to reduce the risk of fire, electrical shock and injury to persons, including the following: 1. If the appliance is damaged, check with the supplier before installation and operation. - Page 5 IMPORTANT SAFETY INSTRUCTIONS not plug in, regulate and clean the appliance or perform user maintenance. 7. Do not use this appliance in series with a thermal control, a program controller, a timer or any other device that switches on the heat automatically, since a fire risk exists when the appliance is accidentally covered or displaced.
- Page 6 IMPORTANT SAFETY INSTRUCTIONS WARNINg: In order to avoid a hazard due to inadvertent resetting of the thermal cut-out, this appliance must not be supplied through an external switching device, such as a timer, or connected to a circuit that is regularly switched on and off by the utility.
-
Page 7: Quick Reference Guide
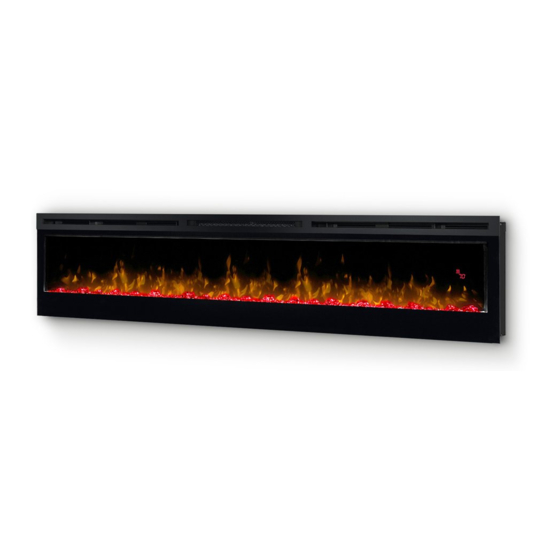
Quick Reference guide Figure 1 ① the electrical information regarding your electric fireplace can be found on the rating label located on [7.1 in.] the front of the unit, behind the glass. Before installation, please record your fireplace's serial number below for future reference. -
Page 8: Fireplace Installation
Fireplace Installation Site Selection 2. For ease of electrical hook up you may wish to review and consider all of the locate the fireplace near an following conditions for installation: existing outlet (for plug-in • Dimensions of the unit: convenience). 188.3cm x 49.5cm •... -
Page 9: Surface Installation
Fireplace Installation the fireplace is packaged with Figure 2 a three prong plug installed for plug-in convenience. Hard wiring the fireplace is also an option by removing the plug from the factory fitted cord and completing the wiring according to national and Local Elecrical Codes. -
Page 10: In-Wall Recessed Installation - 100Mm Deep
Fireplace Installation Installation - 100mm Deep Figure 3 CAUTION: Two people may be required for various steps of this procedure. 1. Prepare a wall with a framed opening of 185.7cm wide x 42 cm high (Figure 4). NOTE: The sizing has allowed for 6.4mm around the fireplace insert for ease of installation. -
Page 11: Flush Mounted Installation - 200Mm Deep
Fireplace Installation Ensure that the 3-Position switch is Figure 4 set to the Off position ("O") and that the circuit on which the fireplace is to be installed has the power cut off at the service panel until installation is complete. 3. - Page 12 Fireplace Installation Figure 6 Ensure that the 3-Position switch is set to the Off position ("O") and that Mounting the circuit on which the fireplace is hole to be installed has the power cut off at the service panel until installation is complete.
-
Page 13: Front Glass Installation
Fireplace Installation Figure 8 fireplace chassis, into wall Mounting hole studs (Figure 8). 6. refer to Front Glass Installation section, for final installation procedures. Front glass Installation 1. Evenly distribute supplied glass rock on the front tray of the fireplace (Figure 9). 2. - Page 14 Fireplace Installation Figure 9 Figure 10 Mounts (4) Front tray Hooks (4) Front glass assembly Figure 11...
-
Page 15: Operation
Operation Figure 12 Figure 13 Floating Display functions that it was set to when WARNINg: this electric firebox it was turned Off and the intake must be properly installed before temperature will be indicated on it is used. the Floating Display the unit can be controlled by ! NOTE: When any button is either the manual controls which... - Page 16 Operation displayed on the Floating • the Floating Display will Display , for 5 seconds before indicate the temperature setpoint turning off. as it is adjusted. ! NOTE: After the heater is ! NOTE: Holding the switched off, there is a 60 second buttons down for two fan delay, where the fan will seconds, on the unit, will change...
- Page 17 ! NOTE: The last theme of the before the unit turns off. cycle is a prism where the unit ! NOTE: the sleep timer can be cycles through a variety of colours. cancelled at any time by pressing...
- Page 18 Operation R e m o t e C o n t r o l B a t t e r y Replacement to replace the battery: 1. slide battery cover open on the remote control. 2. Correctly install one 3 Volt (Cr2032 [longer life] or Cr2025) battery in the battery holder.
-
Page 19: Maintenance
Contact Details Glen Dimplex Australia Pty Ltd Glen Dimplex new Zealand Ltd 1340 Ferntree Gully road 38 Harris Road scoresby VIC 3179 East tamaki, Auckland...
Need help?
Do you have a question about the PRISM and is the answer not in the manual?
Questions and answers