
Related Manuals for CHESTER Champion Mill 16VS


Summary of Contents for CHESTER Champion Mill 16VS
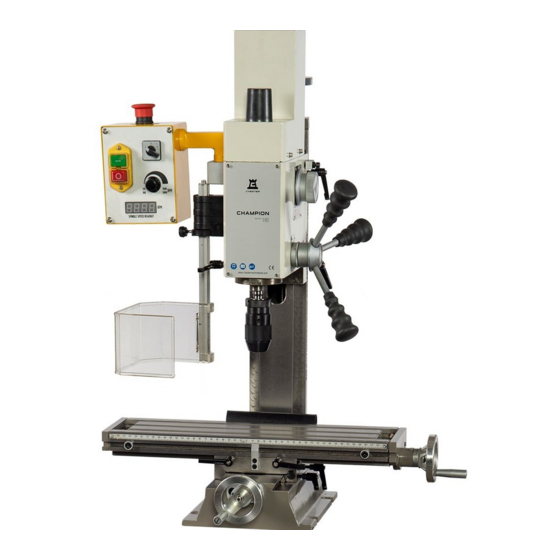
- Page 1 Champion Mill 16VS Instruction Manual Chester UK Ltd Clwyd Close Hawarden Industrial Park Hawarden Chester CH5 3PZ Tel: 01244 531631 sales@chestermachinetools.com www.chestermachinetools.com...
- Page 2 Safety Safety warnings Proper use Possible dangers caused by the milling machine Qualification of personnel Safety devices Safety check Individual protection gear For your own safety during operation Disconnecting the machine and making it safe 1.10 Using lifting equipment Technical Data Assembly and Connection Extent of supply Transport...
- Page 3 1. Safety Purpose of this Machine: This machine has been designed for drilling, deep milling and face milling of small workpieces. If the operator intends to use this machine beyond its design, please contact the manufacturer or dealer before starting the operation. The Following Should be Obeyed before Operating Do not operate this machine before reading this manual thoroughly.
- Page 4 It is also part of proper use that: • the maximum values for the machine are complied with • the operating manual is observed • inspection and maintenance instructions are observed 1.3 Possible dangers caused by the milling machine As the machine operates with •...
- Page 5 In the event of improper use • there may be a risk to personnel, • there may be a risk to the machine and other material property, • the proper operation of the machine may be affected 1.5 Safety devices Use the milling machine only with properly functioning safety devices.
- Page 6 General Check Equipment Check Protective covers Mounted, firmly bolted and not damaged Labels, markings Installed and legible Functional Test Equipment Check Emergency Stop When the Emergency Stop button is activated, the machine should switch off automatically. A restart will not be possible until the Emergency Stop button has been unlocked and the On switch has been activated.
- Page 7 • Use suitable devices to remove drilling and milling chips. • Make sure your work does not endanger anyone. • Clamp the workpiece tightly before activating the machine. In the description of work on the drilling-milling machine we highlight the dangers specific to that work.
-
Page 8: Technical Data
2. Technical Data The following information gives the dimensions and weight and is the manufacturer’s authorized machine data. Engine power consumption 240V / 50Hz / 600W Drilling capacity 16mm End Milling capacity 16mm Face Milling capacity 52mm Working radius 175mm Spindle taper Spindle stroke 52mm... -
Page 9: Assembly And Connection
Improper storage may cause important parts to be damaged or destroyed. Store packed or unpacked parts only under the intended environmental conditions. Consult Chester UK if the machine or accessories have to be stored for a period of over three months or under different environmental conditions than those given here. - Page 10 • Make sure that no add-on pieces or varnished parts are damaged due to the load-suspension. • Check the horizontal orientation of the base of the machine with a spirit level. • Check that the foundation has sufficient floor- load capacity and rigidity. Insufficient rigidity of the foundation leads to the superposition of vibrations between the drilling- milling machine and the foundation (natural...
-
Page 11: Operation
4. Operation 4.1 Safety Use the drilling-milling machine only under the following conditions. • The machine is in proper working order • The machine is used as prescribed • The operating manual is followed • All safety devices are installed and activated All anomalies should be eliminated immediately. - Page 12 4.3 Starting the milling machine By pressing the green button, the machine is switched By pressing the red button, the machine is switched off. The electrical system controls the speed with a ramp to the set value. Wait a little while before you continue with the feed when milling or drilling.
- Page 13 Direct clamping into the work spindle Tools or collet chucks with a MT2 shank may be clamped directly into the work spindle. For mounting these tools, proceed as described in ‘inserting tool’ on page 13. Make sure that the tool is clamped with the draw-in rod. 4.5 Changing the speed range Wait until the machine has come to a complete halt before changing the speed using the gear switch.
- Page 14 Standard values for cutting speeds [m/min] with high speed steel and hard metal in conventional milling. Tool Steel Grey cast iron Age-hardened AI Alloy Peripheral and side milling 10-25mm 10-22mm 150-350mm cutters Relived form cutters 15-24mm 10-20mm 150-250mm Inserted tooth cutter with SS 15-30mm 12-25mm 200-300mm...
- Page 15 4.6 Clamping workpieces Caution! Injury by flying off parts The workpiece is always to be fixed by a machine vice, jaw chuck or by another appropriate clamping tool such as clamping claws. 4.7 Swiveling the mill-drill head The mill-drill head may be swiveled to the left. Caution! The drill head may tilt to the right or the left on it’s own after loosening a screw.
- Page 16 4.10 Installation on a lathe The mill head with column can be mounted on a lathe. For fastening an adapter is required. The adapter needs to be fixed to the engine bed. It is not possible to fix it to the lathe slide. The adapter is dimensioned in a way that the middle of the lathe chuck should be reached with the center of the milling spindle (alignment headstock –...
-
Page 17: Maintenance
5. Maintenance In this section you’ll find important information about • Inspection • Maintenance • Repair The diagram below shows which of these headings each task falls under: Properly performed regular maintenance is essential for safe operation, faulty-free operation, a long service life of the milling machine, and the quality of products that you manufacture. - Page 18 Any maintenance work on electrical equipment may only be carried out specialized electrical staff. For any repair work get assistance from our technical service team. Chester UK Ltd does not take any responsibility nor does it guarantee against damage and operating anomalies resulting from failure to observe this manual.
- Page 20 Spare parts list 1 Pos. Designation Article No Pos. Designation Article No Turnsignal bearing 03336116 1 Counternut 03338116 40 blocked mill head Locking screw 03338116 2 Ball bearing M6 x 16 6001-2RZ Washer 03338116 3 Shaft Spring washer 8 03338116 4 Feather key 4x12 03338116 44 Hexagon socket...
- Page 22 Spare parts list 2 Pos. Designation Article No Pos. Designation Article No Position disc 0 3338116 201 Cover 0 3338116 239 Bush 0 3338116 202 Countersink head 0 3338116 240 screw M4 x 8 Tension spring 2.5 x 0 3338116 203 28 x 110-3 Circlip 45 0 3338116 204...
- Page 23 5.5 Connecting plan Spare parts list for electrical system Designation Article No Qty. Designation Article No Qty. Control board 0 3338116 301 Motor 0 3338116 303 Fine-wire fuse 0 3338116 302 Emergency stop 0 3338116 304 on/off Potentiometer 0 3338116 305...
- Page 24 6. Anomalies 6.1 Anomalies in the machine Anomaly Cause/Possible effects Solution The machine does not start • Defective fuse • Have it checked by authorized personnel Tool burn • Incorrect speed • Select different speed, feed may be too high •...
- Page 25 7. Appendix 7.1 Copyright This document is copyright. All derived rights are also reversed, especially those of translation, re-impression, use of figures, broadcast, reproduction by photo-mechanical or similar means, and recording in data processing systems, whether partial or total. The company reverse the right to make technical alterations without prior notice. 7.2 Terminology/Glossary Term Explanation...
- Page 26 7.3 Product follow up We are required to perform a follow-up service for our products which extends beyond shipment. We would be grateful if you could send us the following information: • Modified settings • Experiences with the milling machine, which could be important to other users. •...
- Page 27 7.4 EC Declaration of Conformity...
- Page 28 8. Index Anomalies …………………………………………………………………………………….. 24 Appendix …………………………………………………………………………………….. 25 Assembly and connection …………………………………………………………………… 9 Classification of hazards ……………………………………………………………………… 3 Connecting plans ………………………………………………………………………………23 Declaration of conformity …………………………………………………………………….. 27 Dimensions …………………………………………………………………………………….. 8 Emergency stop button ………………………………………………………………………… 5 Emissions ………………………………………………………………………………………... 8 Environmental conditions ………………………………………………………………………. 8 First use …………………………………………………………………………………………..
Need help?
Do you have a question about the Champion Mill 16VS and is the answer not in the manual?
Questions and answers