3M Charge Analyzer 711 User Manual
Hide thumbs
Also See for Charge Analyzer 711:
- Quick start manual (26 pages) ,
- Operating instructions manual (24 pages)
Table of Contents
Advertisement
Advertisement
Table of Contents

Related Manuals for 3M Charge Analyzer 711


Summary of Contents for 3M Charge Analyzer 711
- Page 1 Charge Analyzer 711 ™ User’s Guide...
-
Page 2: Table Of Contents
Remote Field Sensor Probe 711RS Operation ........20 ™ 8.0 Data Recording and Analog Outputs ............23 9.0 Verification Procedure ................23 10.0 Maintenance/Calibration/Repair of 3M Charge Analyzer 711 and ™ Remote Field Sensor Probe 711RS ...........25 ™ Regulatory Information ..................26 Warranty ......................27... -
Page 3: Safety Information
™ future reference. Intended Use The Charge Analyzer 711 is intended for use in testing the performance of static control products. This device is designed for use as specified in the operating instructions. It is intended for use in an indoor environment and has not been evaluated for other uses or locations. - Page 4 Charge Analyzer 711 housing or power supply are damaged; ™ • Do not attempt to modify or repair – no user serviceable parts inside – contact 3M Service for repair. To reduce the risks associated with fire or explosion: • Do not operate the Charge Analyzer 711 in an explosive environment. The Charge Analyzer 711 is not designed to be intrinsically safe.
-
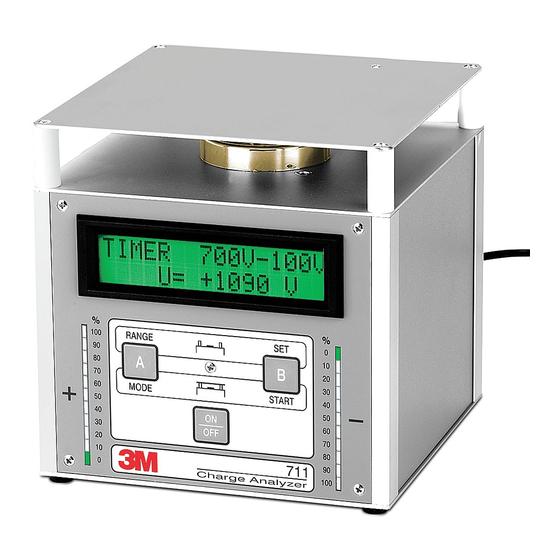
Page 5: General Function And Description
The alphanumeric LCD-display is the information center of the Charge Analyzer 711 and allows the user to observe the principles of static protection. The unit’s high accuracy makes it well... - Page 6 This feature allows to the user to make measurements by means of a hand-held or fixed position probe in remote locations, where it may be impossible to position the Charge Analyzer 711. Measurement distances with the probe are 1, 2, 5, 10 and 20 centimeters. The built-in microprocessor automatically converts the measured field strength via the chosen distance into a charge of an equivalent potential in volts.
-
Page 7: Accessories
2.0 Accessories The 3M Charge Analyzer 711 is shipped in a durable black case with foam ™ interior containing the following accessories: A. Cup electrode Metal-spacers (3) with thread, 76 mm (3 in.) length B. Plate electrode K. Transport case C. -
Page 8: Specifications
3.0 Specifications Description Typical Value Dimensions Base unit: (152 x 152 x 152) mm (6 x 6 x 6) inches Weight 1.8 kg (4 lbs.) High Voltage Cascade > 1100 V positive or negative Power Supplies Built-in NiMH-rechargeable batteries, 1400 mAh - Recharge time approximately 14 hours (unit off) when batteries are fully discharged AC adaptor: secondary side, 12VDC/500 mA... -
Page 9: Fieldmeter Operation
• Do not use if the Charge Analyzer 711 housing or power supply are damaged; • Do not attempt to modify or repair – no user serviceable parts inside – contact 3M Service for repair. To reduce the risks associated with fire or explosion: •... - Page 10 Example 1: If reading on the display of the Charge Analyzer 711 is 200 KV/m and the distance to the sensor electrode is 5 cm, the voltage on the tape is calculated by: 200/100 x 5 = 10 Kilovolts...
-
Page 11: Voltmeter Operation
• Do not use if the Charge Analyzer 711 housing or power supply are damaged; • Do not attempt to modify or repair – no user serviceable parts inside – contact 3M Service for repair. To reduce the risks associated with fire or explosion: •... - Page 12 8. Select OFFSET A by pressing the “A” button to display UPDATE OFFSET menu. Note: If you should press the “B” button (SETUP), you will have to switch off the Charge Analyzer 711 to get back into the Voltmeter mode.
- Page 13 4. Hold the cylinder electrode in one hand and perform some body movements and observe reduced or eliminated voltage variations on the Charge Analyzer 711. Note: Properly performing ESD control flooring in conjunction with ESD control footwear/straps must be able to minimize and quickly drain electrical charges developed by a person.
- Page 14 Notice the level of charge on the 3M Charge ™ Analyzer 711. 4. Contact an ESD control worksurface with the container and observe the voltage reduction and removal.
-
Page 15: Static Decay Time & Balance Operation
• Do not use if the Charge Analyzer 711 housing or power supply are damaged; • Do not attempt to modify or repair – no user serviceable parts inside – contact 3M Service for repair. To reduce the risks associated with fire or explosion: •... - Page 16 9. Press the “A” button YES to verify and store the stop voltage value. Pressing the “B” NO button repeats the voltage value setting menu again. Note: If you should select a start or stop voltage outside of the ranges listed above, the 3M Charge ™...
- Page 17 1. Remove the red sensor cover from the measurement electrode. 2. Mount the plate electrode (b) to the Charge Analyzer 711. Be sure that the red sensor cover (e) is removed from the sensor electrode. Display will indicate DECAY TIME, voltage polarity (“Either” POS, NEG, or AUTO) and PRESS START.
- Page 18 3. Position the ionizing air gun above the charge plate and activate the air gun blowing ionized air at the plate. The timer in the Charge Analyzer 711 will begin counting (in 1/10’s of seconds) when the set start voltage is reached on the plate.
- Page 19 4. When the stop voltage is reached, the unit will begin the offset time (ionizer balance) mode. The display will indicate OFFS-TIME (starting timer at set time) and U (current charge plate voltage). 5. When the offset time is complete, the display will indicate the following: OFF (Maximum voltage offset observed during offset time period), T (Set offset time), and NEG.
-
Page 20: Remote Field Sensor Probe 711Rs Operation
3M Charge ™ Analyzer 711. 2. Position the Charge Analyzer 711 in front of the ionizer blower with the display facing upward. 3. Measure the static decay rate and offset balance by following the procedure outlined in Demonstration #6 above. - Page 21 • Do not use if the Charge Analyzer 711 housing or power supply are damaged; • Do not attempt to modify or repair – no user serviceable parts inside – contact 3M Service for repair. To reduce the risks associated with fire or explosion: •...
- Page 22 To convert readings into volts/inch or volts/cm use the following two formulas: R/100 x D (cm) or R/39.4 x D (in.) where: R = Reading indicated on the Charge Analyzer 711 display. D = Distance between object and sensor electrode, measured in inches or centimeters.
-
Page 23: Data Recording And Analog Outputs
The 3M Charge Analyzer 711 is now ready to perform measurements through ™ the Remote Field Sensor Probe 711RS. Demonstration #8 Measuring a Charge on an Object Using the 3M Remote Field ™ Sensor Probe 711RS Hold the conductive container (h) in one hand and rub the handle against the sleeve of your shirt or pants to accumulate a charge on the handle. - Page 24 Charge Analyzer 711 Internal Sensor IMPORTANT NOTE 1. Mount the cup electrode (a) to the top of the Charge Do not discharge to the Analyzer 711 and perform the zeroing function sensor element. described in Section 5. Voltmeter Operation/Setup. 2. Connect a lead wire between the ground jack of the unit and the low/return side of the DC high voltage power supply.
-
Page 25: Maintenance/Calibration/Repair Of 3M Charge Analyzer 711 And Remote Field Sensor Probe 711Rs
To reduce the risks associated with property damage due to improper repair or modification: • Do not attempt to modify or repair — no user serviceable parts inside — contact 3M Service for repair To reduce the risks associated with property damage from improper maintenance: •... -
Page 26: Regulatory Information
NOTE: Modifications to this device shall not be made without the written consent of 3M. Unauthorized modifications may void the authority granted under Federal Communication Rules and Industry Canada Rules permitting the operation of this device. -
Page 27: Warranty
3M’s option, to replace or repair the 3M product or refund the purchase price of the 3M product. Except where prohibited by law, 3M will not be liable for any indirect, special, incidental or consequential loss or damage arising from this 3M product, regardless of the legal theory asserted.
Need help?
Do you have a question about the Charge Analyzer 711 and is the answer not in the manual?
Questions and answers