Table of Contents
Advertisement
For
For
For
For
For
F F F F
F
F
For Installation Help
For
or
Installation
Installation
Installation
Installation
Installation
Installation
Installation
1-877-654-9394
1 1 -877-654-9394
877 654 9394
White-Rodgers.com
White-Rodgers.com
© 2011 Printed in China
Help
Help
Help
Help
Help
Help
Help
White-Rodgers
8100 West Florissant Avenue
St. Louis, MO 63136
0037-7256A
UP300 Programmable Thermostat
Installation Instructions & User Guide
Congratulations on the purchase of your White-Rodgers
Save these instructions for future use!
Questions? Contact White-Rodgers
customer service at 1-877-654-9394
™
thermostat!
™
Advertisement
Table of Contents

Related Manuals for White Rodgers UP300


Summary of Contents for White Rodgers UP300
- Page 1 UP300 Programmable Thermostat Installation Instructions & User Guide For Installation Help F F F F Installation Installation Installation Installation Installation Installation Installation Help Help Help Help Help Help Help 1-877-654-9394 1 1 -877-654-9394 877 654 9394 White-Rodgers.com White-Rodgers.com Congratulations on the purchase of your White-Rodgers ™...
-
Page 2: Table Of Contents
TABLE OF CONTENTS Part 1: Before Getting Started ............Page 2 • Failure to read and follow all instructions carefully before installing 1.1 Check package contents or operating this control could cause personal injury and/or 1.2 Answer questions about source of heating in your home property damage. -
Page 3: Part 1 Before Getting Started
1.2 Answer questions about source of Part 1 Before Getting Started heating in your home Before getting started, please review the following ✔ Do you have either oil or gas burning furnace? pre-installation checklist. ✔ Do you have a Heat Pump (and is it 1-stage or 2-stage)?* ✔... -
Page 4: Part 2 Remove Old Thermostat And Install New Thermostat
3-Part unit Part 2 Remove Old Thermostat and Install New Thermostat Do not disconnect wires from the old thermostat until you label all the wires according to this manual. Cover Base Wallplate 2.1 Expose wires connected to 2-Part unit old thermostat 2.1.1 After turning off power to your heating &... -
Page 5: Label And Disconnect The Wires
2.1.2 Loosen all screws holding the old thermostat’s wallplate to 2.2 Label and disconnect the wires the wall. Do not disconnect the wires from terminals. Allow the wallplate to hang loosely on the wires. 2.2.1 Note you may see two types of wiring in the old thermostat: 1. - Page 6 If the OLD thermostat’s 2.2 Label and disconnect the wires (cont.) …Then label its wire with terminal is wired into the wall this letter: and identifi ed by this letter… 2.2.2 Label each wire that comes out of the wall and attaches to terminals on the old thermostat.
-
Page 7: Install New Thermostat's Wallplate
2.2.3 After labeling all the wires, use a screwdriver to disconnect 2.4 Match and connect wires each wire from its terminal. Remove the old thermostat. 2.4.1 Match each wire coming from the wall to its corresponding Make sure that the wires don’t fall terminal, as shown in the illustration below. -
Page 8: Install Additional Wiring (For Heat Pumps Only)
2.5 Install additional wiring 2.6 Set Switches (for Heat Pumps only) Find two switches located on in the lower right corner of the wallplate labeled ELE/GAS and O/B. Set them as follows: If your HVAC system does NOT include a Heat Pump, continue to 2.6. •... -
Page 9: Part 3 Quick Setup
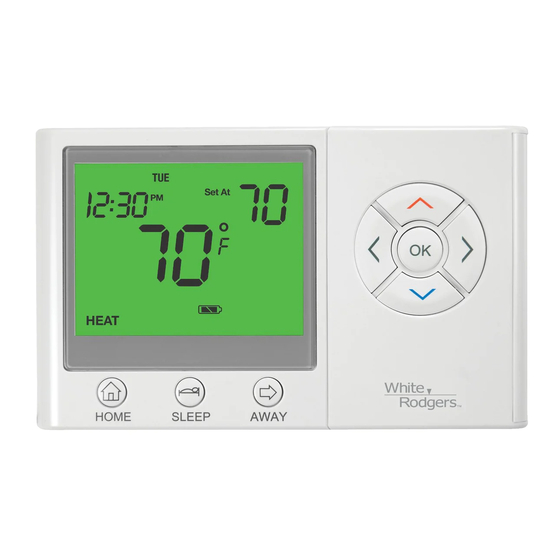
3.2 Set fan and system switches Part 3 Quick setup 1. Open the door on the right side of the cover and locate the FAN and SYSTEM switches. 3.1 Get to know your thermostat 2. Set the FAN switch to AUTO. 3. -
Page 10: Select Options
3.3 Select options Options Default Setting Additional Information 3. Do you have a If you do not have a Heat Press the MENU button and, using the buttons scroll down until Heat Pump? (no Heat Pump) Pump, select OFF. MORE OPTIONS is fl ashing. Press OK. If you do have a Heat Pump, You will be prompted to answer 6 “Options”... -
Page 11: Turn On Power To Your Heating And Cooling System
3.4 Turn on power to your heating and 3.6 Review pre-programmed schedule cooling system The thermostat is set to control temperature according to the following pre-programmed, energy-effi cient schedule. If this schedule meets your needs, no further action is required. 3.5 Set time and date Mon - Fri Sat - Sun... -
Page 12: Part 4 Additional Thermostat Features
5. To program subsequent days, use the Easy Copy function Part 4 Additional thermostat features OR move to step 6. Easy Copy function 4.1 Customize the pre-programmed • You can copy one day’s schedule to other days of the week. schedule –... -
Page 13: Set Favorite Temperatures (Home / Sleep / Away)
4.2 Set favorite temperatures 4.3 Set temporary hold at (home / sleep / away) You can override a programmed temperature for a brief period of time. You can set your three most frequent temperatures (Home, Sleep, 1. Use the buttons to raise or lower the setting. When the desired Away). -
Page 14: Set Vacation Hold
4.5 Set vacation hold 4.6 Change batteries You can override a preset temperature for up to 60 days. The thermostat displays battery life in three stages: • Battery full 1. Using the buttons, set the desired temperature for Vacation Hold. 2. -
Page 15: Activate Permanent Auxiliary Heat (For Heat Pumps Only)
4.7 Activate permanent auxiliary heat 4.8 Set keypad lockout (for Heat Pumps only) To activate: Use this function to bypass the Heat Pump and use ONLY auxiliary Press and hold the OK button for 3 seconds to lock the keypad. The heating. -
Page 16: Set Change Fi Lter Reminder
4.9 Set change fi lter reminder 4.10 Adjust actual temperature display The thermostat will display a reminder when it is time to change the air Your thermostat was accurately calibrated at the factory. However, fi lter on your heating and cooling system. if you would like the displayed temperature to read higher or lower than the actual temperature, you can adjust the displayed temperature by +/- 4 degrees. -
Page 17: Part 5 Troubleshooting Guide
5 Troubleshooting Guide (continued) Part 5 Troubleshooting Guide Problem Possible Cause Action Problem Possible Cause Action Temperature set 2-minute lockout No action needed: should Thermostat AM or PM set Check the current point icon blinking enabled to protect stop blinking after doesn’t follow the incorrectly in the settings including AM and... -
Page 18: Appendix: Heat Pump Identifi Cation
Appendix: Heat Pump Identifi cation 1. How do I know if I have a Heat Pump? • Check the documentation for your heating and cooling system or contact your HVAC contractor. • Confi rm that you have a Heat Pump by checking the labels of the wires coming out from the wall (labels you attached according to the right-hand column of the 2.2.2 table).
Need help?
Do you have a question about the UP300 and is the answer not in the manual?
Questions and answers